- Item Name : Orgado - eCommerce React, Next js Template
- Author : bdevs
- Support Tickets: https://support.bdevs.net/
Orgado Documentation
Welcome to Orgado ! Get familiar with the Stripe products and explore their features:
Well Documented
Well organized and easy to understand. You can any work by following our docs
Clean Code
Code is clean if it can be understood.Our code is more formatting for your website
Fully Responsive
Our Template is full Perfect for all device. You can visit our template all device easily.
Sass Available
The template has Sass available for css. You can Change and customize css by sass.
Speed Optimized
Orgado is faster loading speed. Orgado create your template so much faster
24/7 Support
We are provide 24 hours support for all clients.You can purchase without hesitation.
Getting Started
Welcome to Orgado.
Orgado is an innovative e-commerce platform tailored to the agricultural sector. that leverages popular web development technologies, including React and Next.js,TypeScript, for the client-side, and Node.js , express js and TypeScript for the backend. This template is designed to provide a robust foundation for building a website or application related to the e-commerce platform.
Orgado Features Overview
- User Authentication
- Stripe Payment Method
- User Profile Dashboard
- Admin Dashboard
- Rating and Review System
- Advanced Product Search and Filtering
- Comment System
- Get Offer Products
- Get Best Selling Products
- Get Top Rated Products
- Contact With Admin
Uses Technology In Orgado
- Next js - App Directory with TypeScript
- Next Image
- Redux Toolkit
- Context API
- Mongodb
- Mongoose
- Json Web Token
- Bootstrap 5.x Framework
- 3 Home Pages
- 14+ Inner Pages
- 19+ Total Pages
- Developer Friendly Code
- Touch Friendly
- 100% Fully Responsive
- SASS
What's Included
After purchasing Orgado template on templateforest.net with your Envato account, go to your Download page. You can choose to download Orgado template only or the entire Orgado template package which contains the following files:
- Orgado template: A .zip file with all files with all necessary assets.
- Documentation: An HTML format documentation.
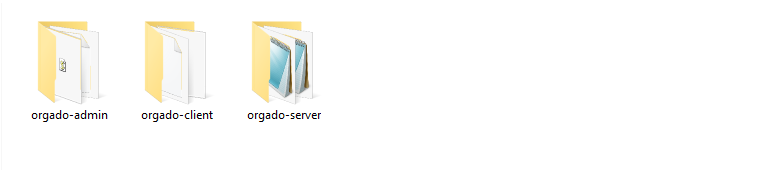
Root Folder Structure
Template Installation
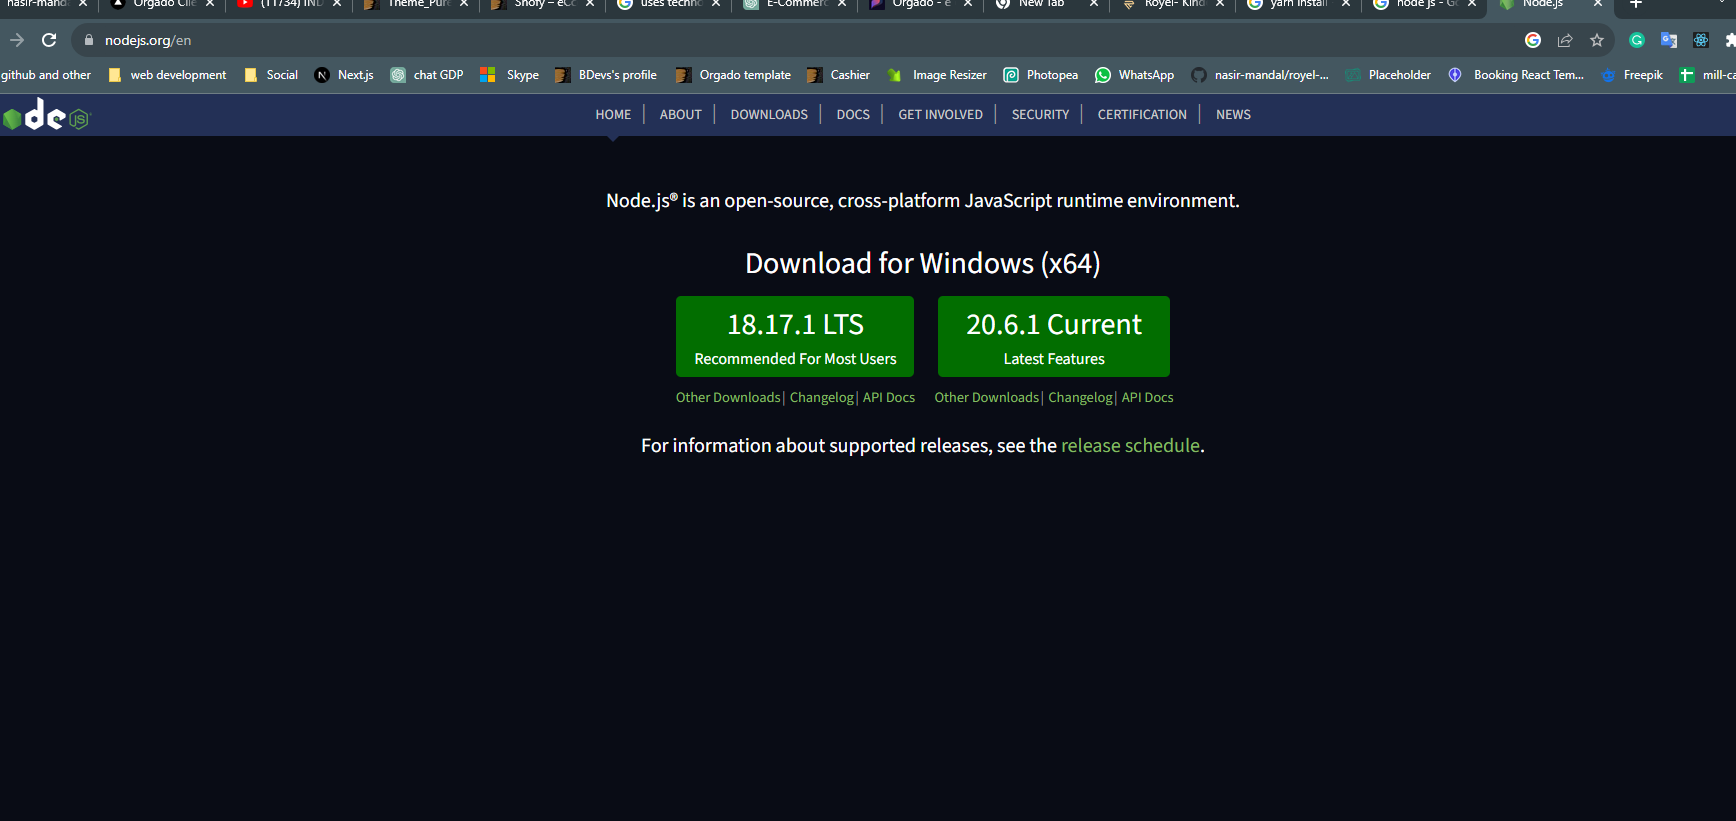
Install NodeJs
It’s easy to install Template . Just follow these steps, they won’t take much of your time. Downlod Now
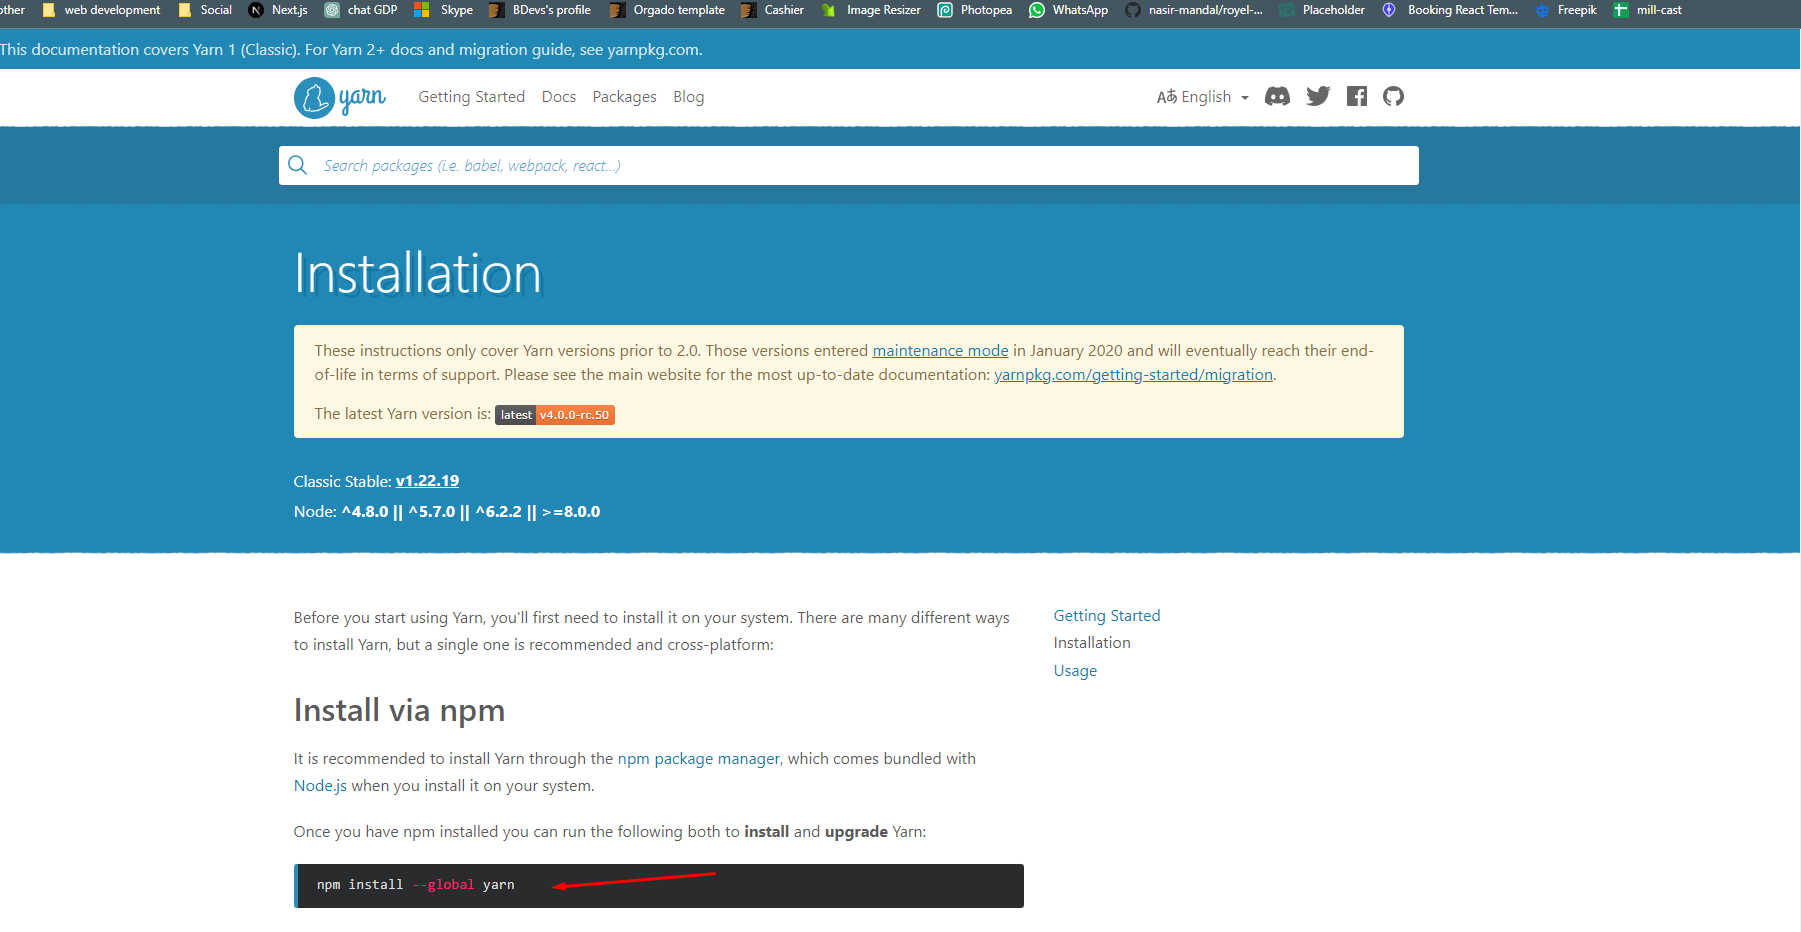
Install Yarn
Your computer must have installed Yarn globaly to run this template by yarn. You can install yarn globaly by follow this url
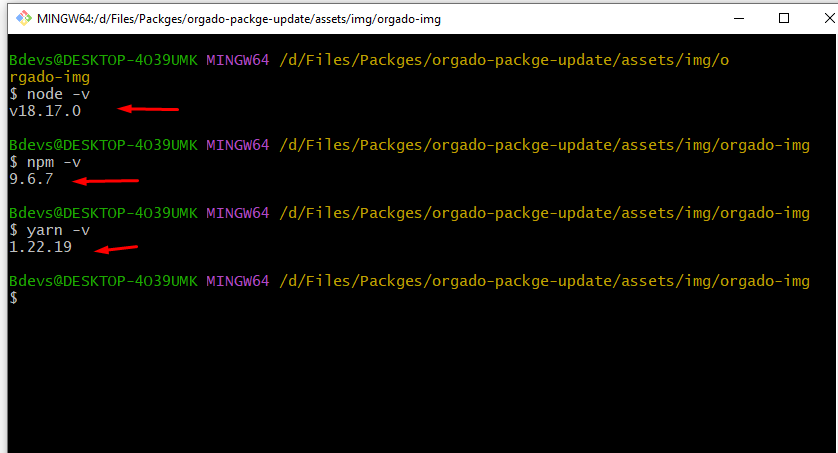
Dependencies
Make sure your node , npm & yarn version match or Update with Recommended
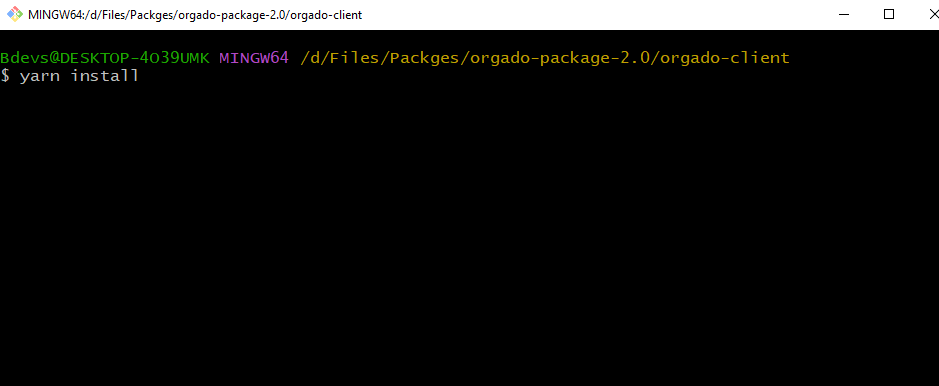
Install Dependencies packages (client , admin and server also)
when you run the project then first install all Dependencies using command yarn install Root Of Your Porject
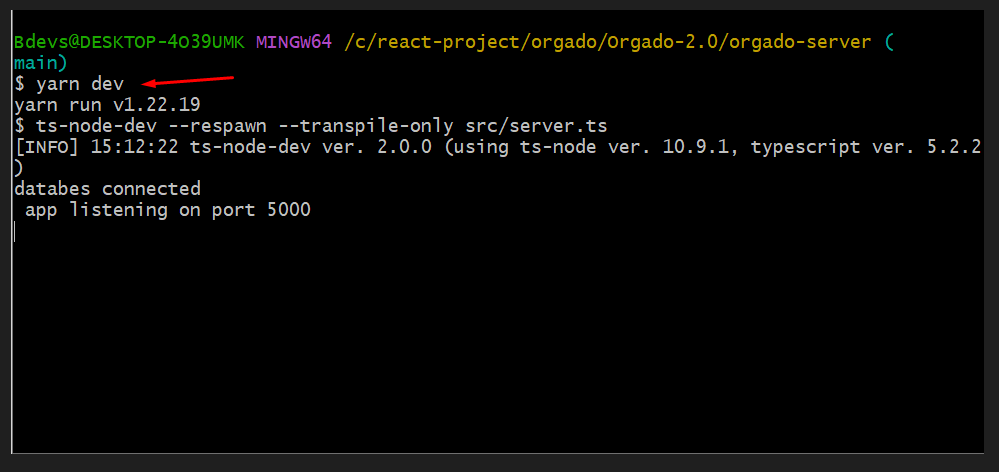
Conncet Node server
when you run the project then first start your orgado-server using command yarn dev and you will se the database connected otherwise you don't see the data on client site or admin Panel
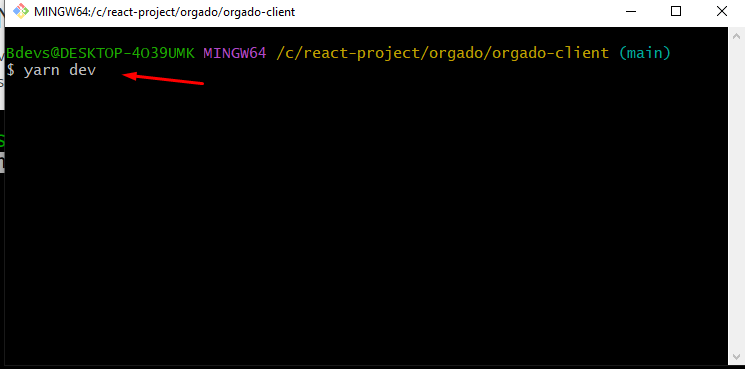
Development server ( Client & admin project same process)
Run yarn dev from the root of your project to start a dev server . Navigate to http://localhost:3000/. or http://localhost:3001/ The app will automatically reload if you change any of the source files.
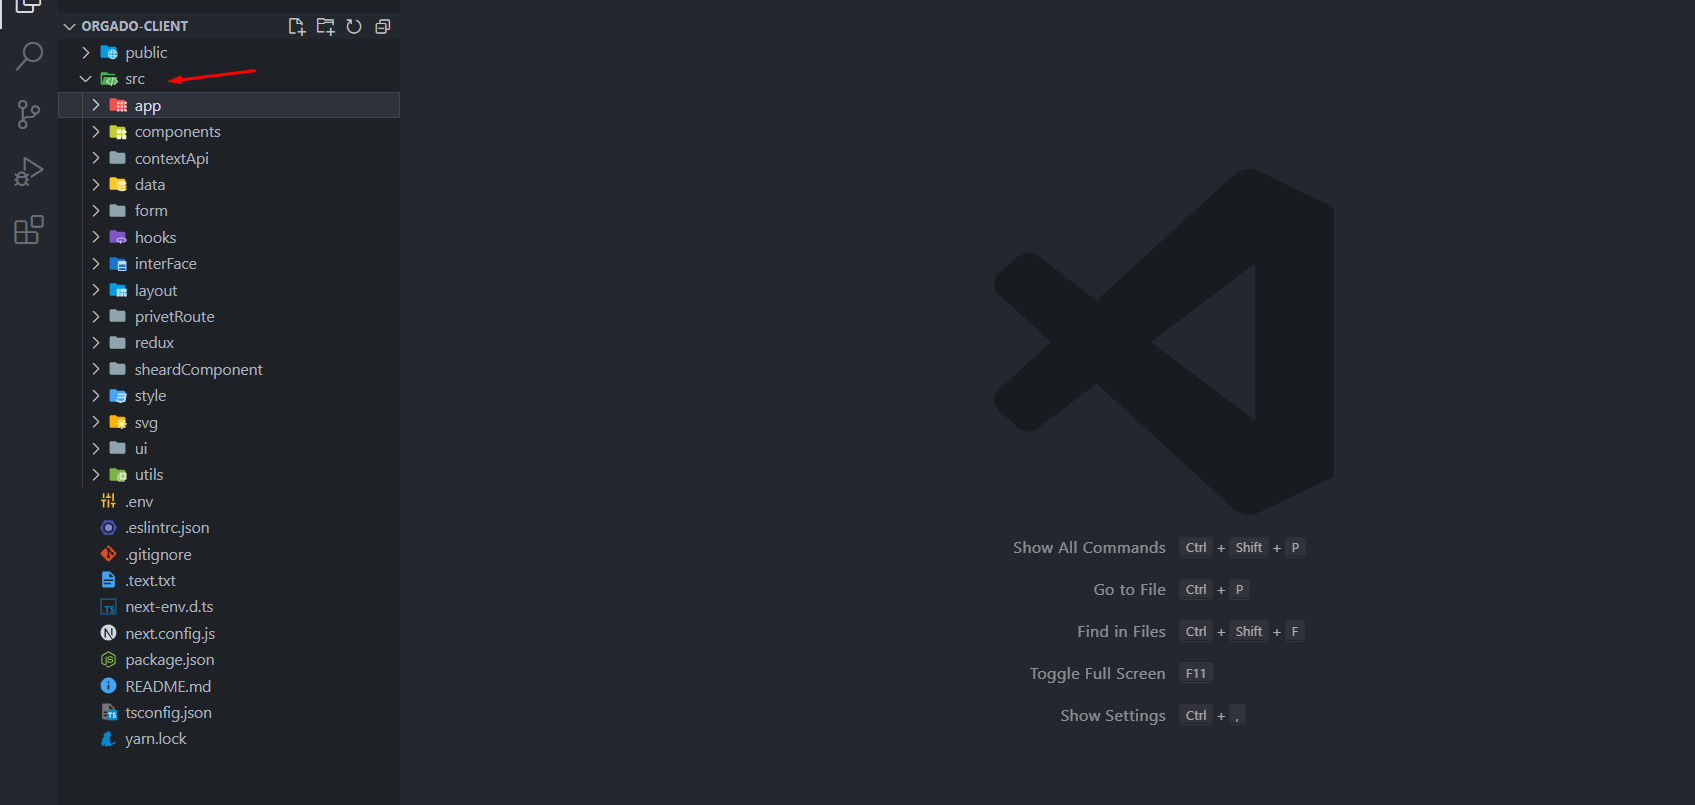
Root Folder Structure
Orgado Client
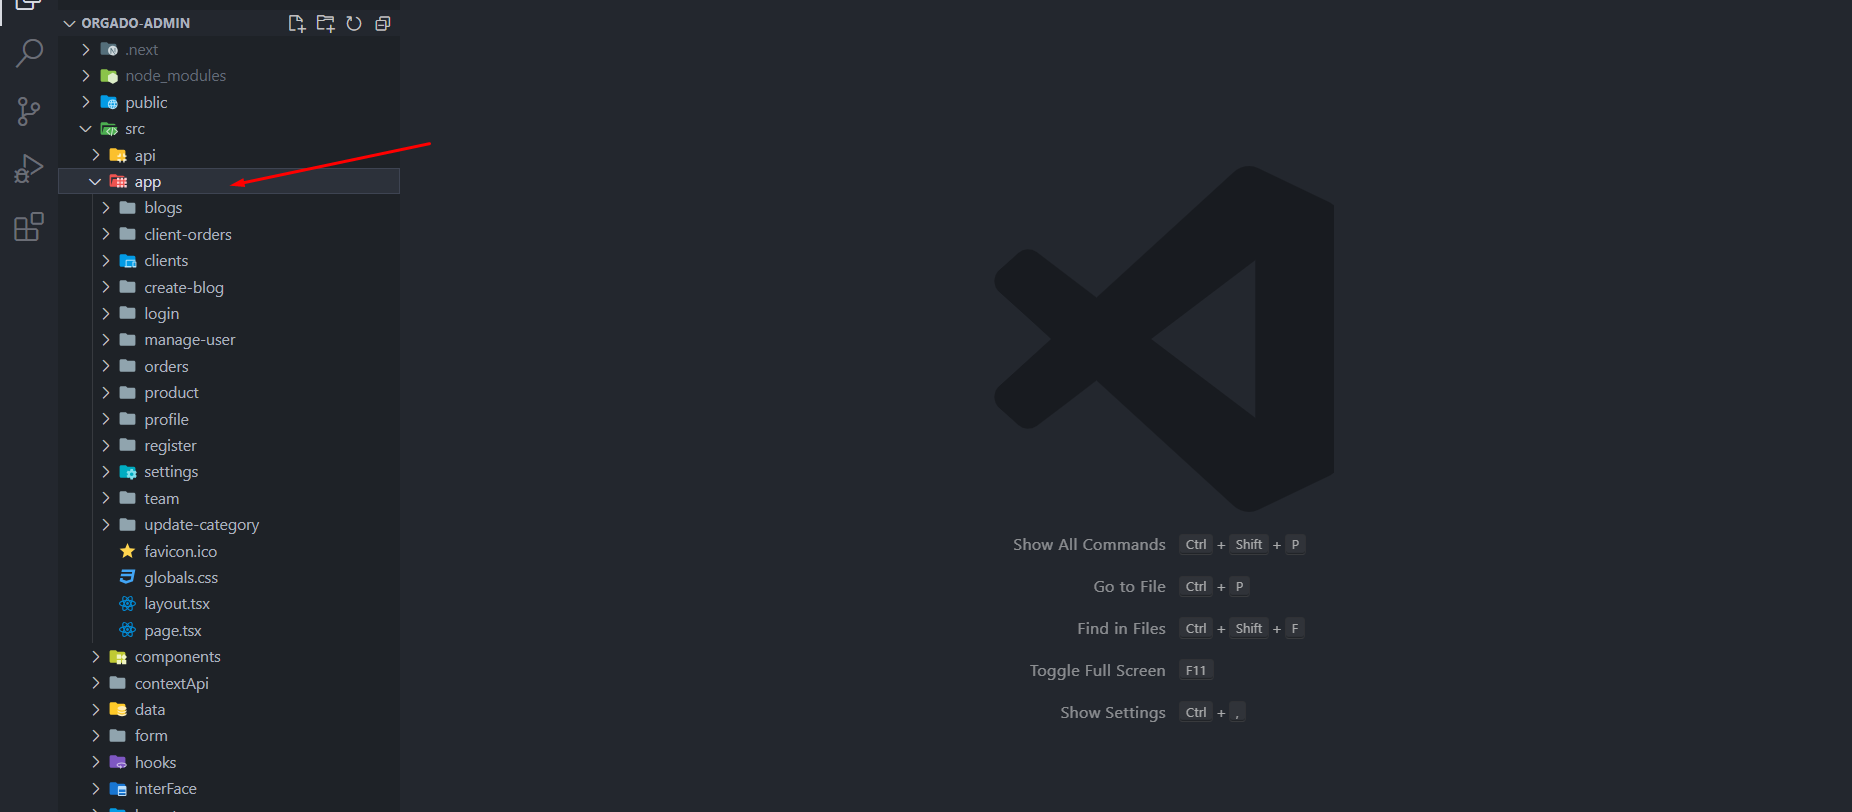
Src Folder Structure
Layout Structure

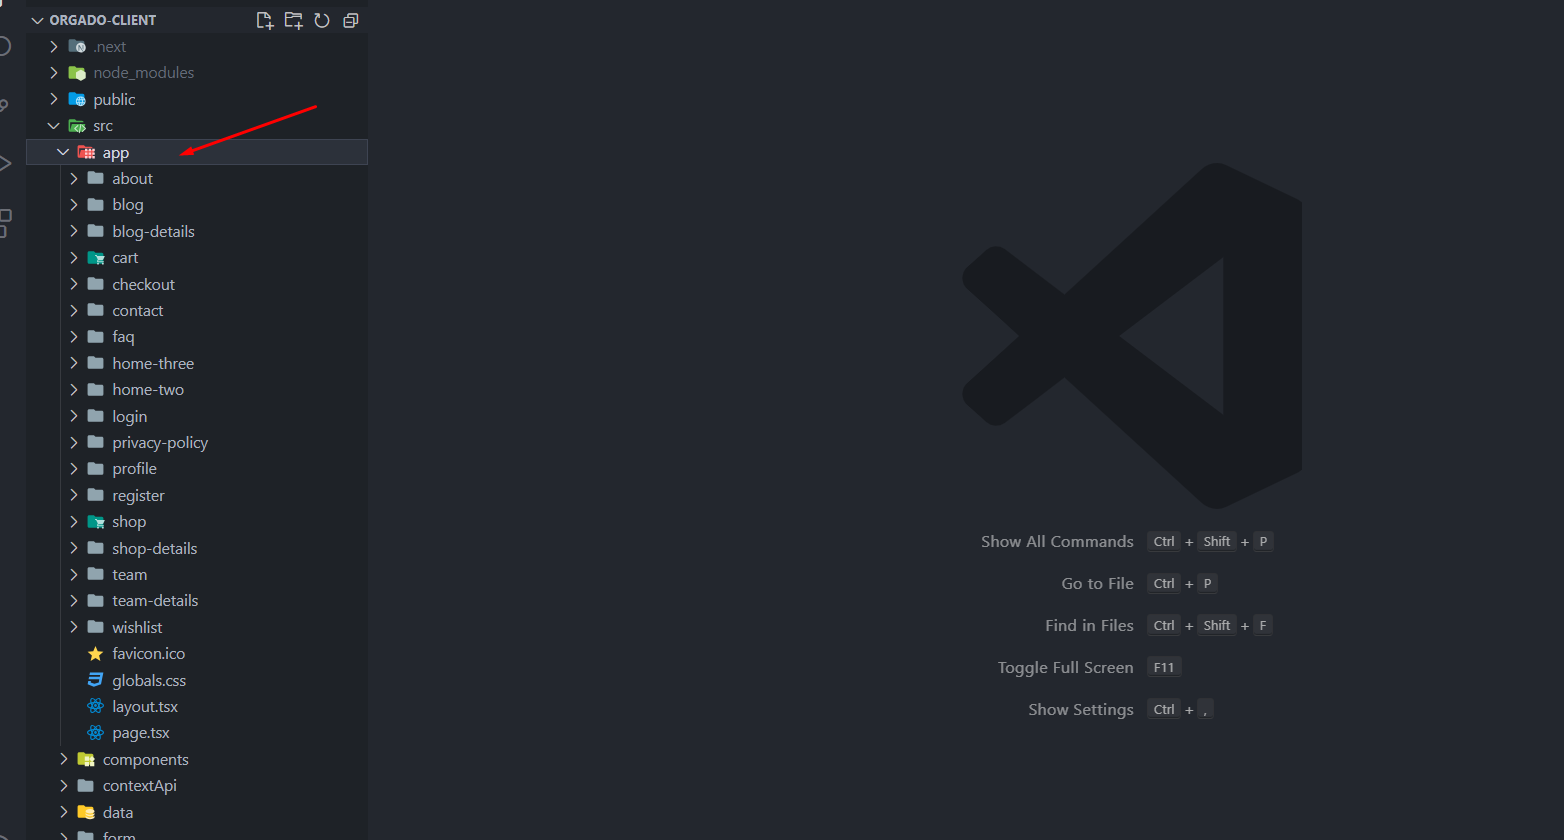
App Route Page Structure
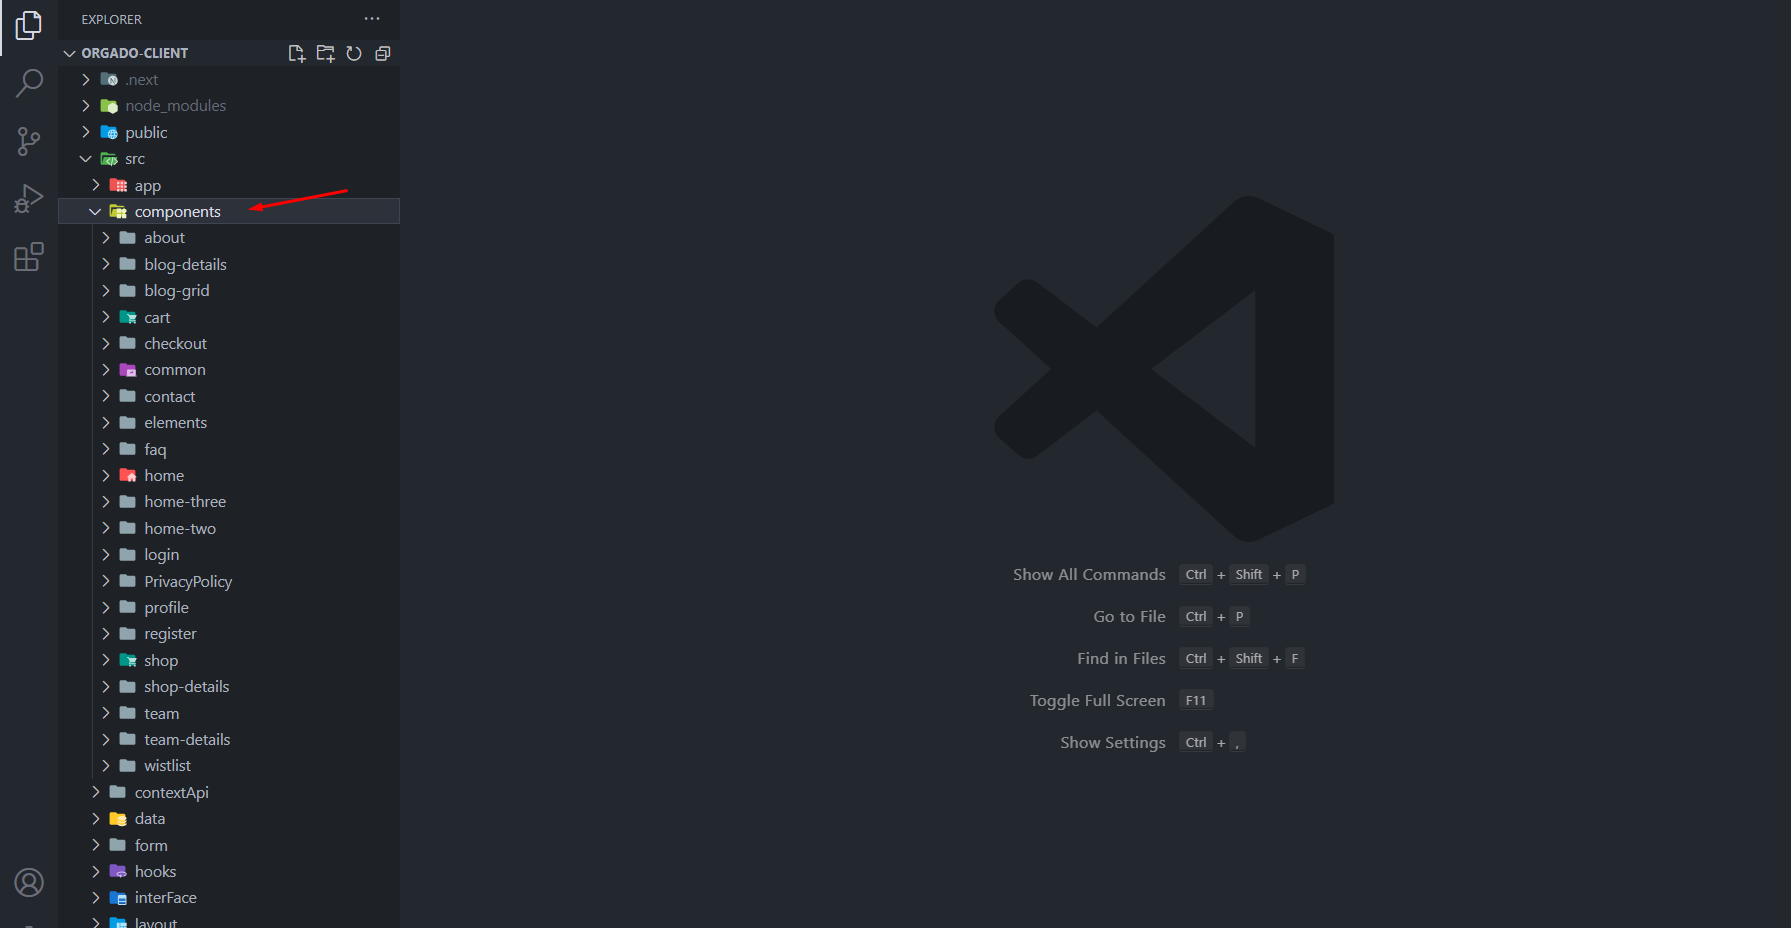
Component Structure
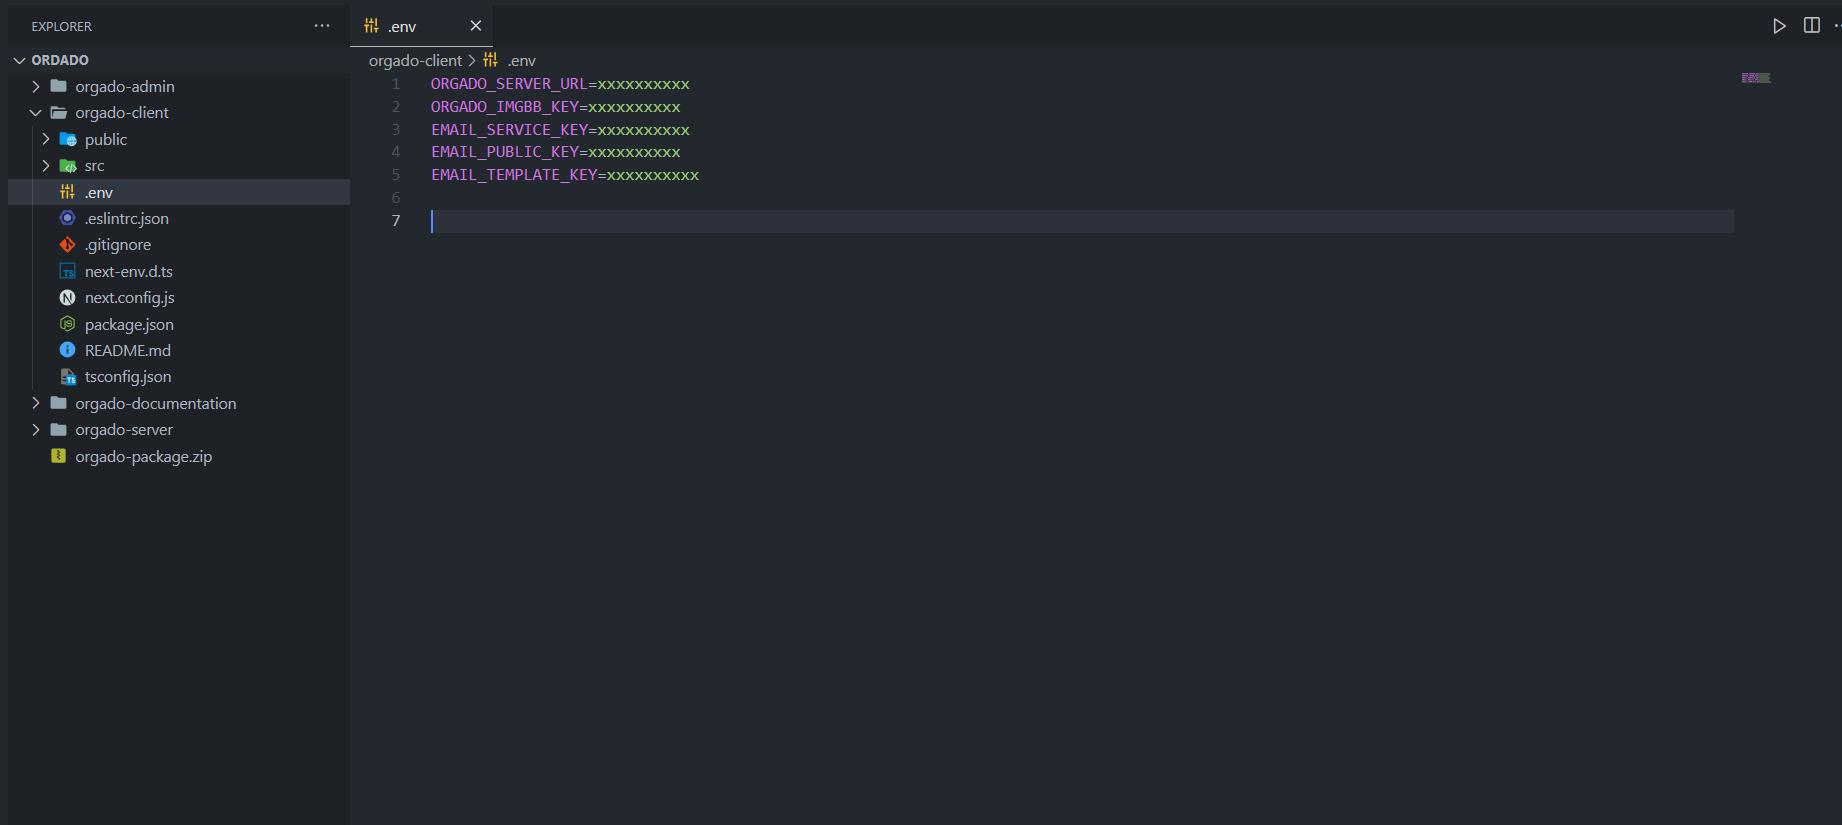
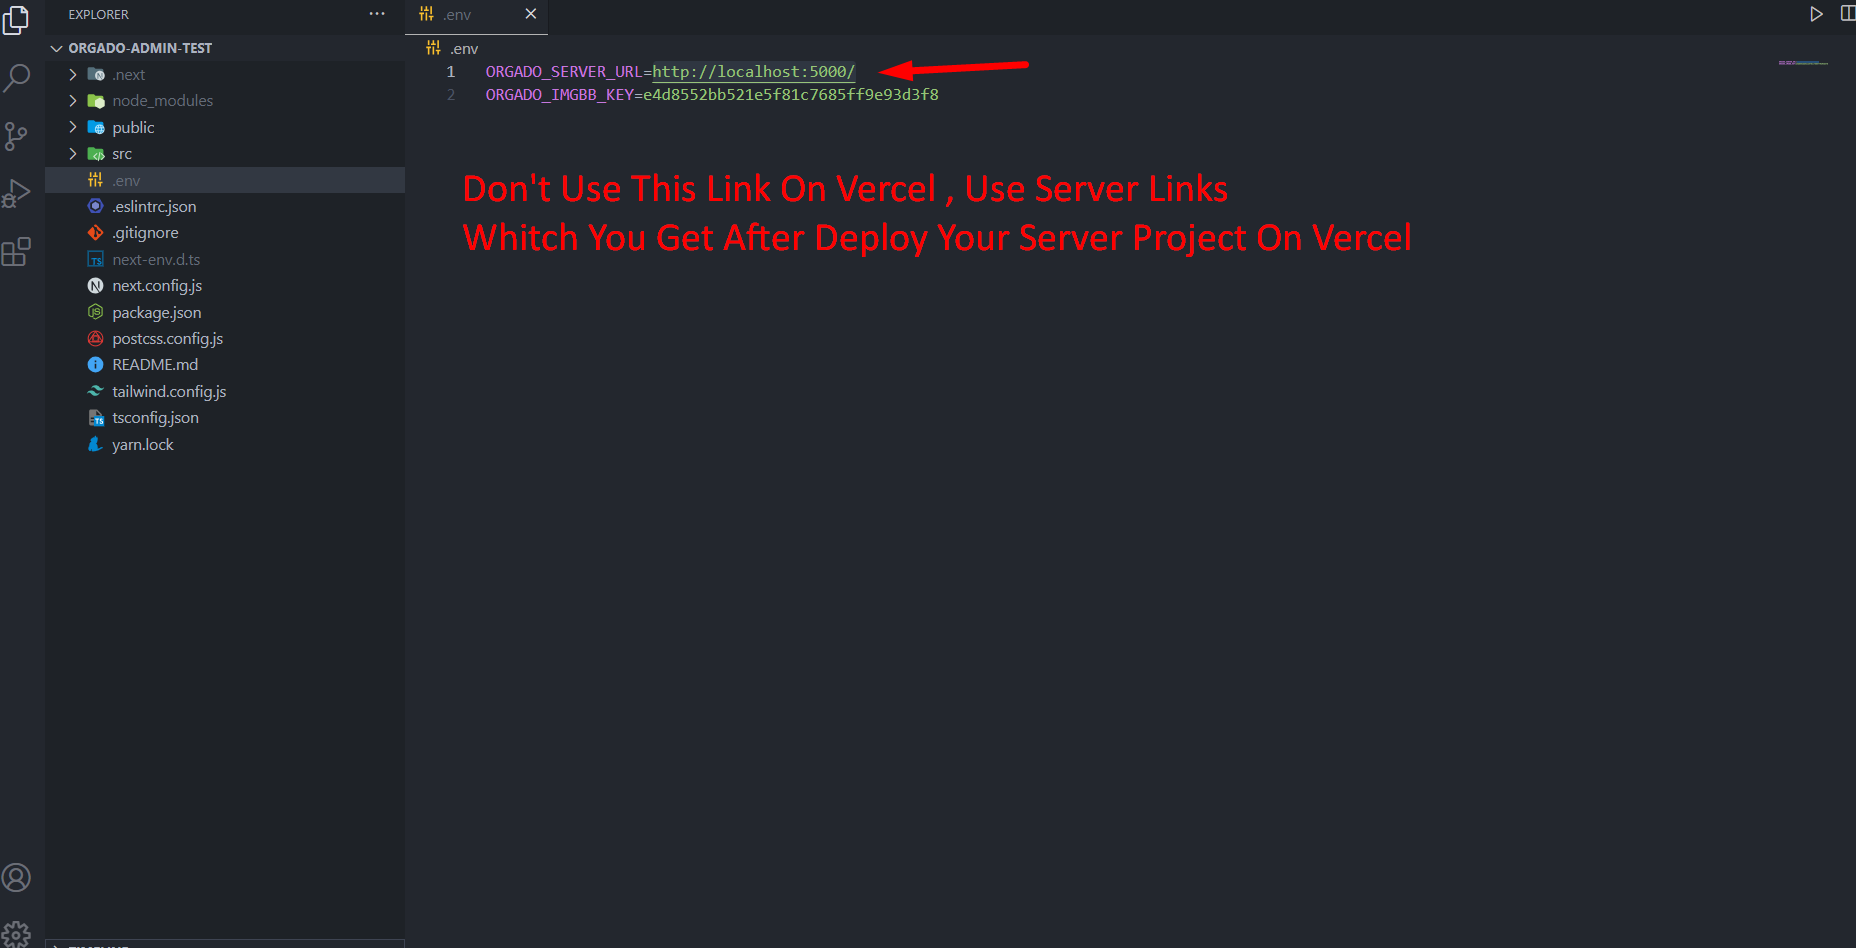
.env file Client : Replace necessary links and keys
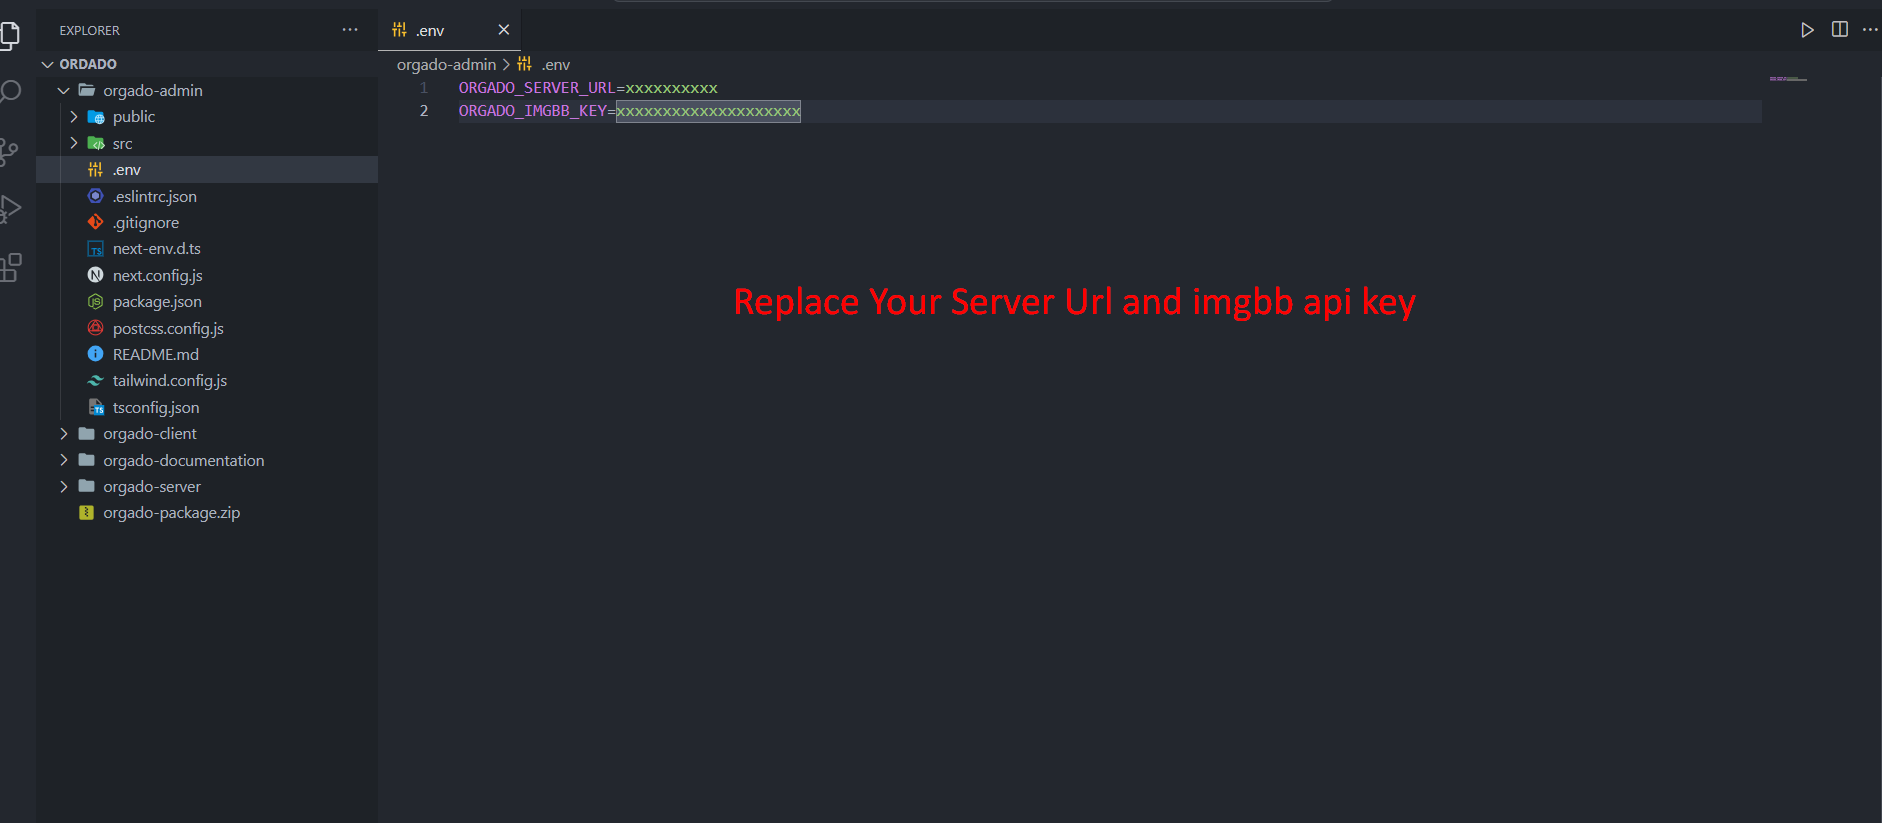
.env file Admin
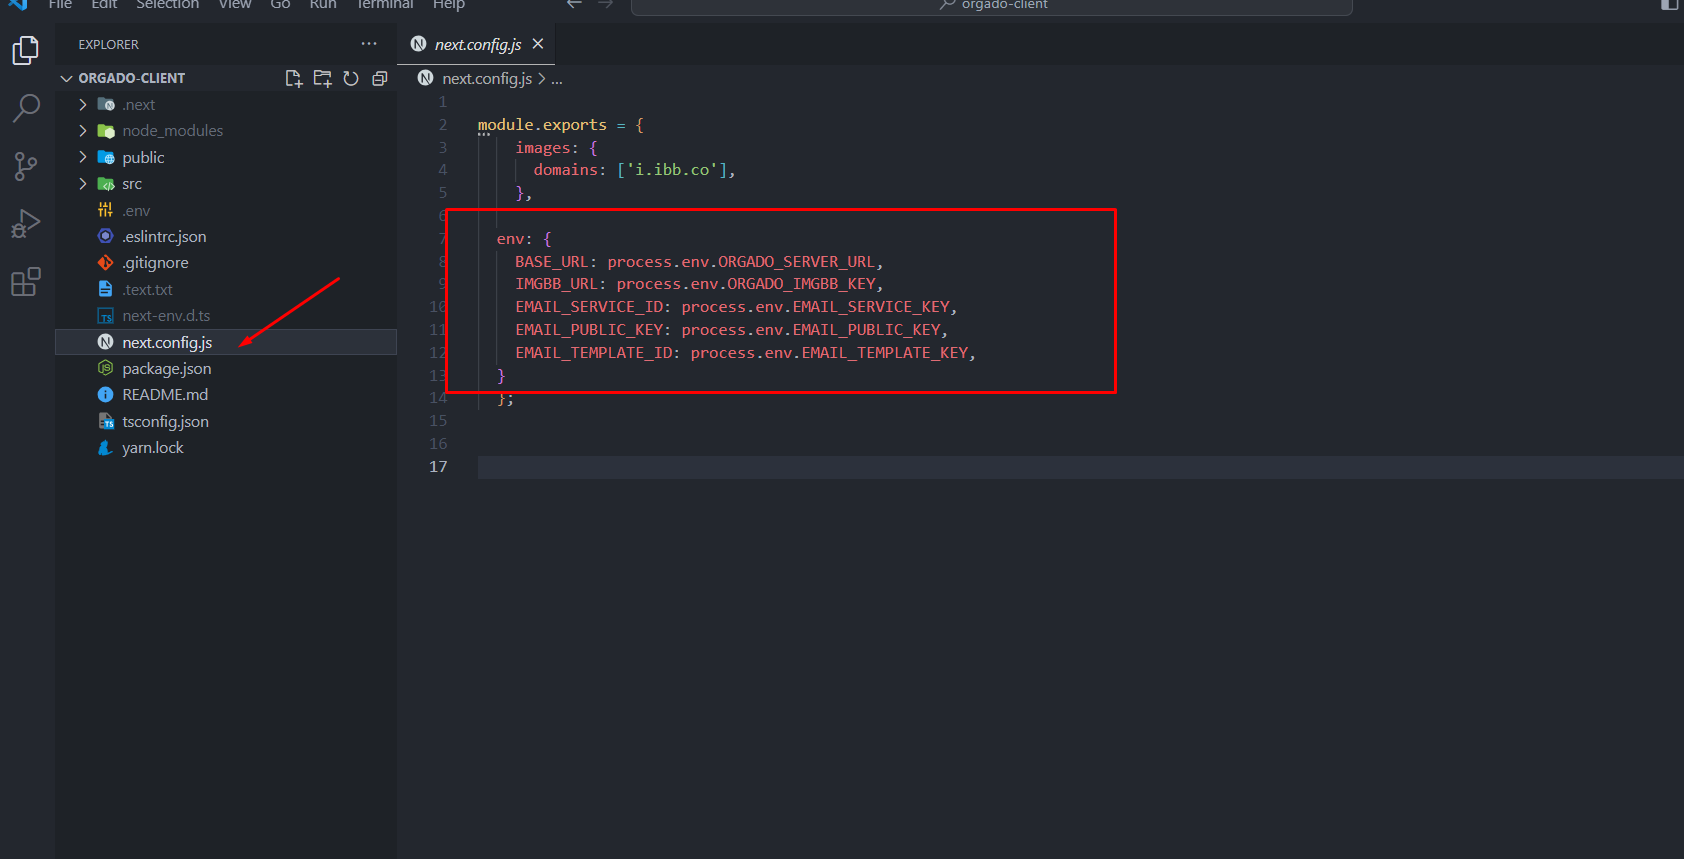
next.config.js
it will access your .env file variables
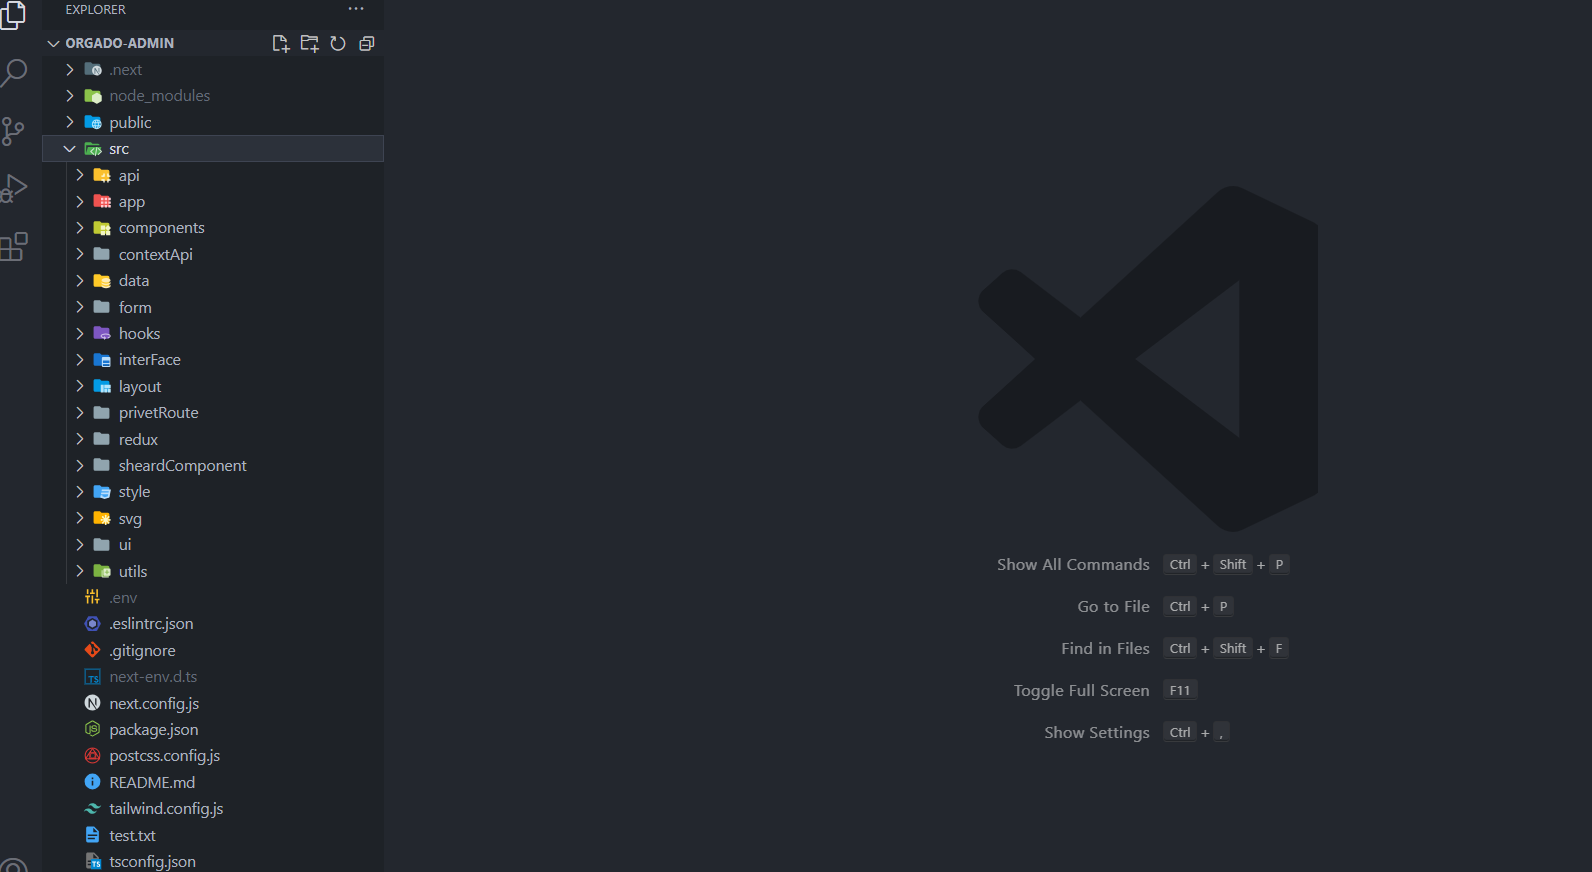
Orgado Admin
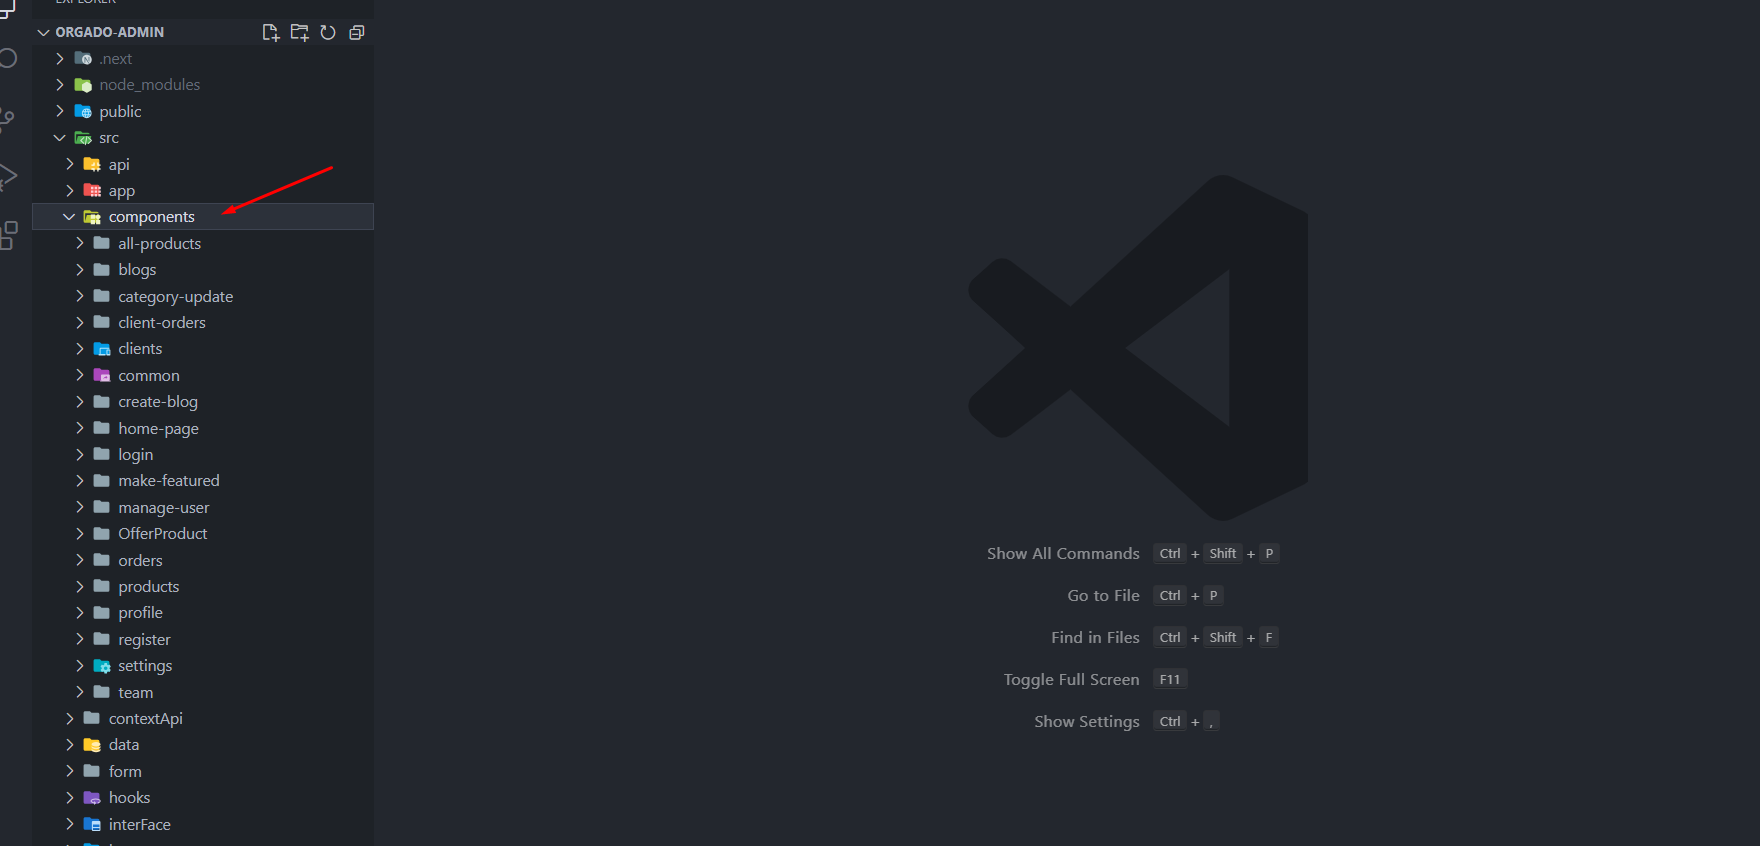
Src Folder Structure
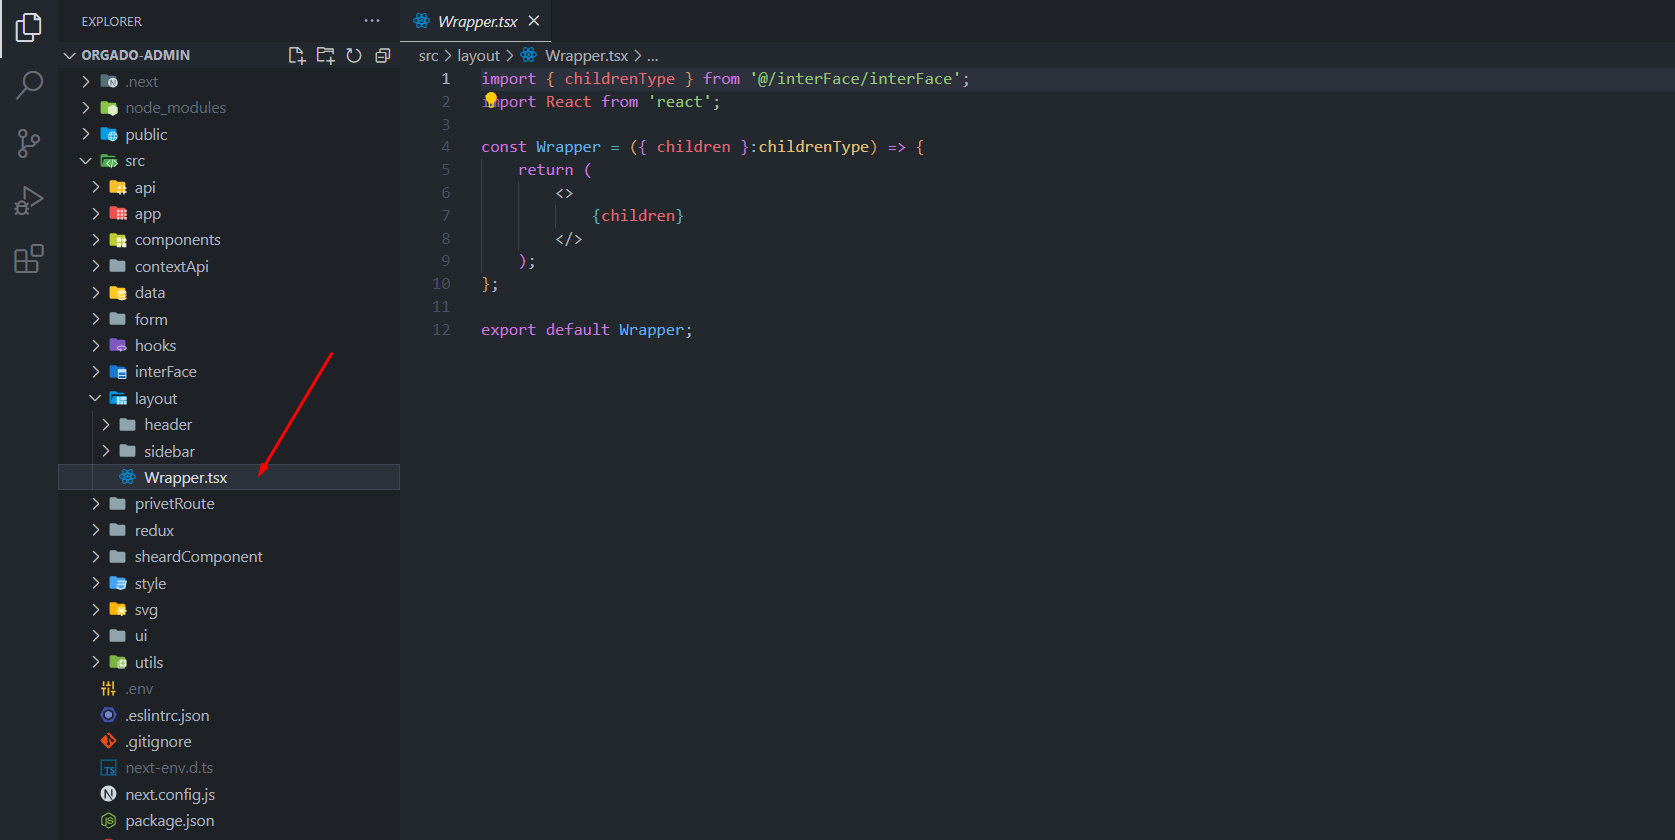
Layout Structure
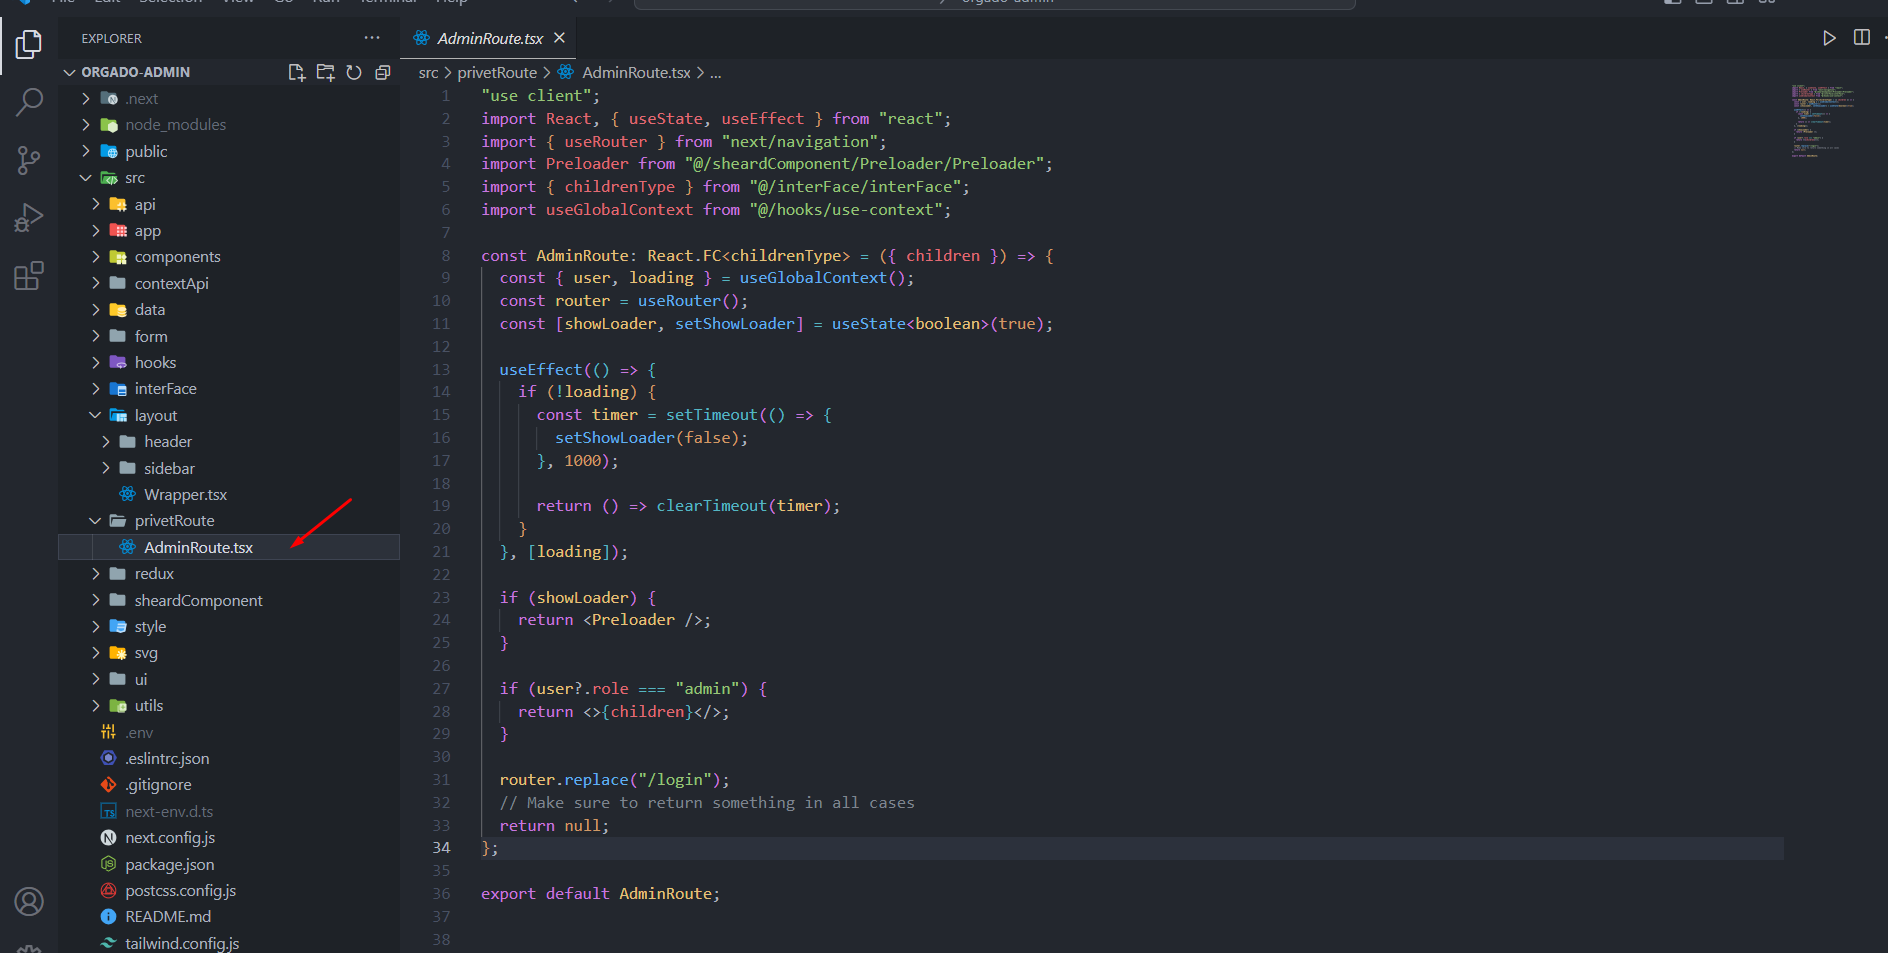
Admin Route
App Route Page Structure
Component Structure
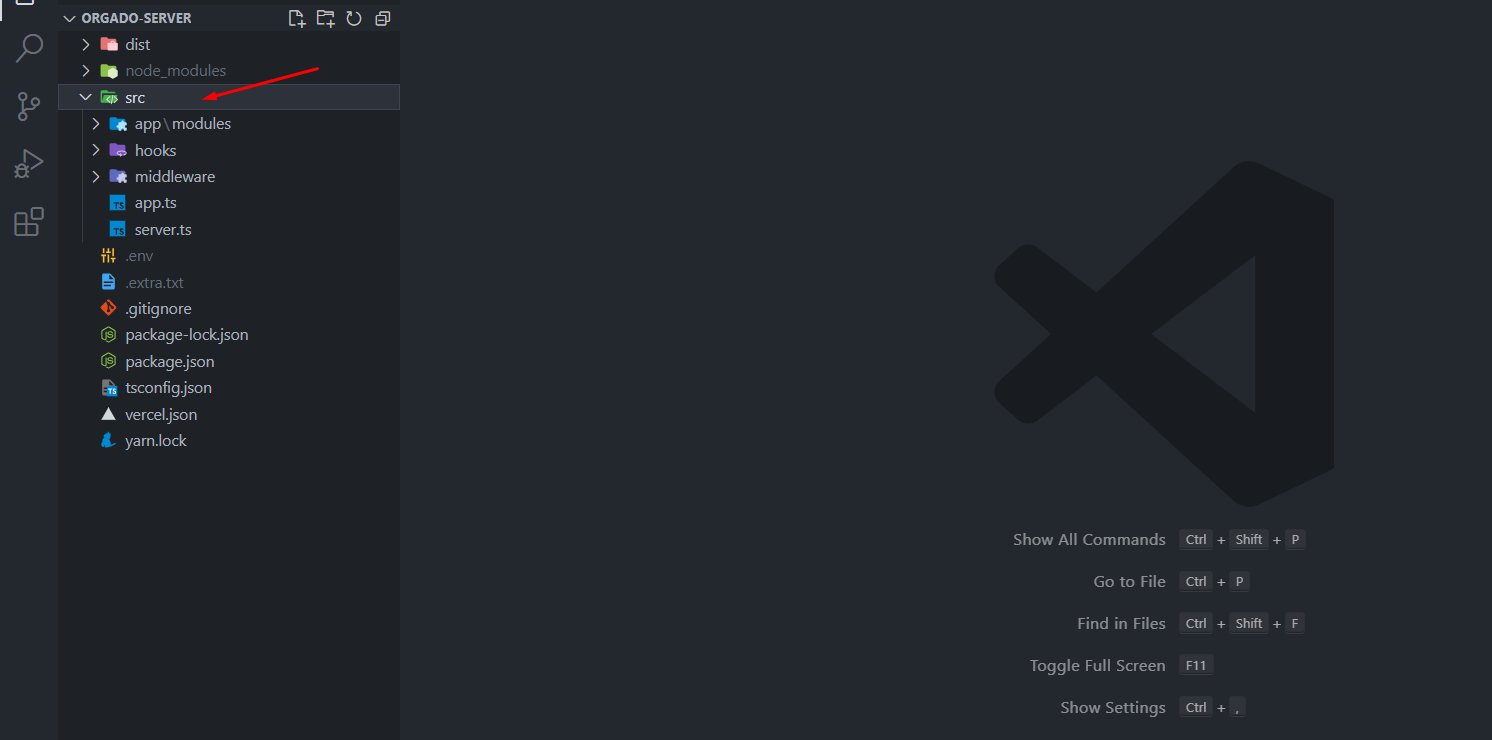
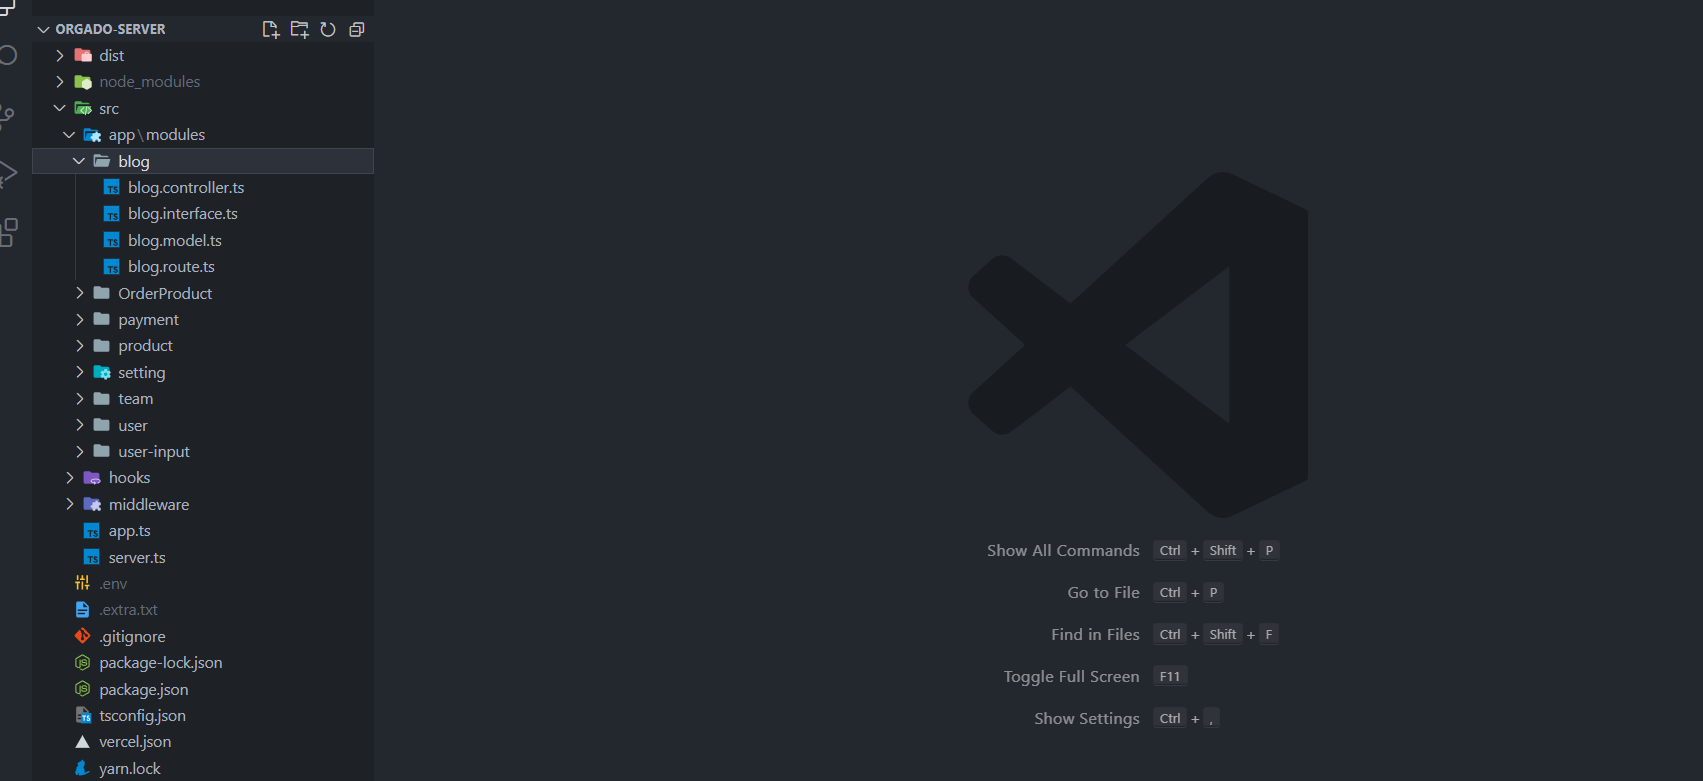
Server File Structure
here is all api functionality and database connection and we use modular pattern let's see structure , it is very easy to modify your api
Root File Structure
Mongodb Connect To Database
Replace Your Mongodb Database Link Here
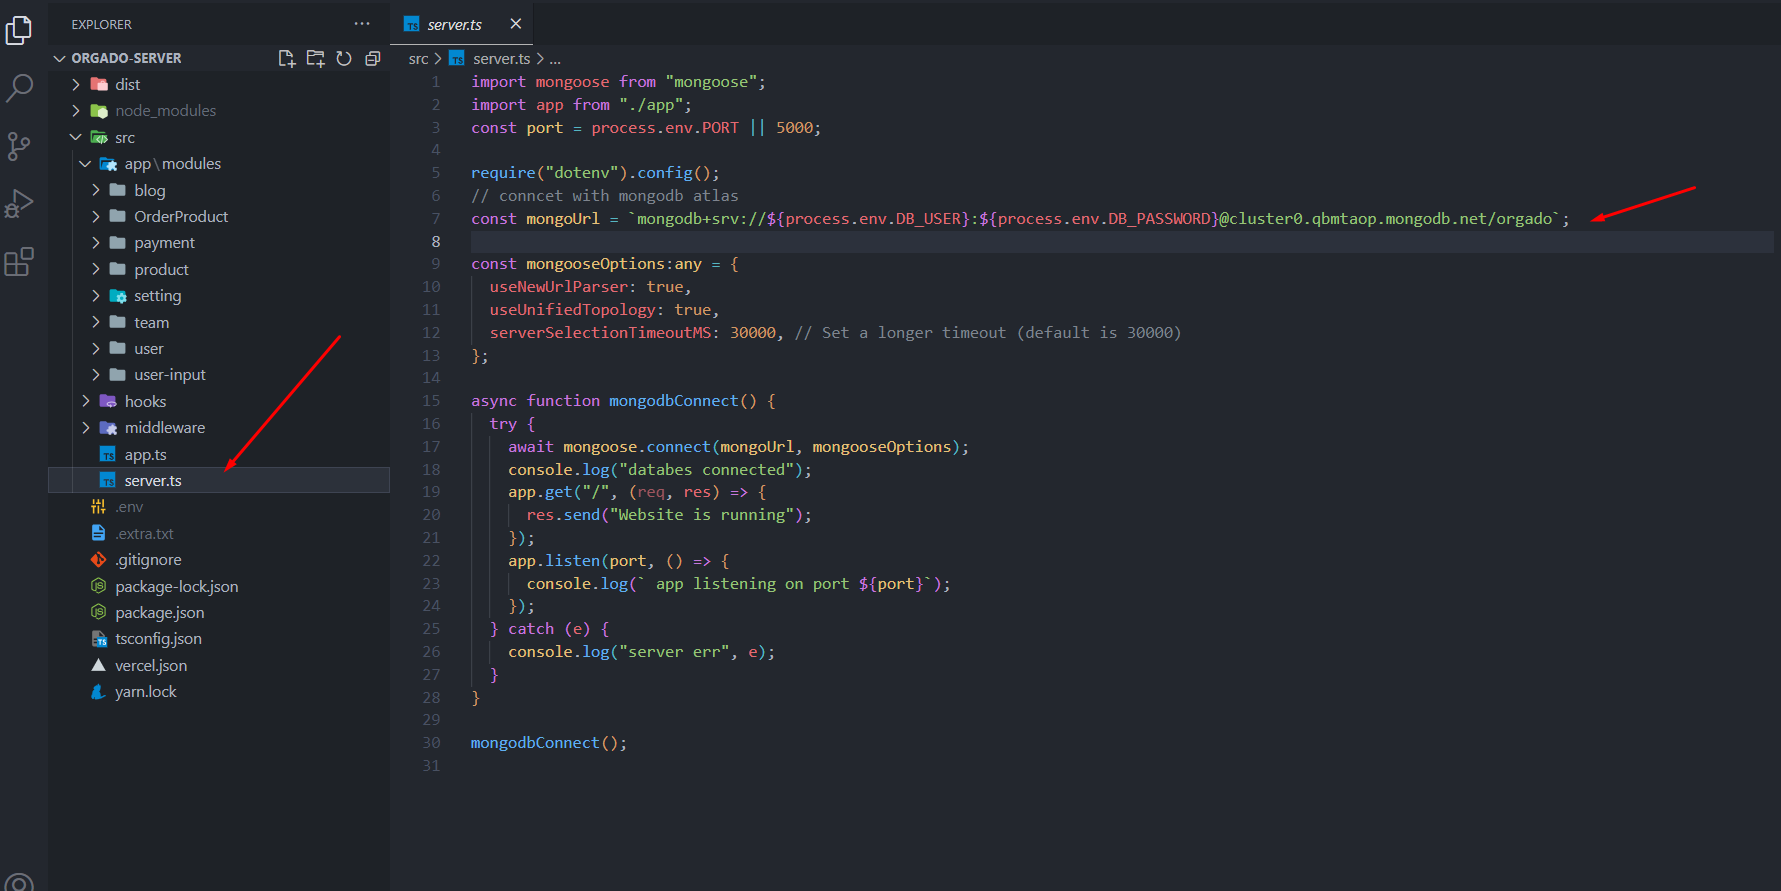
Modules Structure
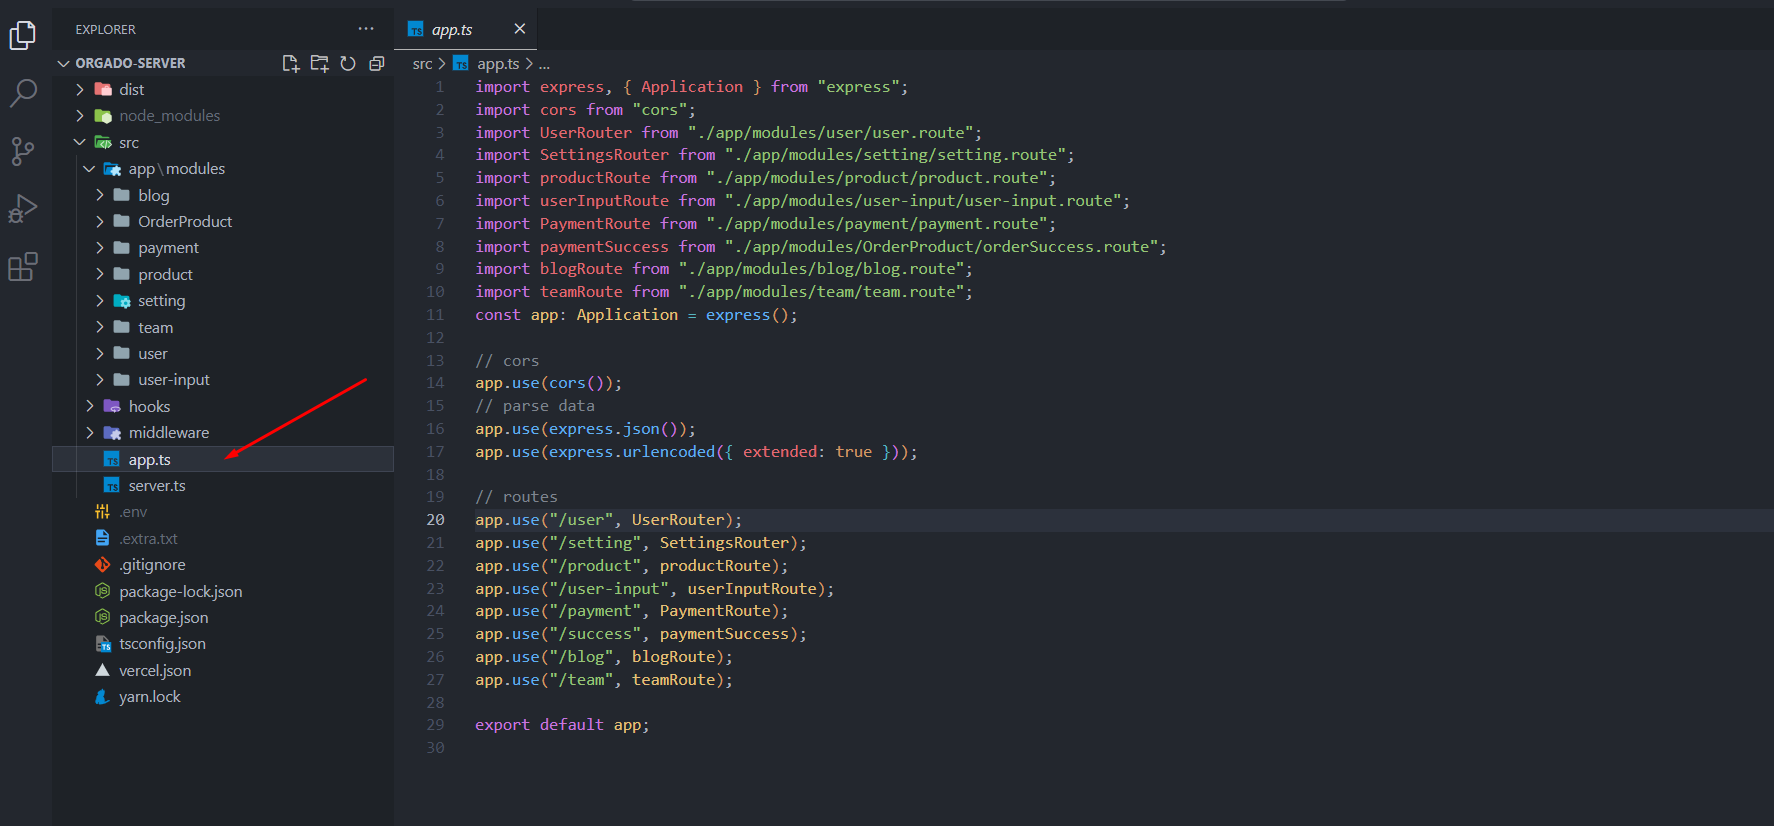
App File To Conncet All Api
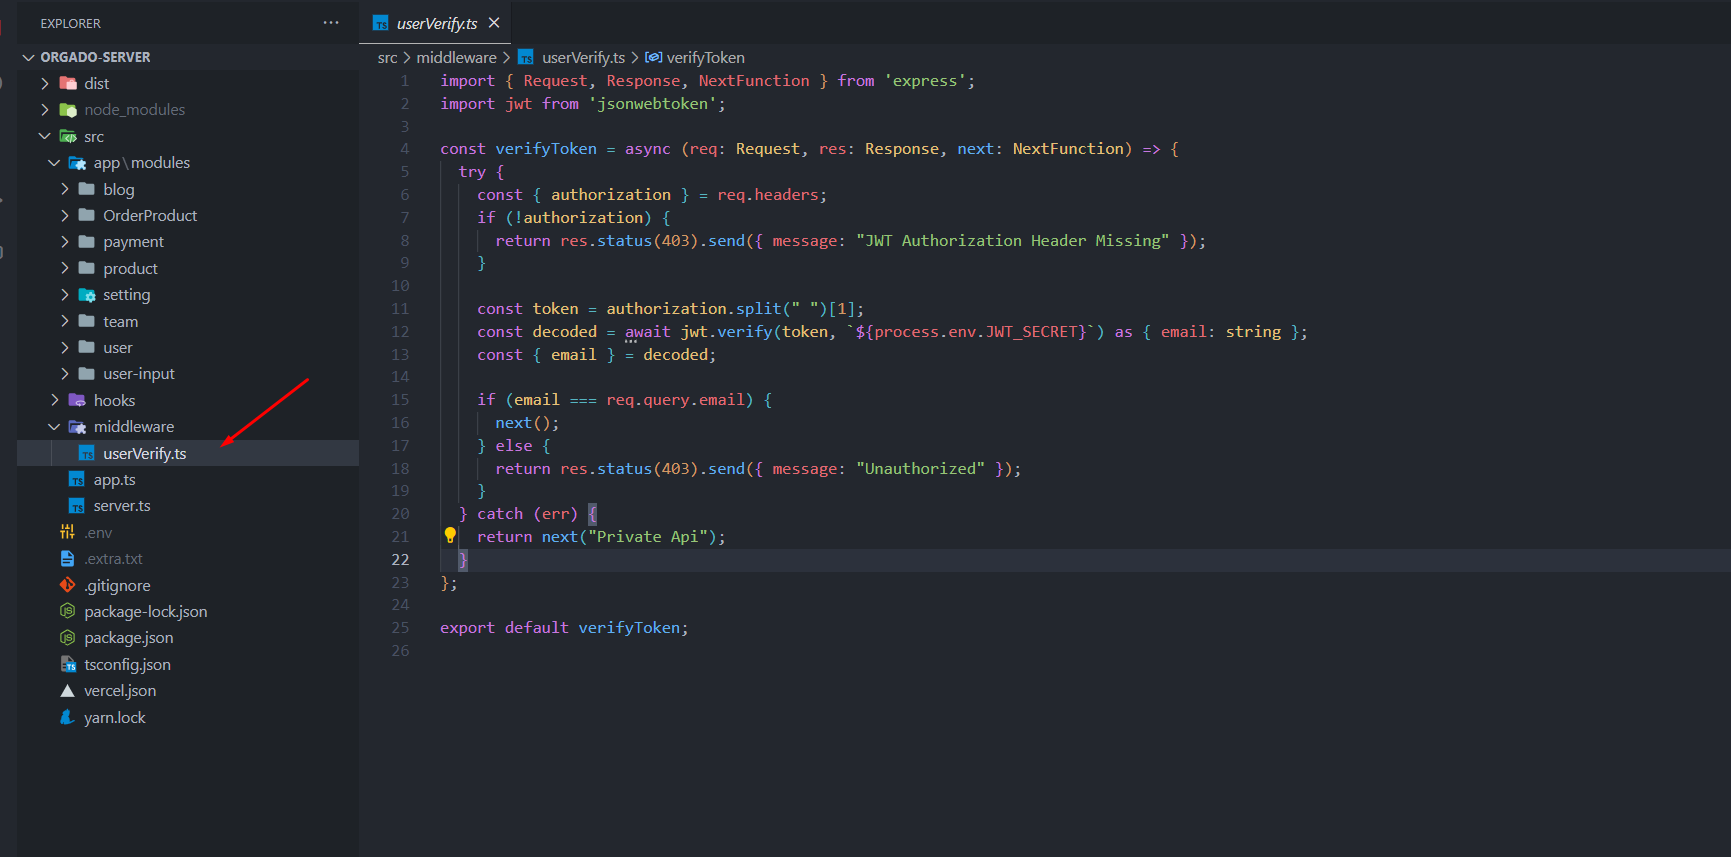
Middleware For Protected API
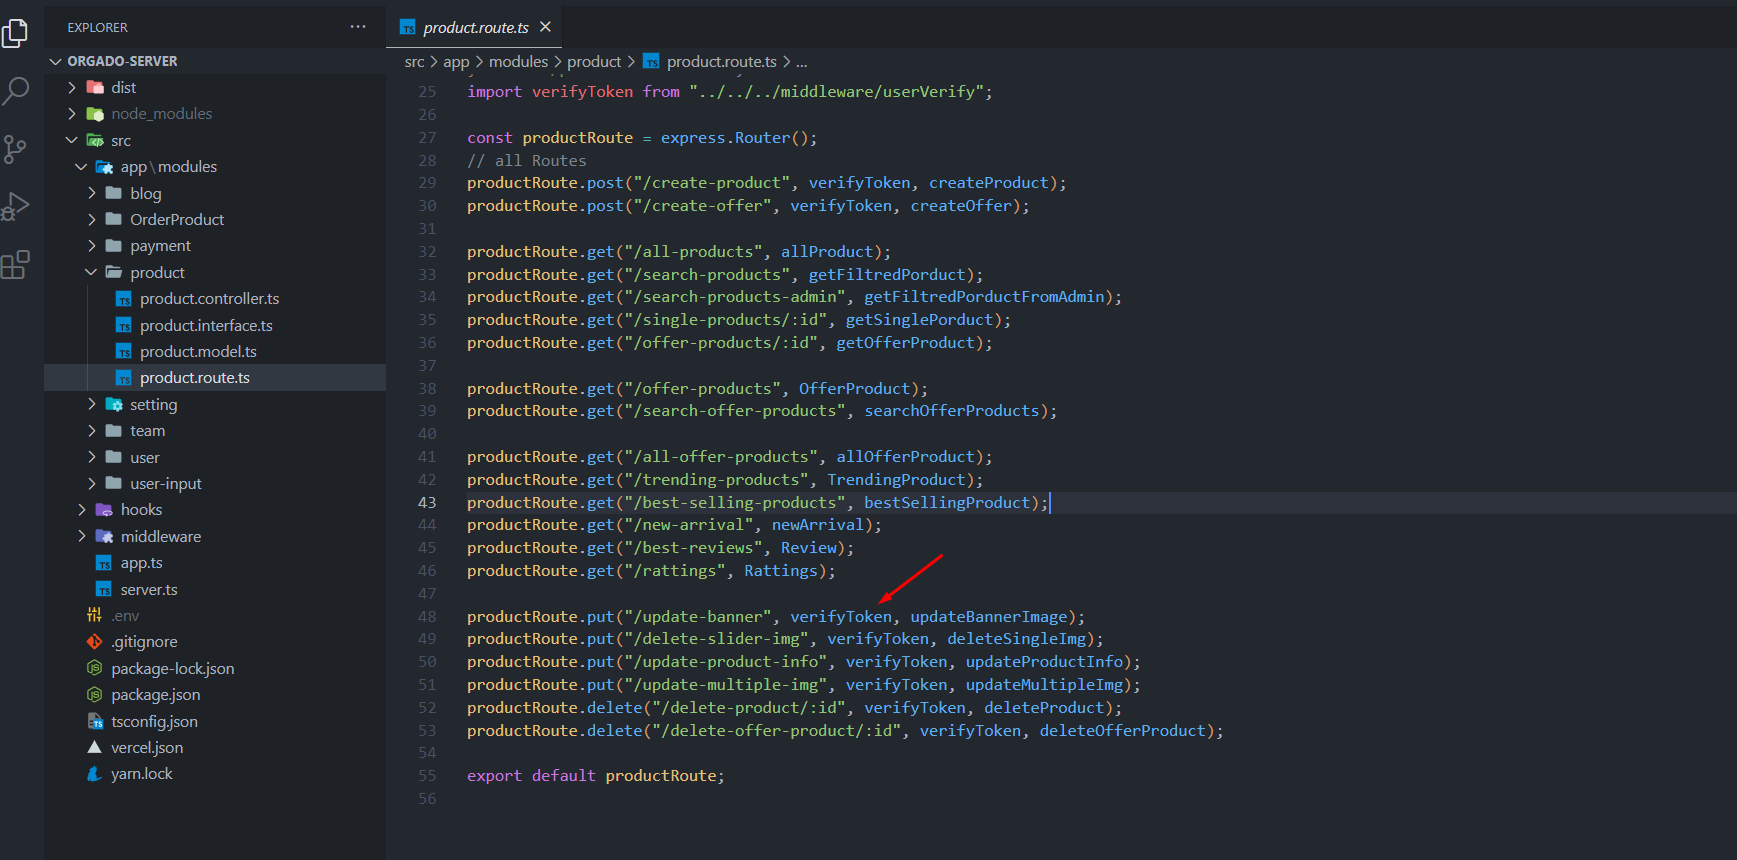
Use Middleware
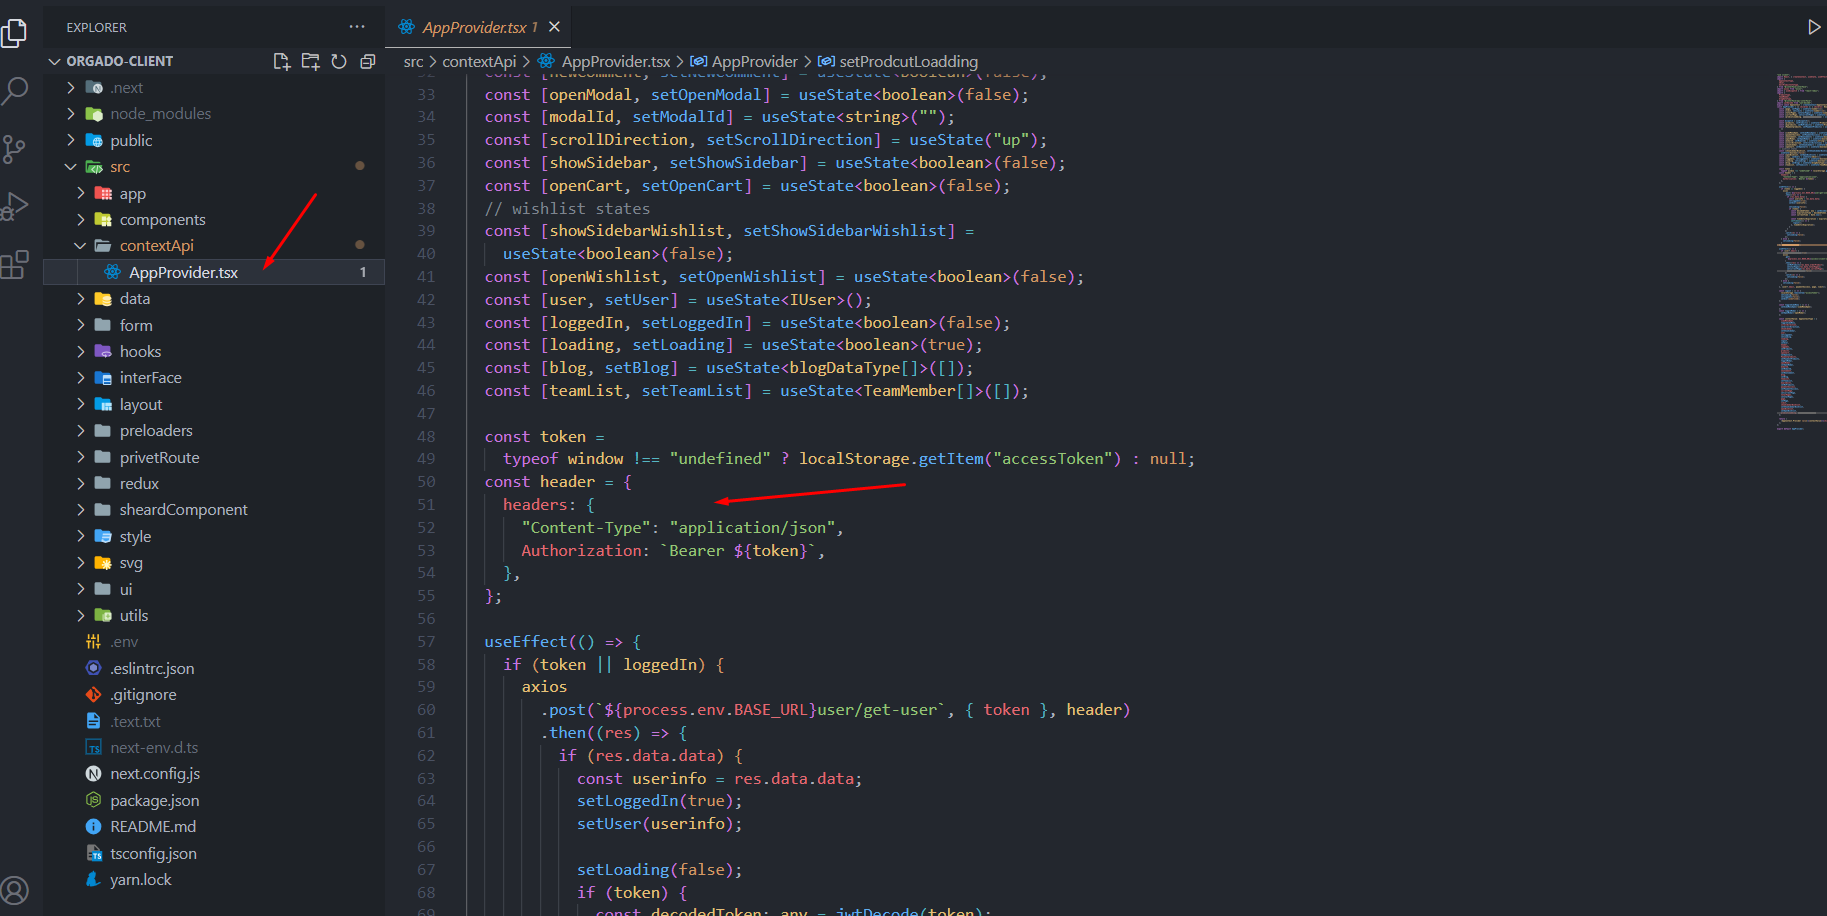
API Request From Client Site

Client Site Header For Verify Token
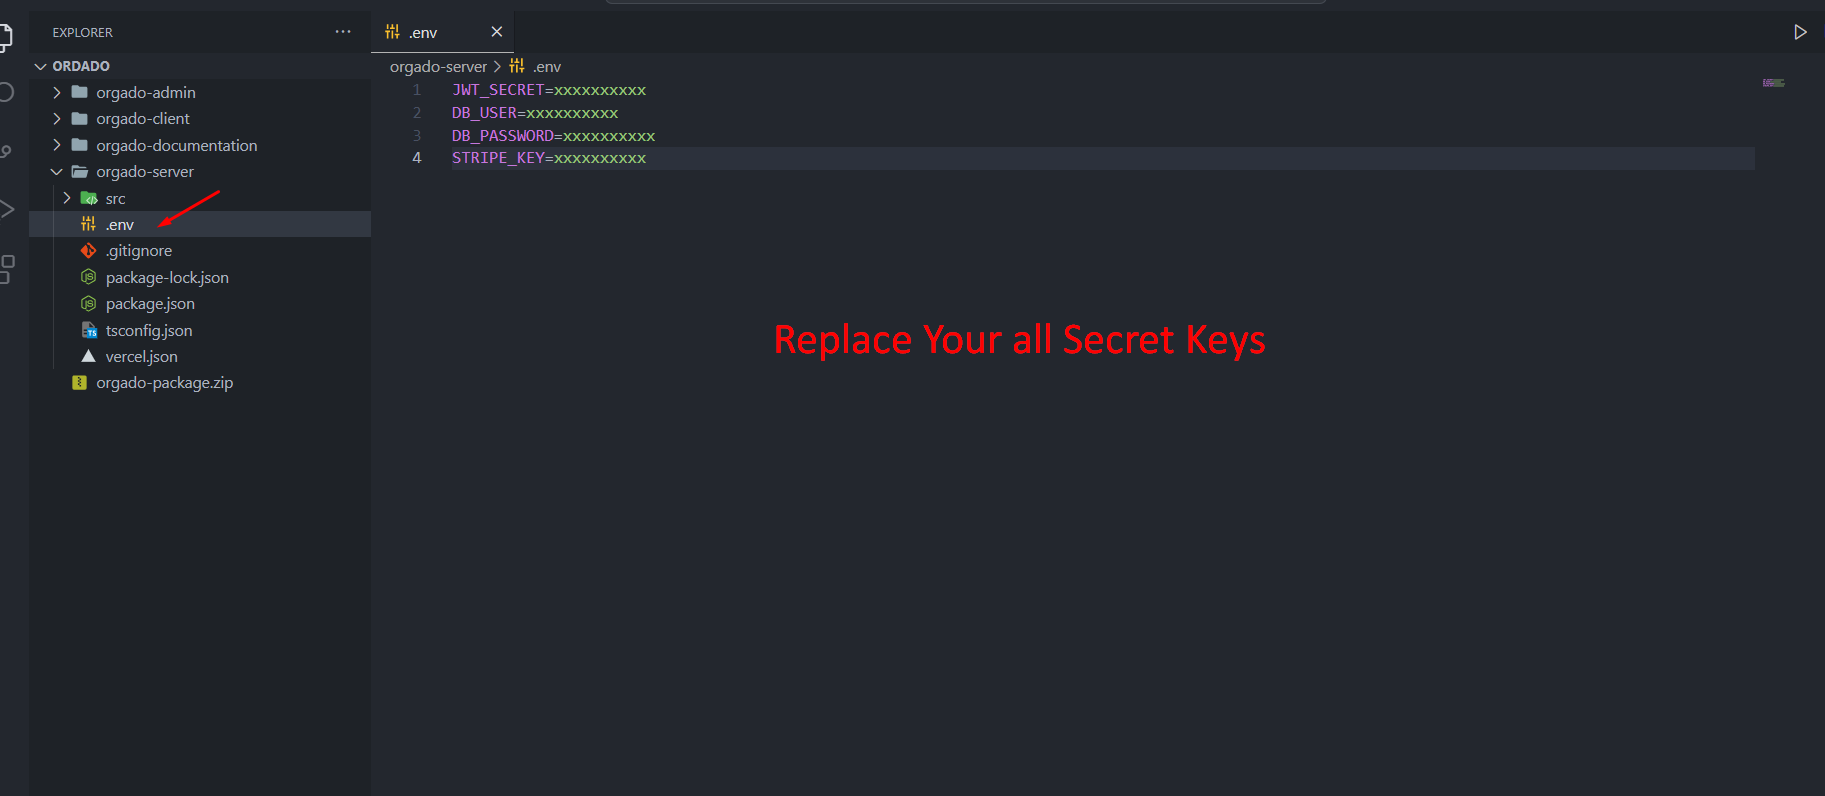
.ENV File
Change Contents (Orgado Client)
Changing Brand Logo
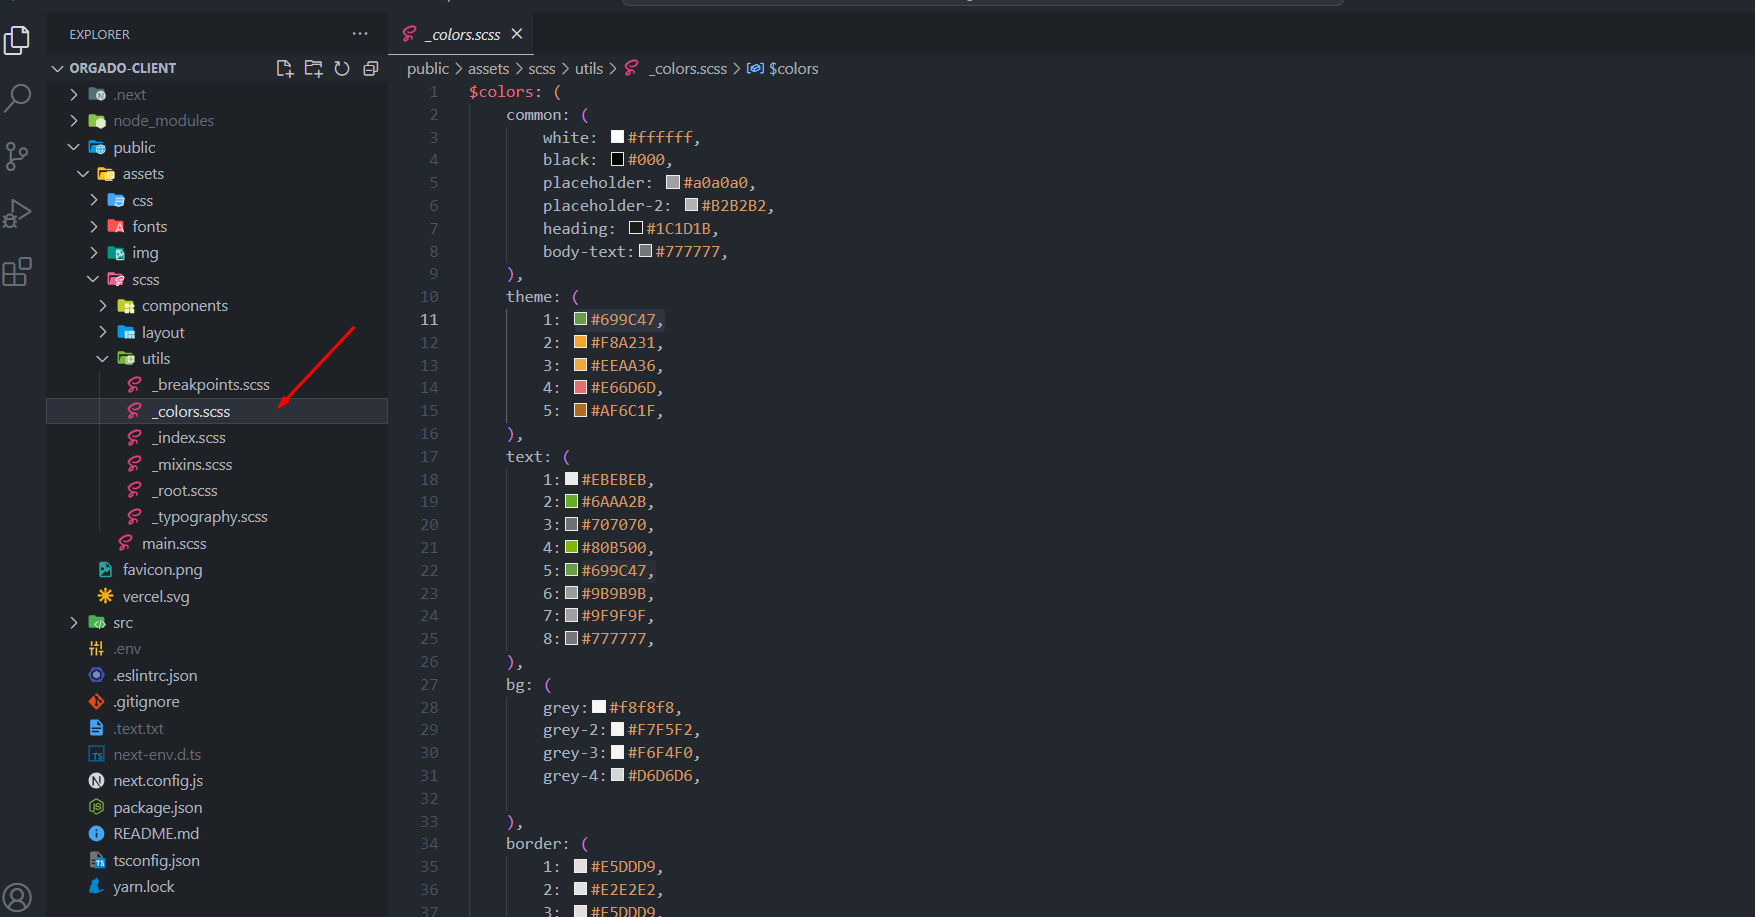
Changing Colors
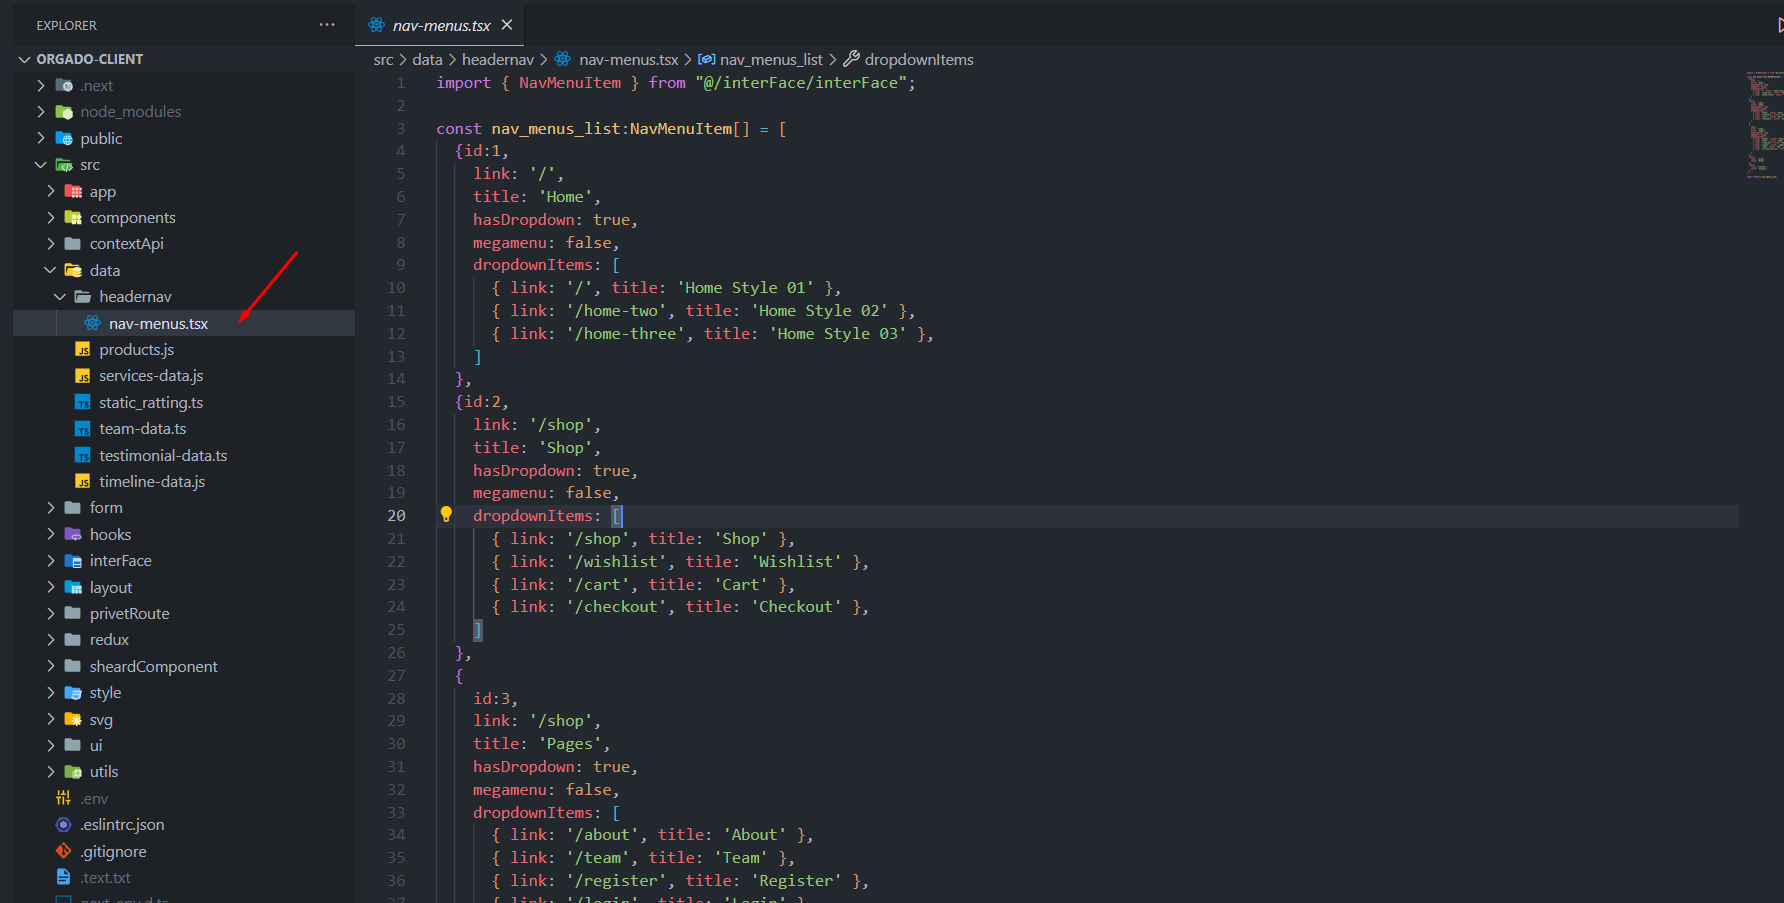
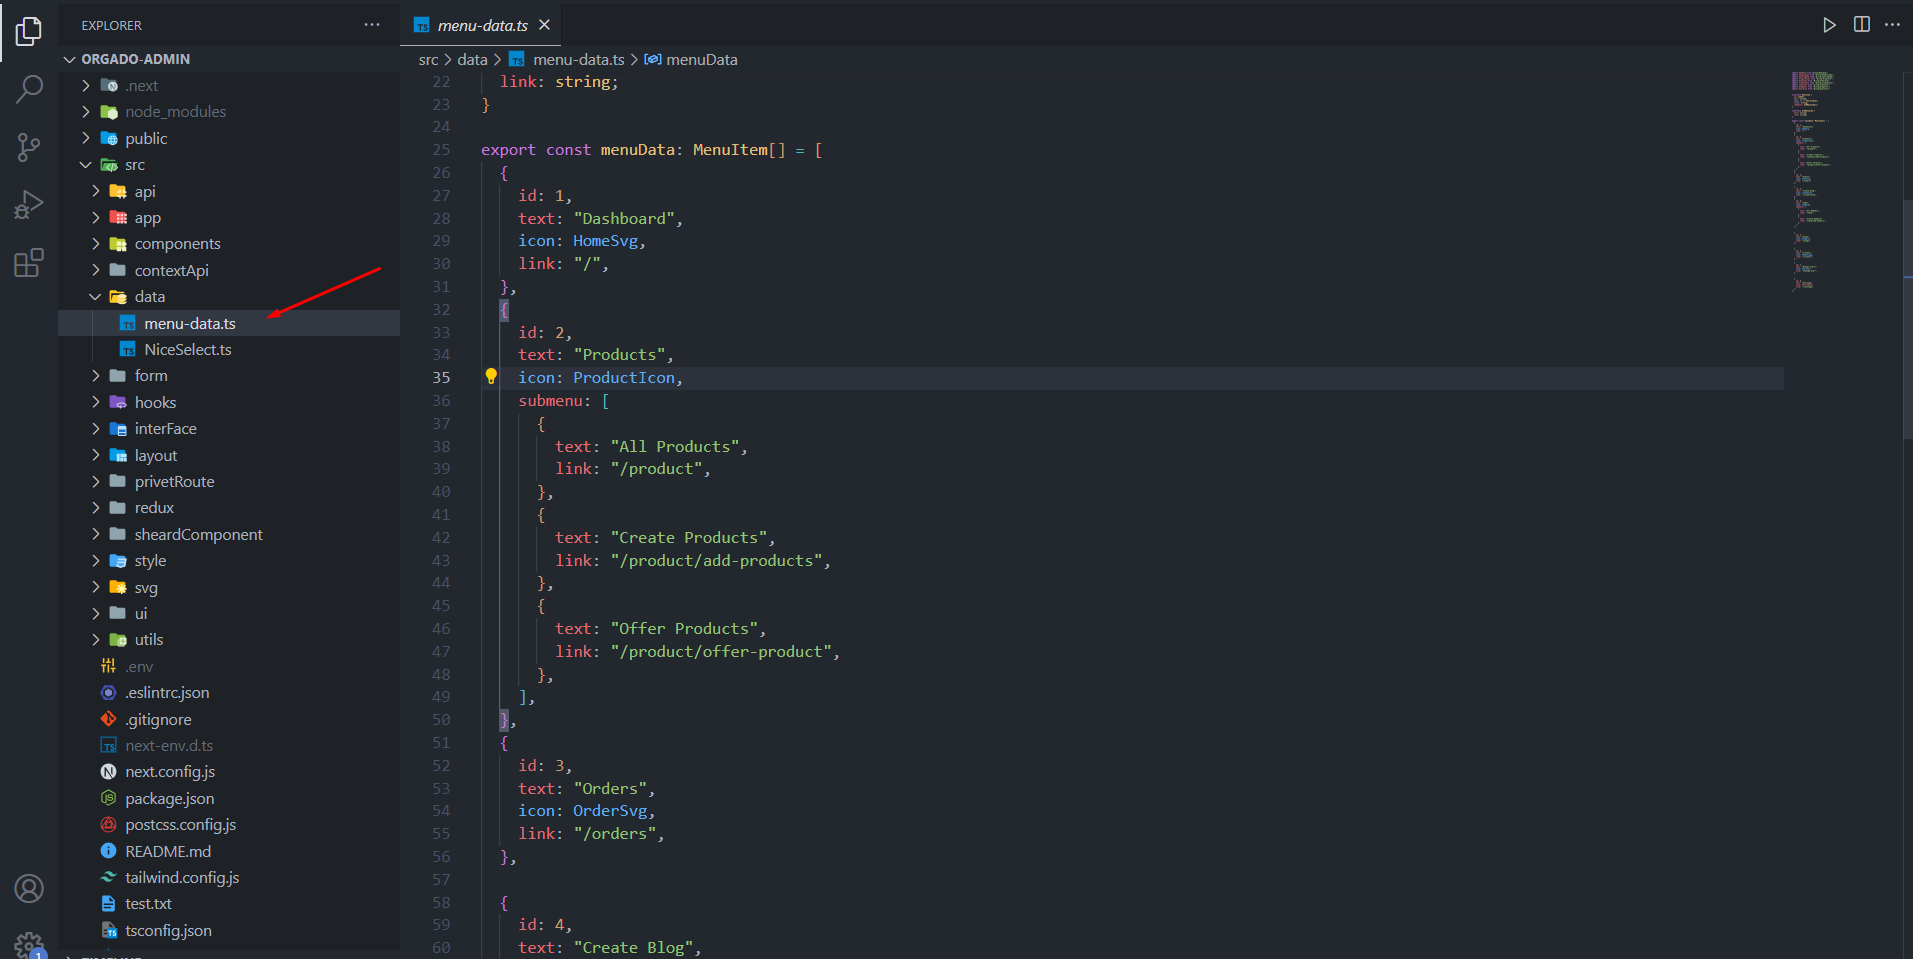
Changing Nav Menu Client Site
Changing Nav Menu Admin Panel
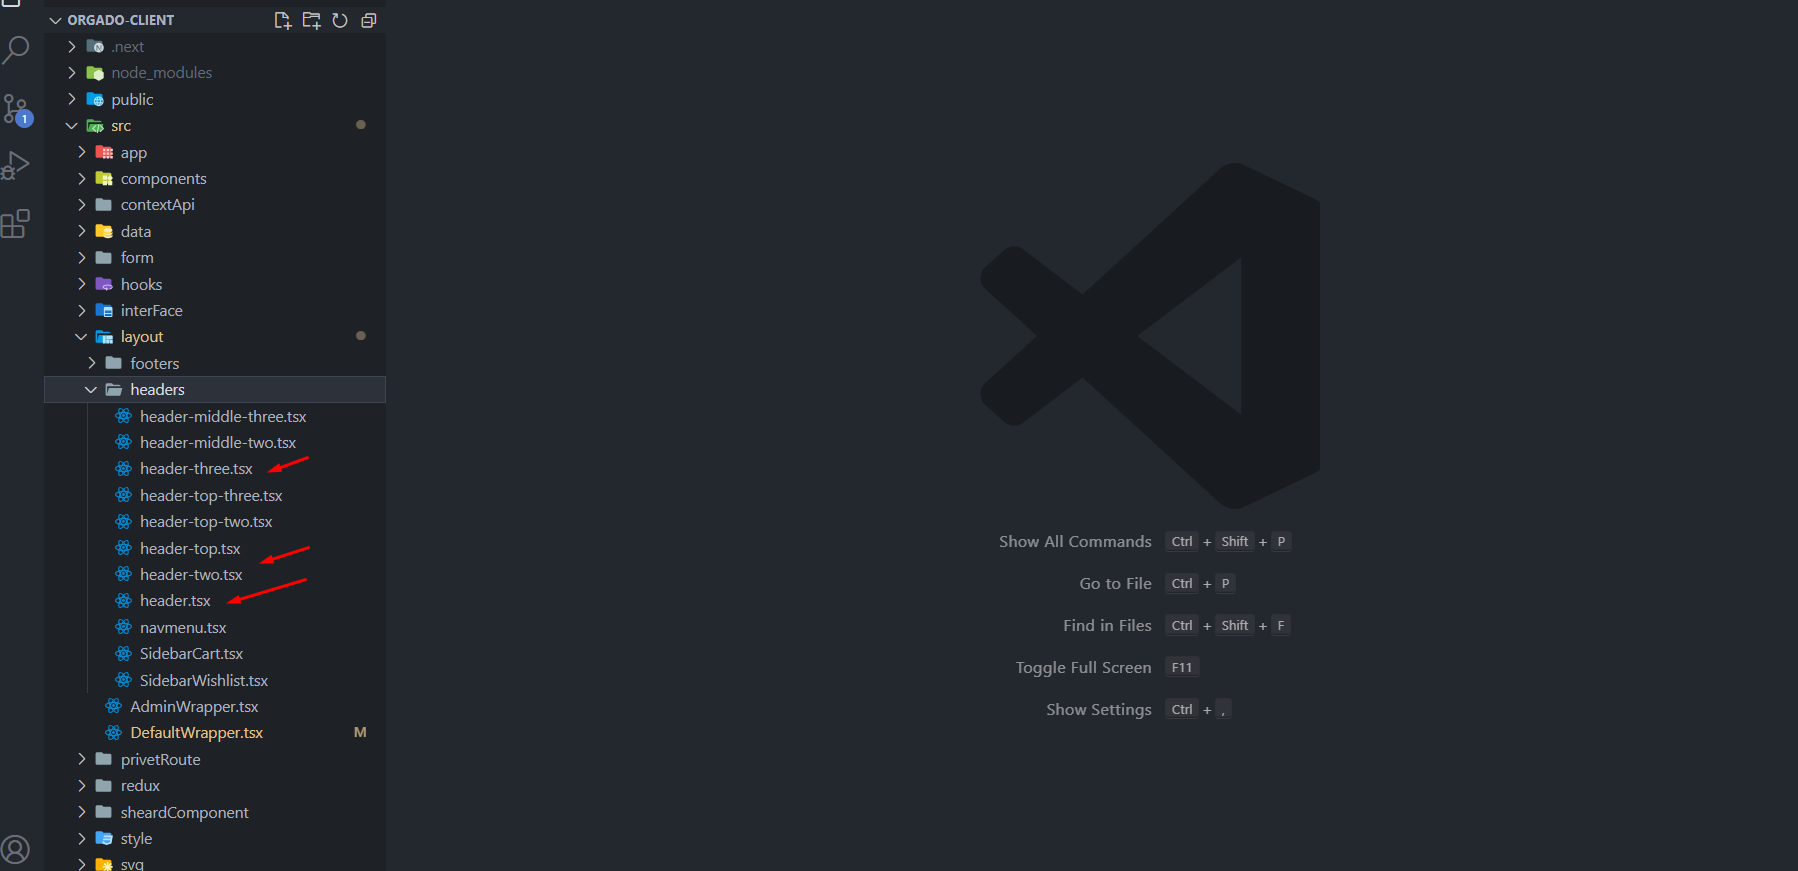
Header Types
Welcome to Orgado Header Elements! You can choose 3 Types of header in you website.
Header File Structure
How To Call Header Component
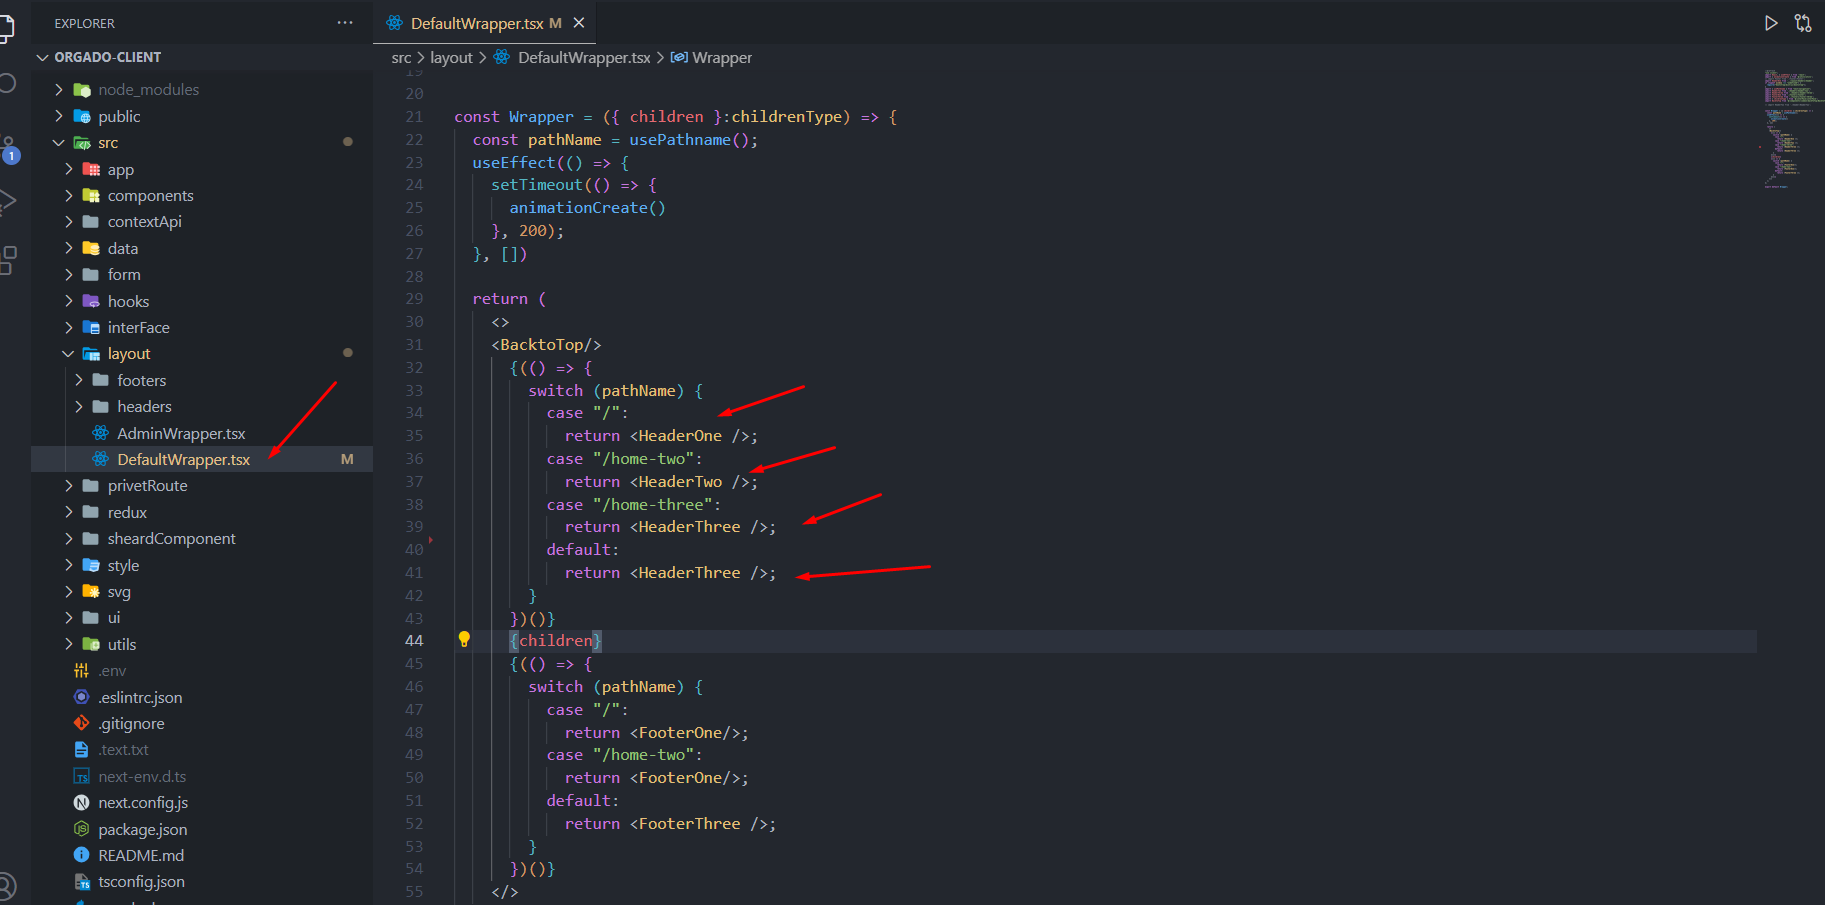
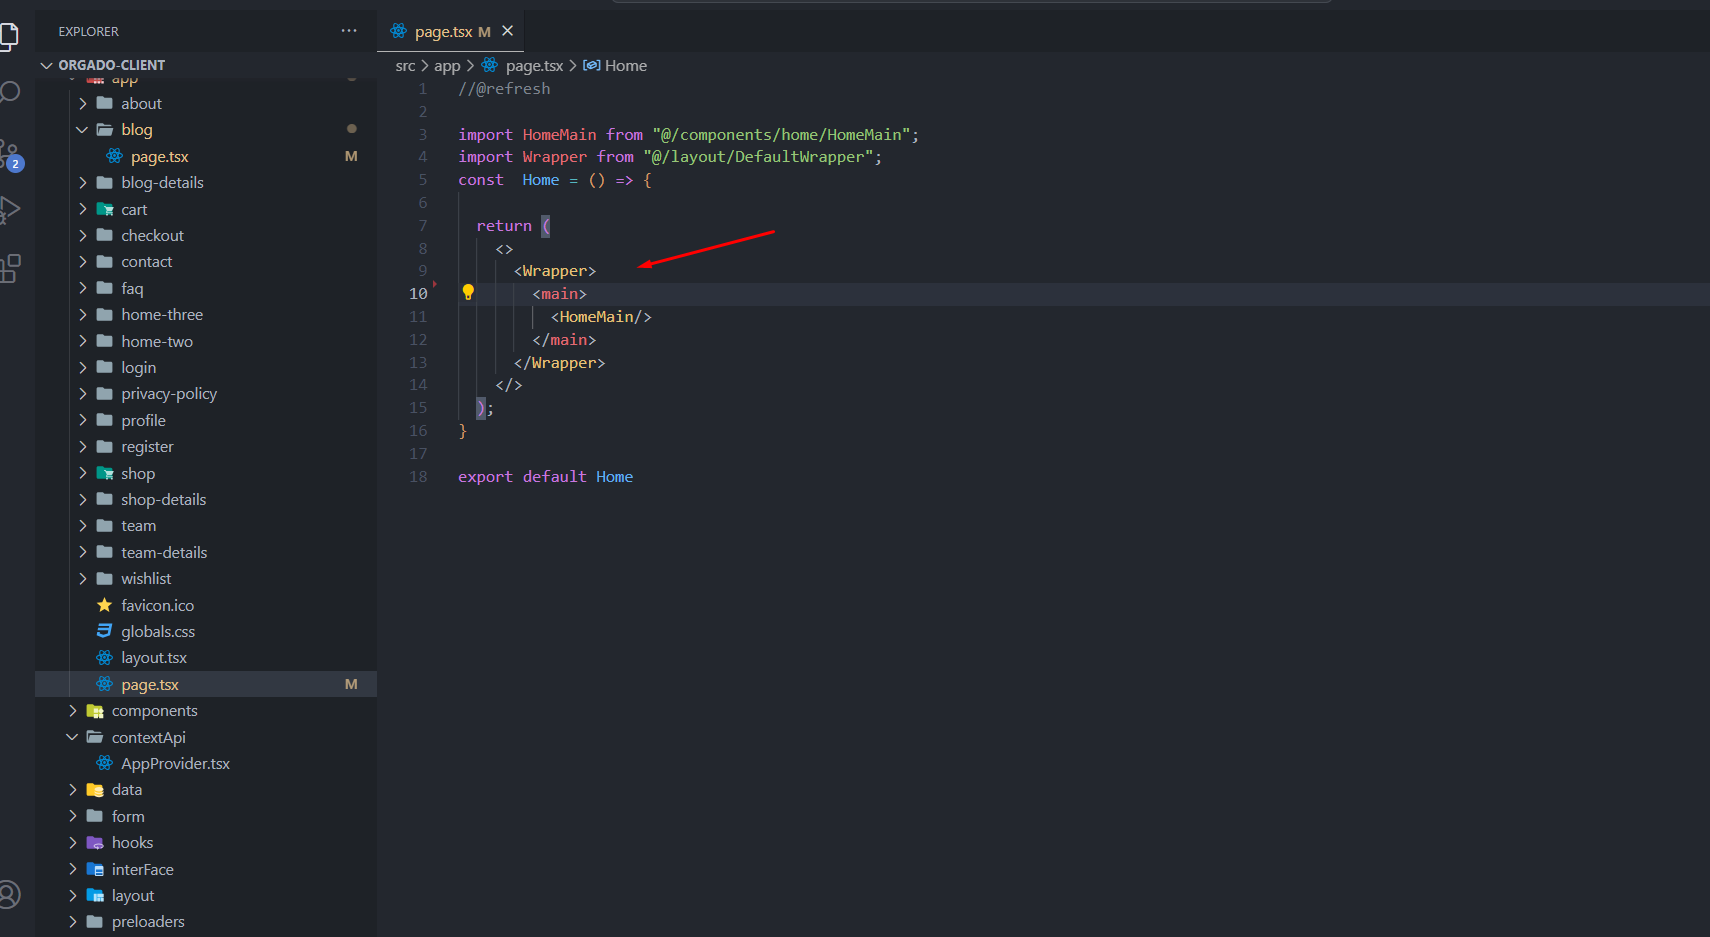
Where Should You Use Wrapper
Use Wrapper In Every page.tsx file Like That
Orgado Client Features
User Authentication
- User authentication is the process by which users are required to register and log in to access your website's features
- It ensures the security of user accounts and allows for personalized experiences
- Users can create accounts, log in, and manage their profile information
Buy Product
- User Can Buy Product With Card
- User Can Take Refund
- User Can Cancel His/Her Orders Befor Package Product By Owner
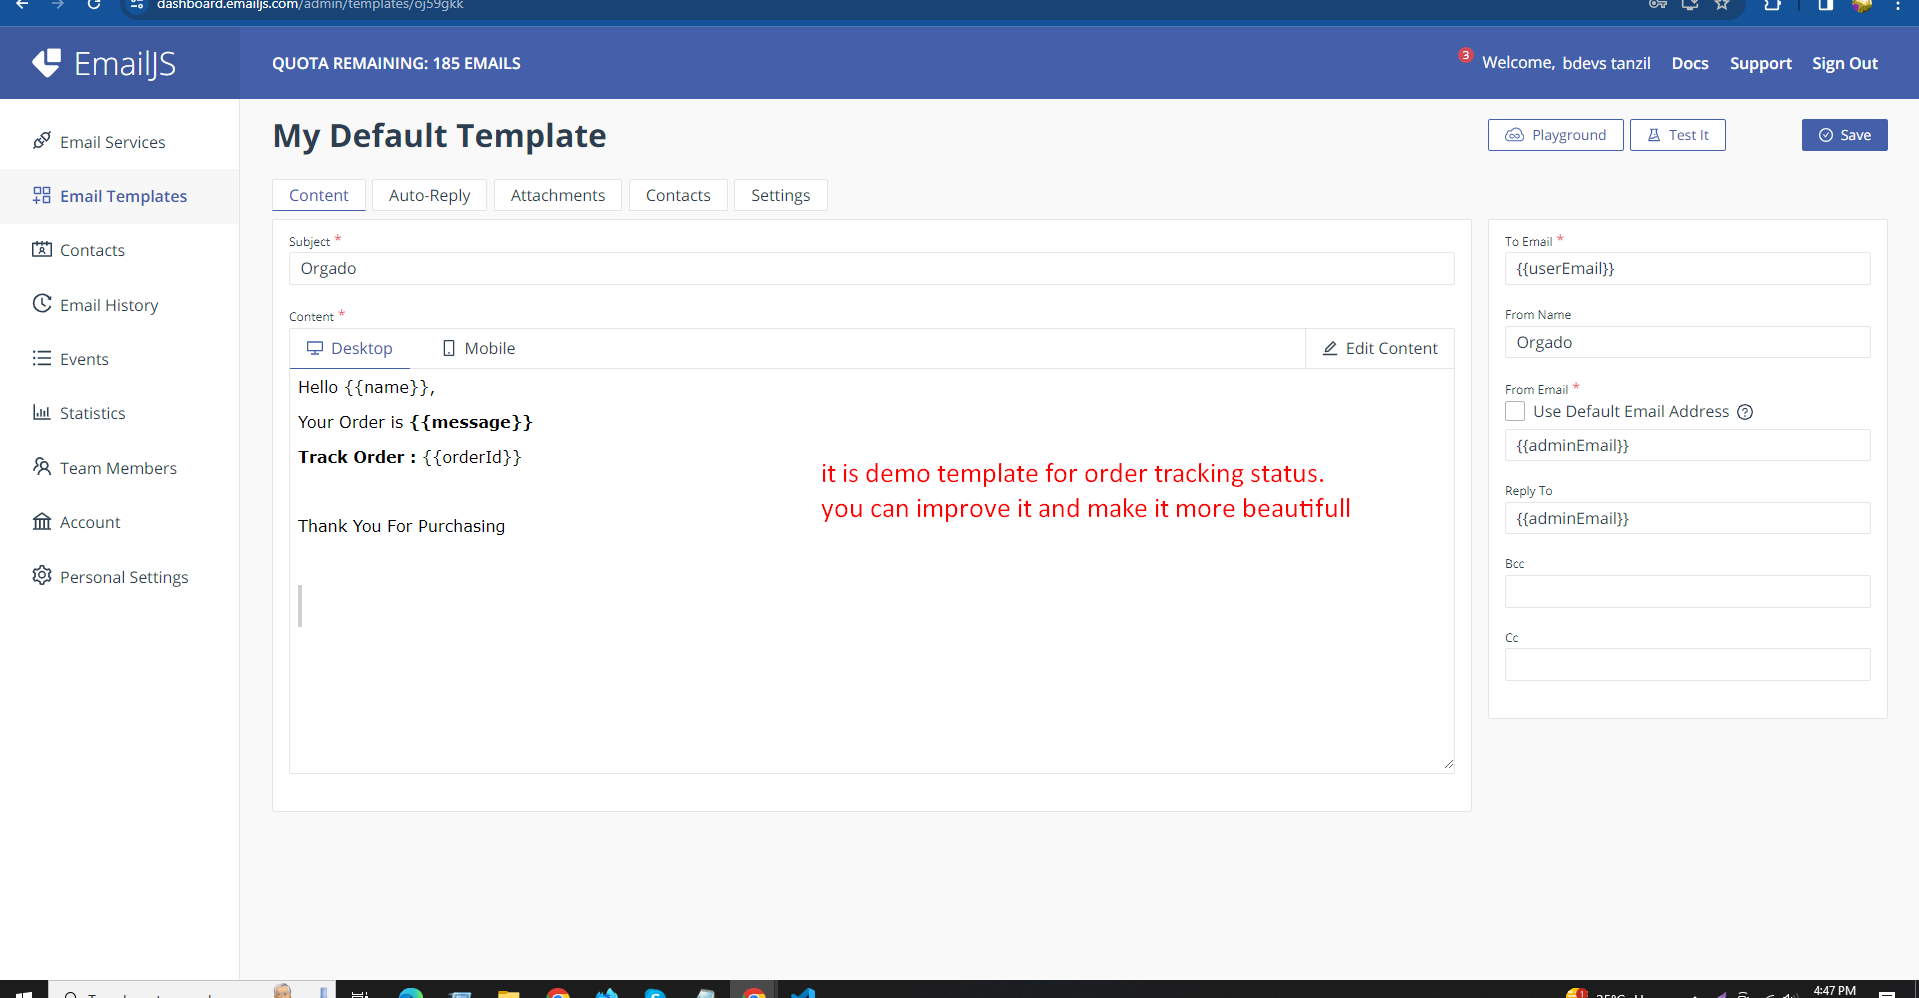
Order Tracking
- User Can Check His Shipment Status Using His Order Id (Without Login)
- User Will Get Email For Shipment Status, Like, Order Process, Shipment Etc.
Stripe Payment Method
- Stripe is a popular payment gateway that allows you to securely process payments online
- It supports various payment methods such as credit cards, debit cards, and digital wallets
- Integration with Stripe enables smooth and secure transactions on your website.
User Profile Dashboard
- A user profile dashboard provides users with a centralized place to manage their account settings, order history, cart product , wishlist product and personal information.
- Users can view past orders, update their contact details, and Update and delete their Review Ratting and comments.
Rating and Review System
- This feature allows customers to rate and write reviews for products they have purchased.
- Reviews provide valuable feedback to other customers and can help in the decision-making process.
- Ratings and reviews can be displayed alongside product listings.
Advanced Product Search and Filtering
- Advanced search and filtering options help customers quickly find the products they are looking for.
- Features may include keyword search, filters by category, Brand, and other attributes.
Comment System
- The comment system allows users to leave comments or ask questions about blogs article.
- It can serve as a discussion platform where customers can interact and share insights.
Offer Products
- This feature enables you to highlight and promote special offers or discounted products.
- Customers can easily identify and access deals and promotions on your website.
Best Selling Products
- Showcase a section for best-selling products to highlight popular items.
- This can help boost sales by drawing attention to products that are in high demand.
Top Rated Products
- Display a section featuring top-rated products based on customer reviews and ratings.
- It helps customers discover products that have received positive feedback from others.
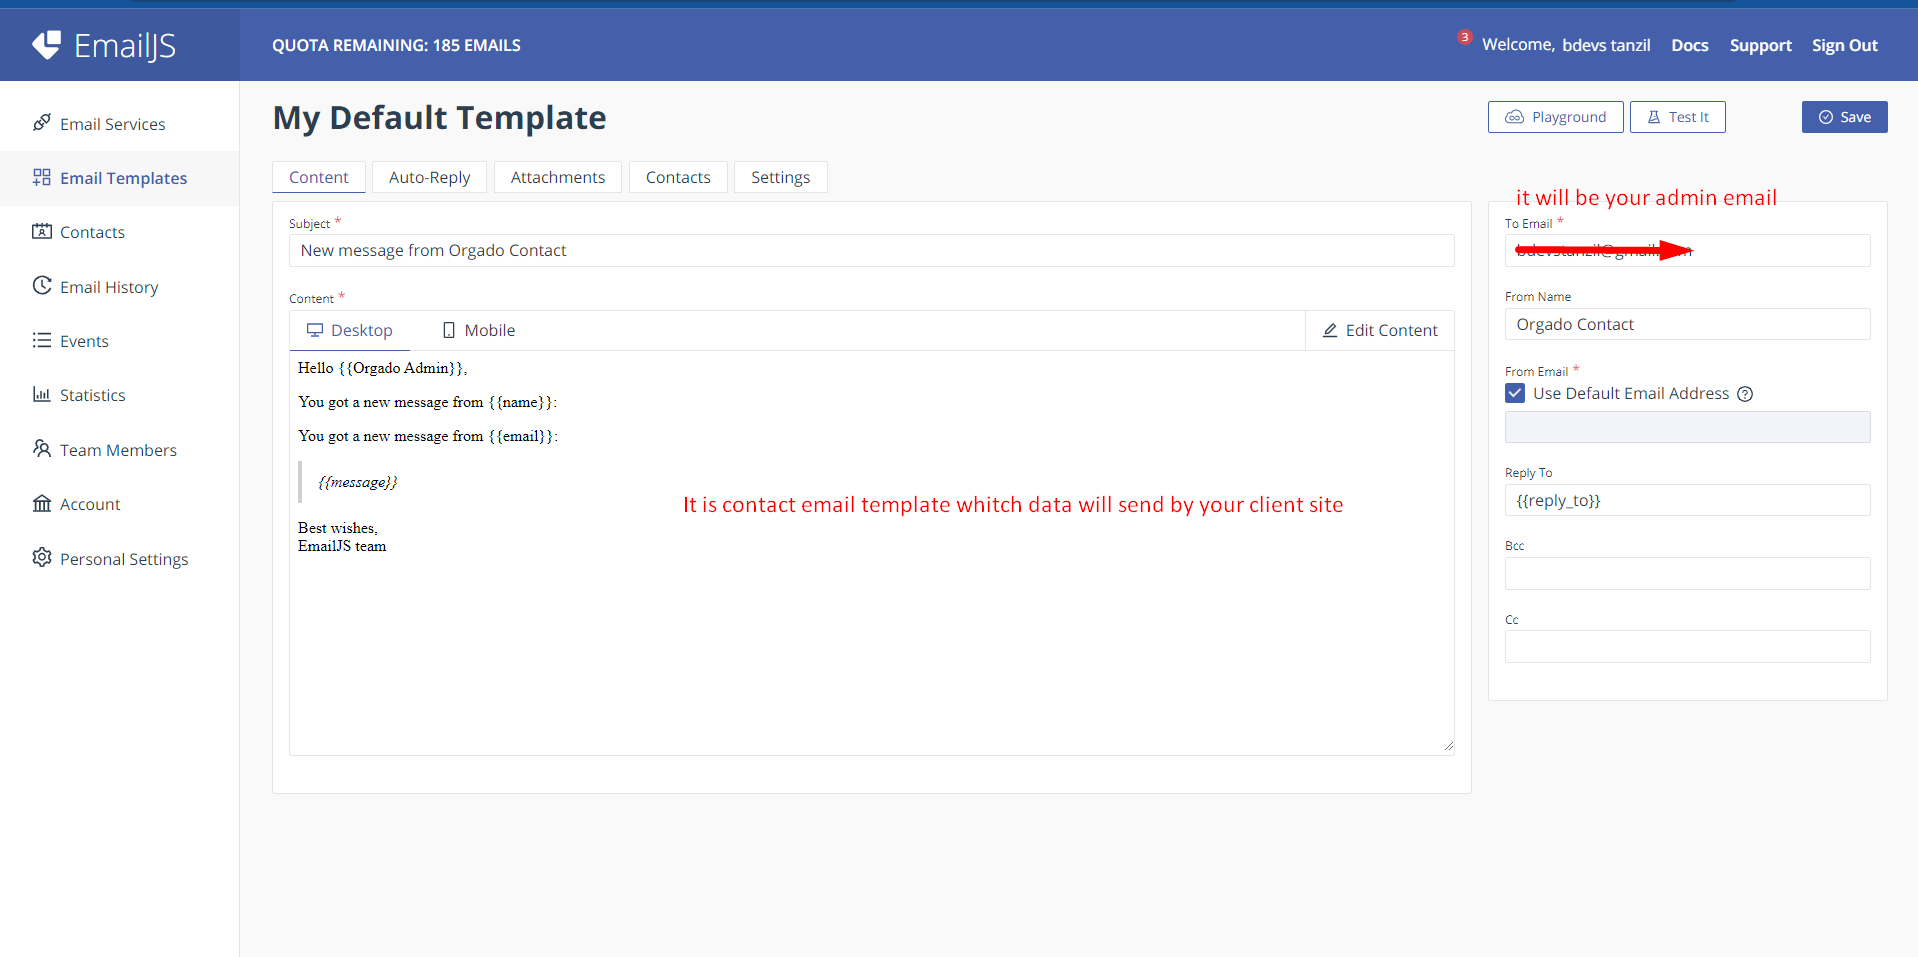
Send Message to Admin
- Provide a contact page or form where users can send messages or inquiries to the website's admin or customer support.
- This feature facilitates communication and support between users and your team
- Admin Will get Message though Email
Orgado Admin Features
Provides quick access to essential sales reports
- Today's sales report
- Last 7 days report
- Last 30 days report
- Last year's report
Recent Clients
- Displays a list of users who have made recent purchases.
- Helps monitor customer activity and engagement.
Clients Orders
- Admin Will Check the Product Status And Update It. The Client Will Get an email from Admin us with the Order Status
- Admin Will Get Notification If Any Order Was Cancelled By User
- After Verify, The Admin Will Accept The Cancelled Order And Admin Will Give Back The Money To Client
Cashflow
- Presents a chart depicting the flow of revenue over the past 30 days.
- Includes product sales data with quantities and prices.
Best Selling Products
- Offers insights into the top-performing products on the platform
- Helps in identifying high-demand items.
Recent Sold Products
- Lists products that have been recently sold.
- Provides a real-time view of product popularity.
Pie Chart Report
- Analyzes and visually represents product sales data categorized by product categories.
- Aids in understanding the distribution of sales across different product types.
Recent Users
- Displays a list of newly registered users.
- Allows for monitoring user growth and engagement.
Product Management
- Provides CRUD (Create, Read, Update, Delete) operations for products.
- Admins can create, update, view, and delete product listings.
Orders
- Offers access to a client's order history.
- Allows admins to view and manage orders placed by customers.
Blog Management
- Offers CRUD operations for blog posts.
- Admins can create, update, read, and delete blog articles.
Clients
- Provides a list of clients along with their order history.
- Allows admins to view and manage orders by client, including their names and order details.
User Role Management
- Enables admins to manage user roles.
- Admins can promote users to admin status or demote admins to regular users.
Product Category Management
- Offers CRUD operations for product categories and Brand.
- Admins can create, update, read, and delete product categories and Brand.
Offer Management
- Offers CRUD operations for Offer Products.
- Admins can create, update, read, and delete Products.
How To Use Footer (Client Site)
Footer File Structure
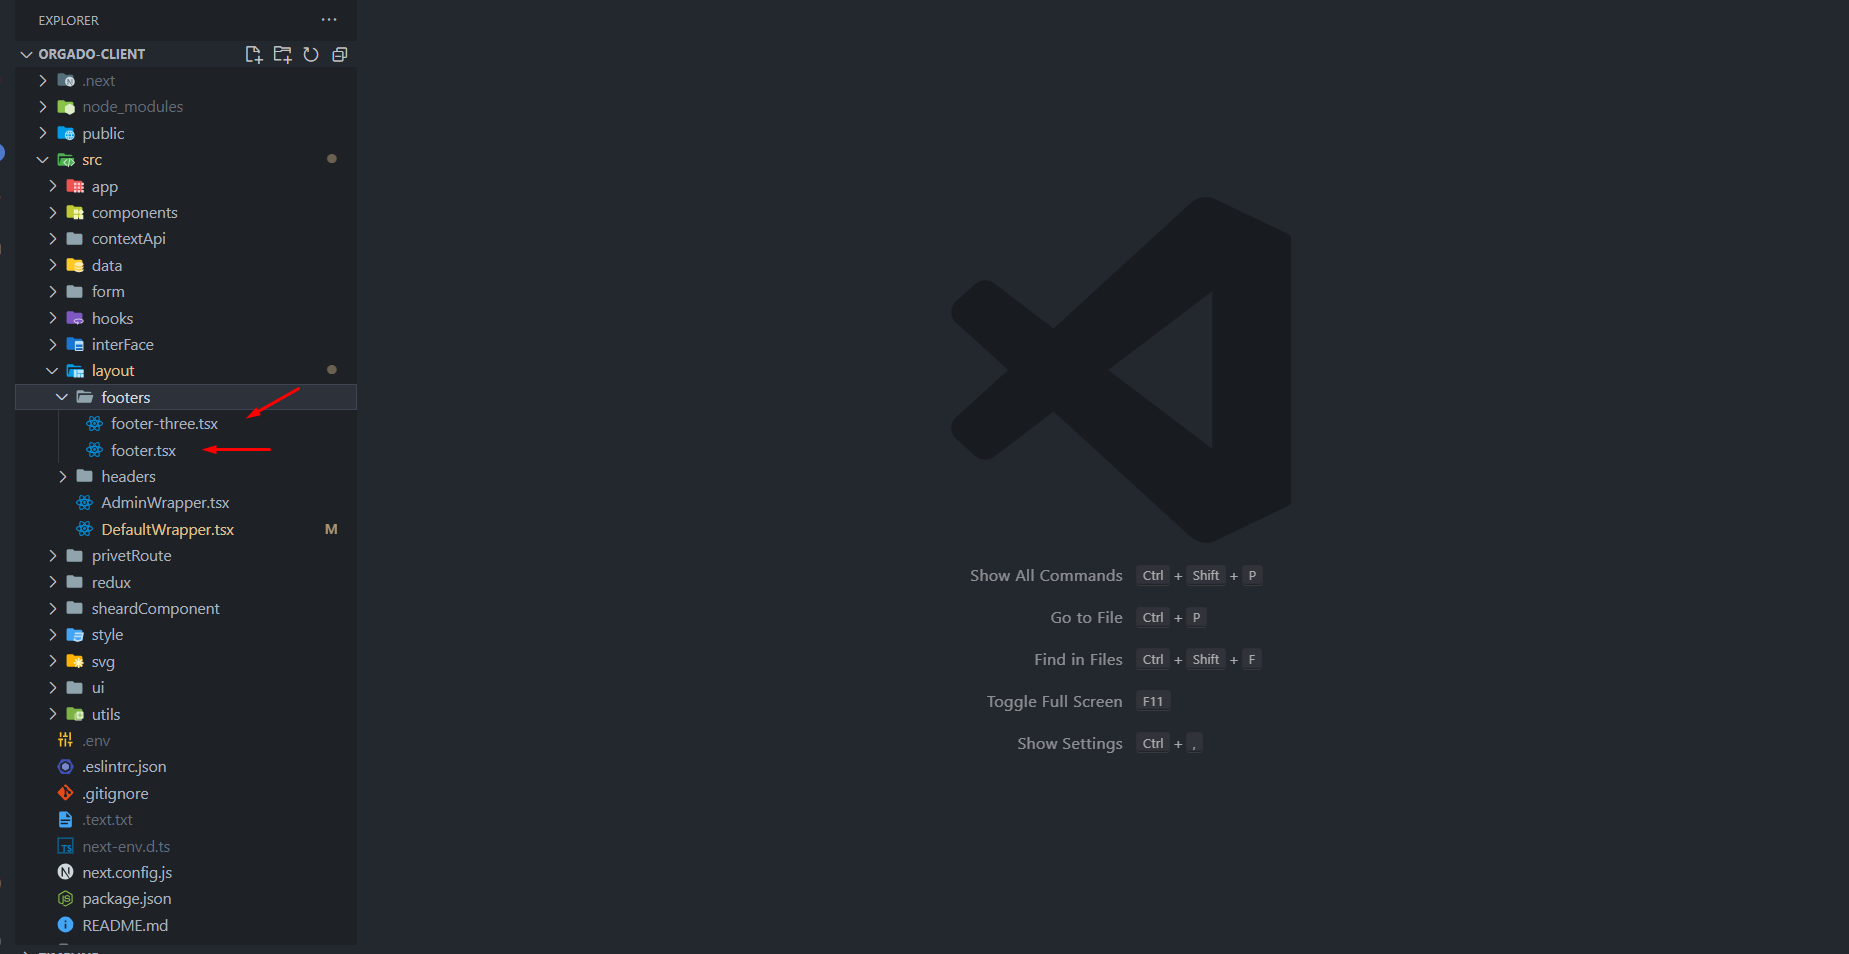
Use Footer In Wrapper

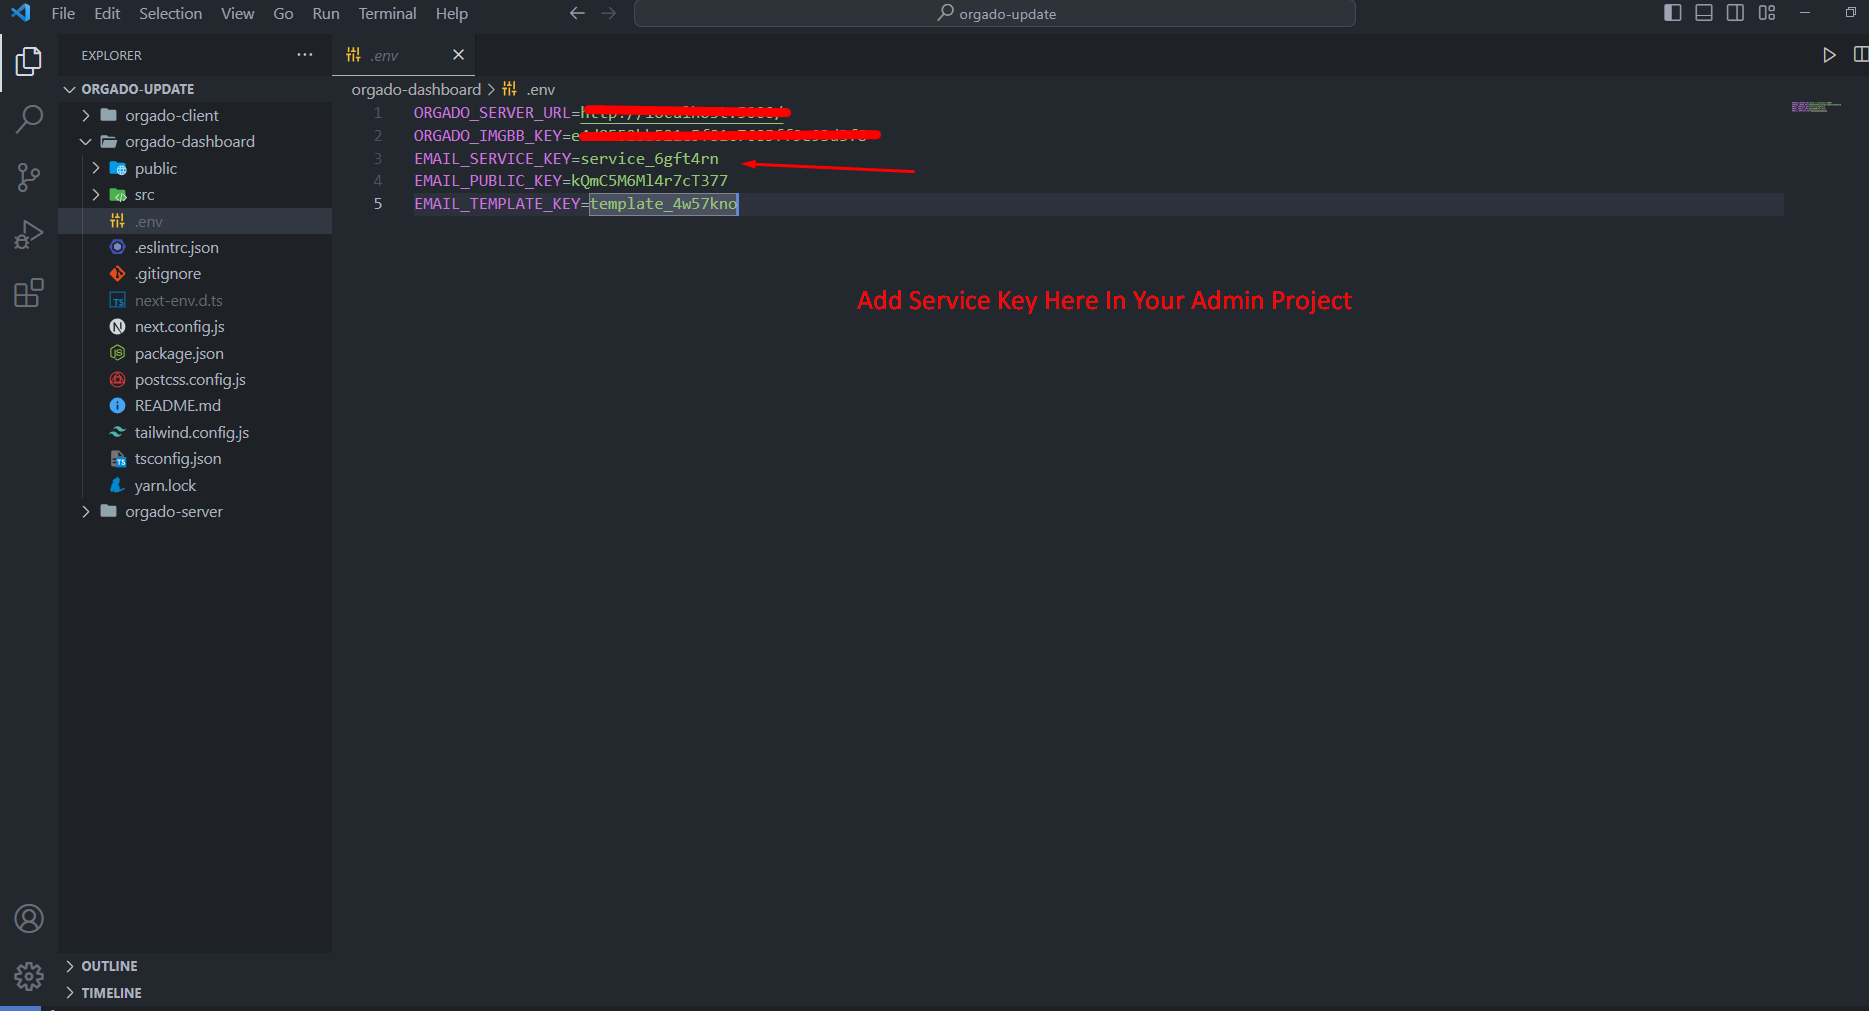
How To Configur Your Email Service Configaration
Login Email Js
Want Sign Up In Email Js ? Click Here
[notes: order tracking template key will be insert on dashboard .env file,Contact Info template key will be insert on Client Site .env file, and Need Separate Service Key/Id For Order Tracking and Contact Info]
Email Service Configaration Steps
1. After Login Go Account Follow This Picture and Copy The Public Key It Will Be Insert Admin And Client Project .env File
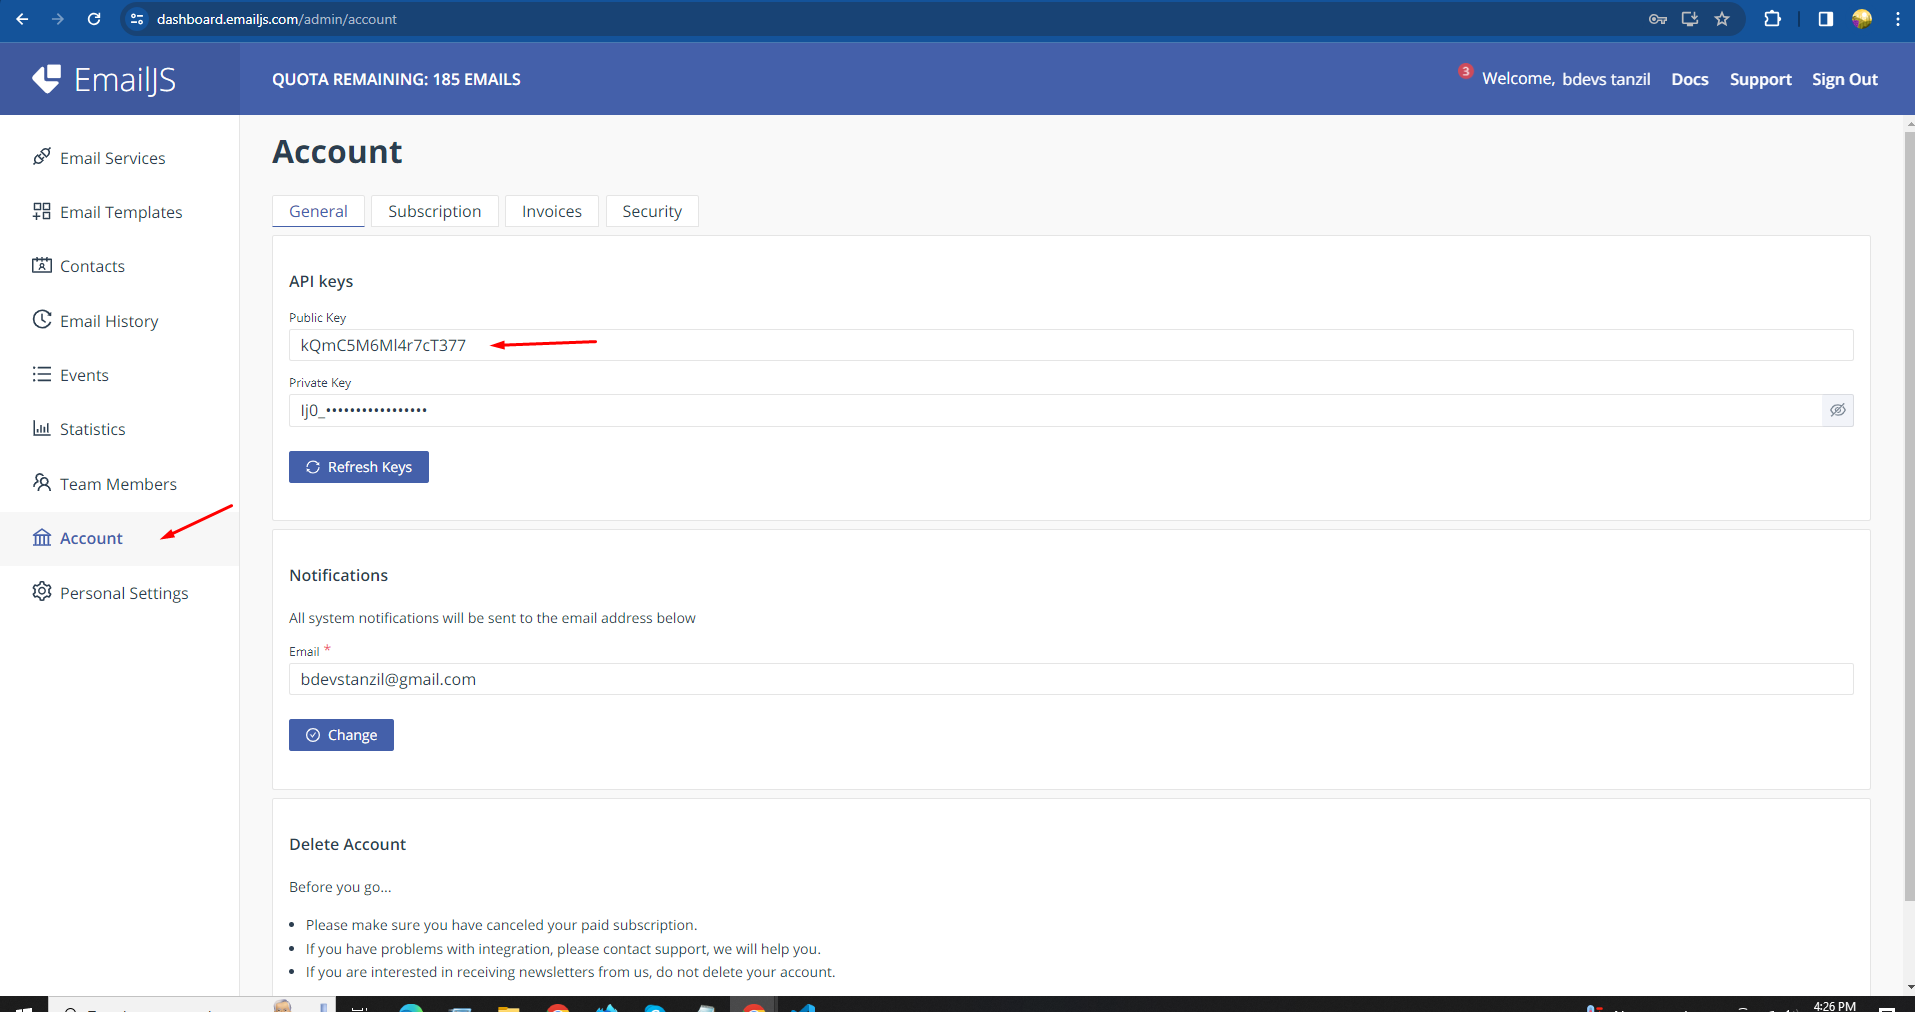
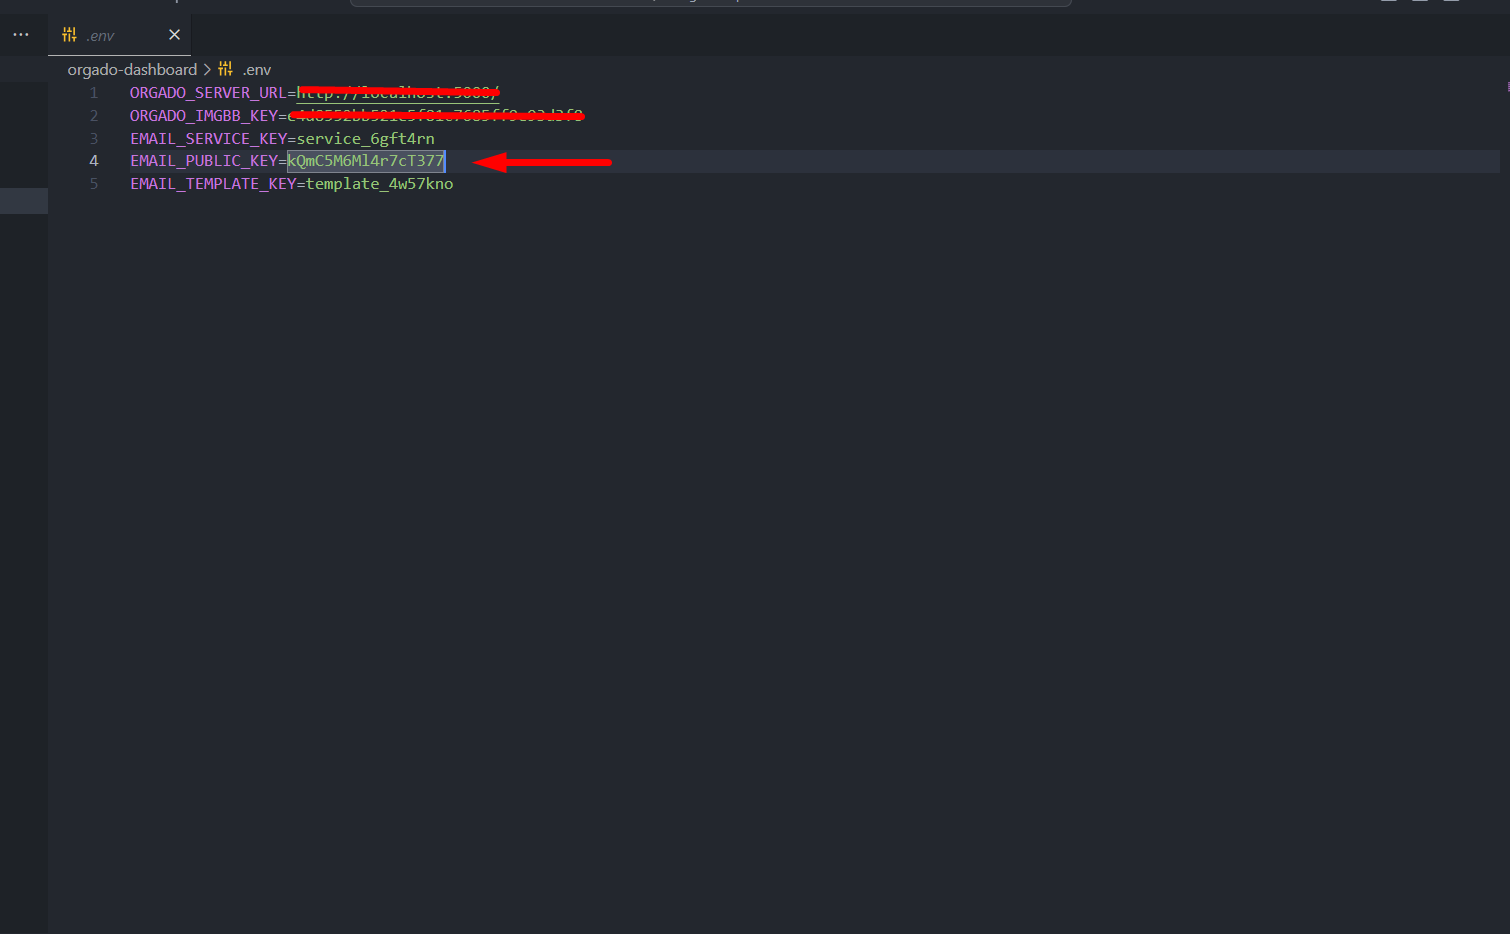
2. Add Public Key Admin And Client Both Site .env File
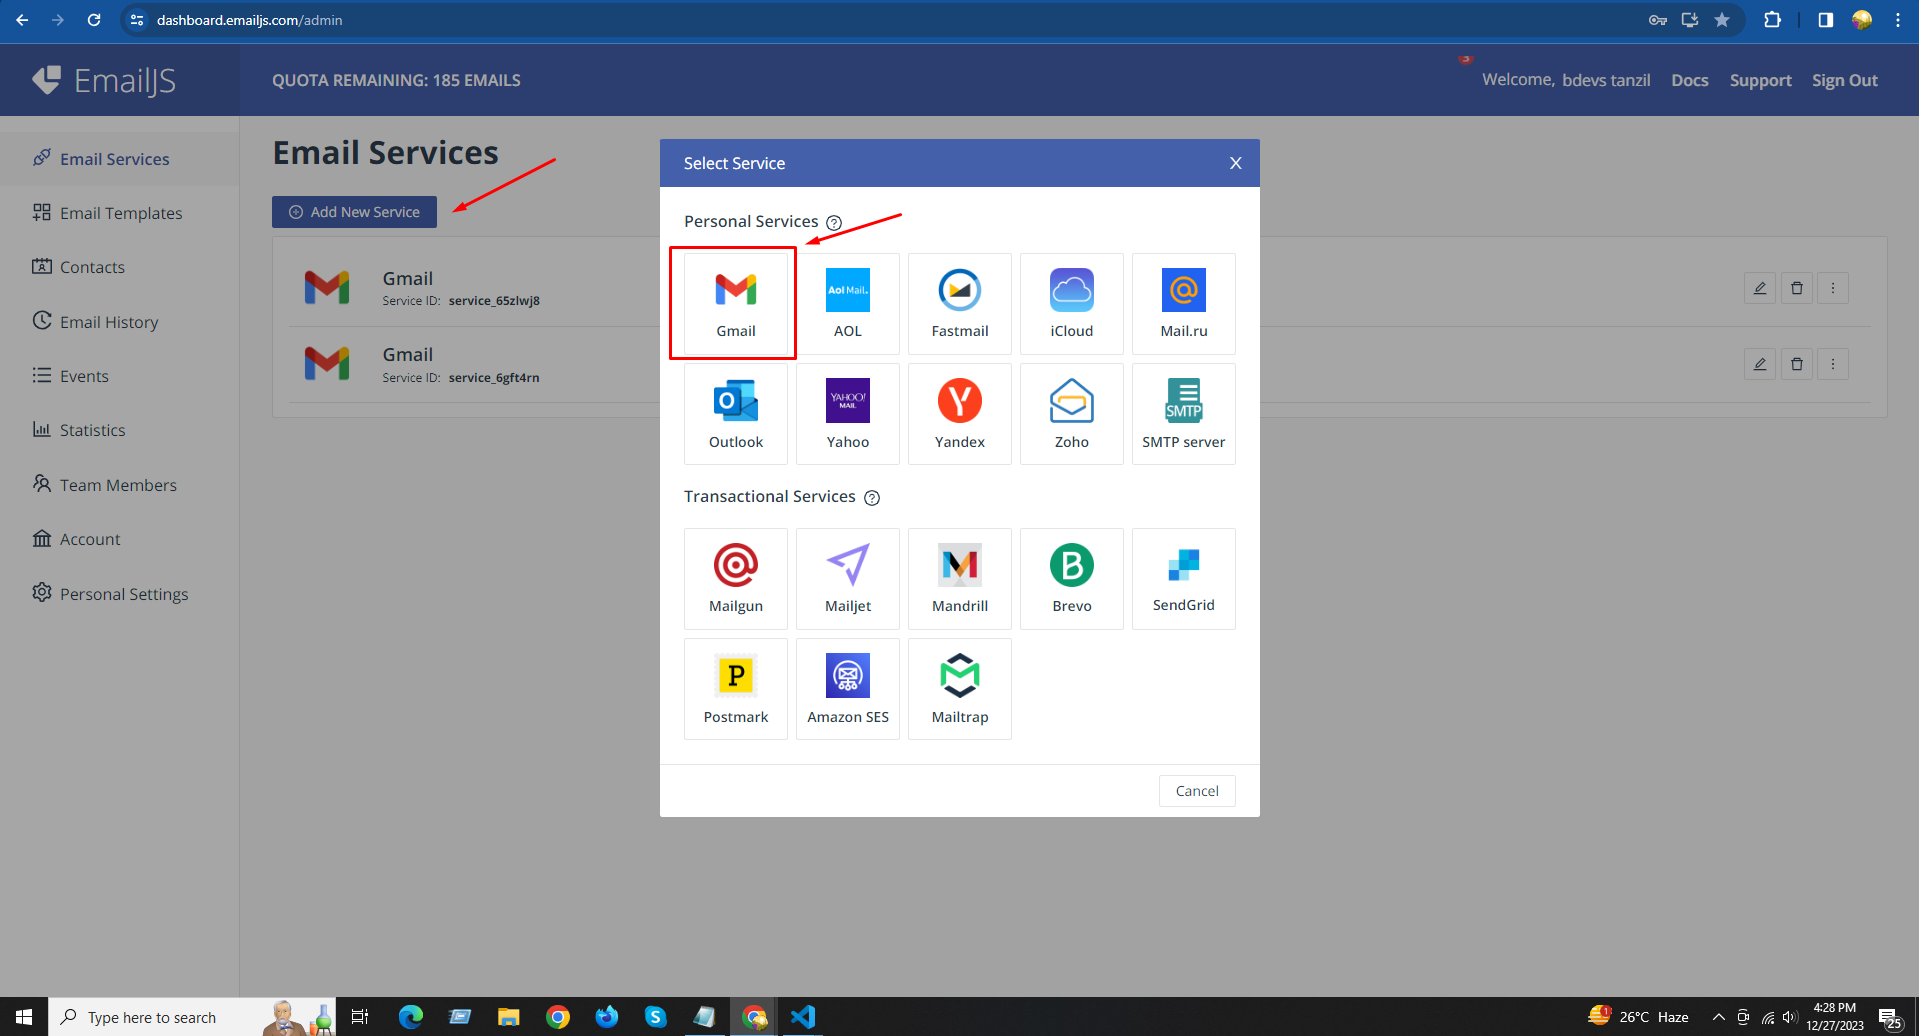
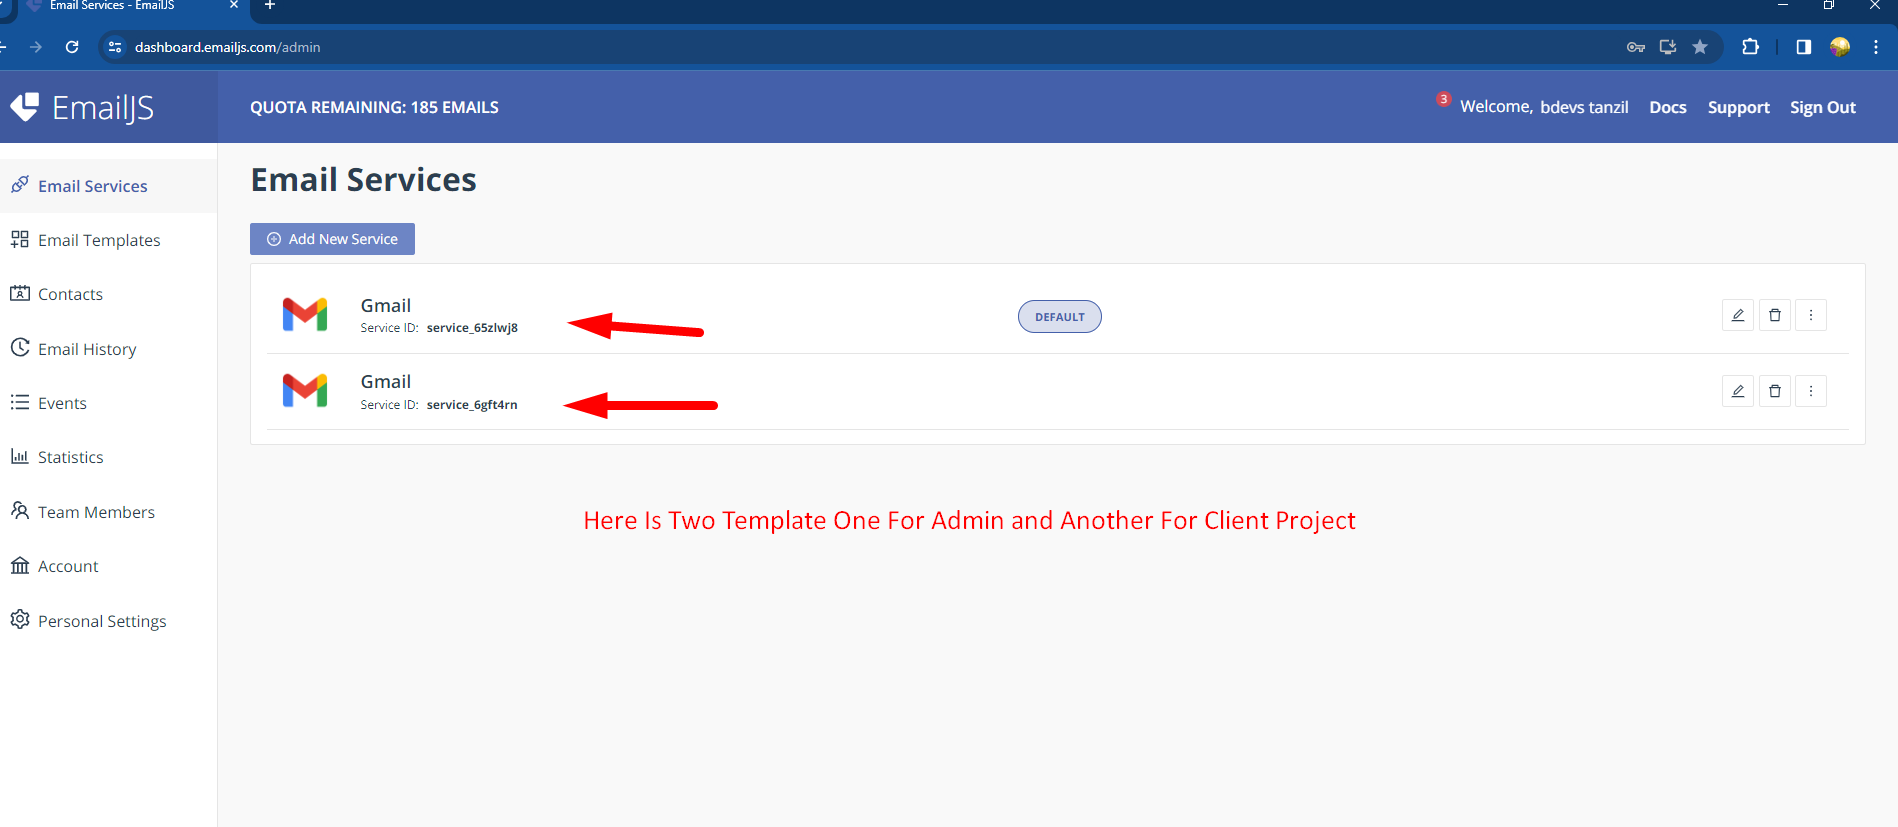
3. Create Email Service . It Will Be Two Service One For Client And One For Admin.
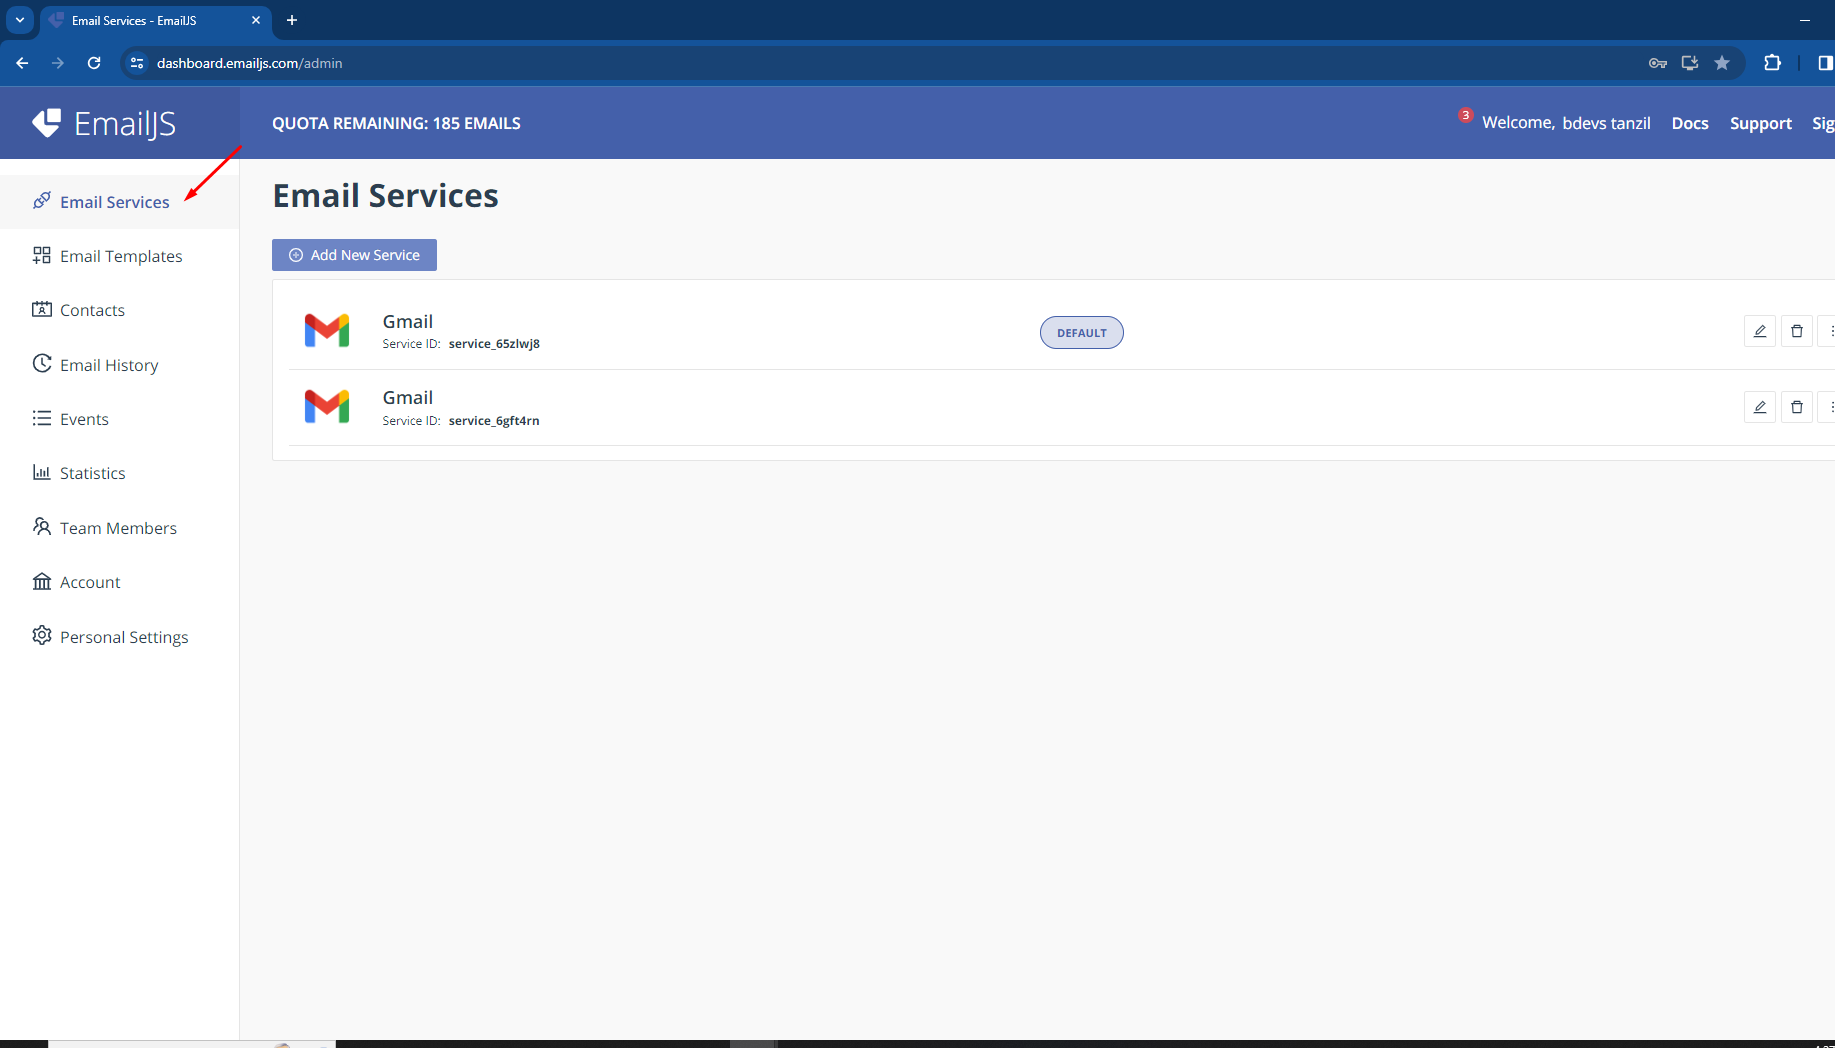
4. Connet With Gmail (We Used It)
5. Connect With Your Gmail Account And Give it Access
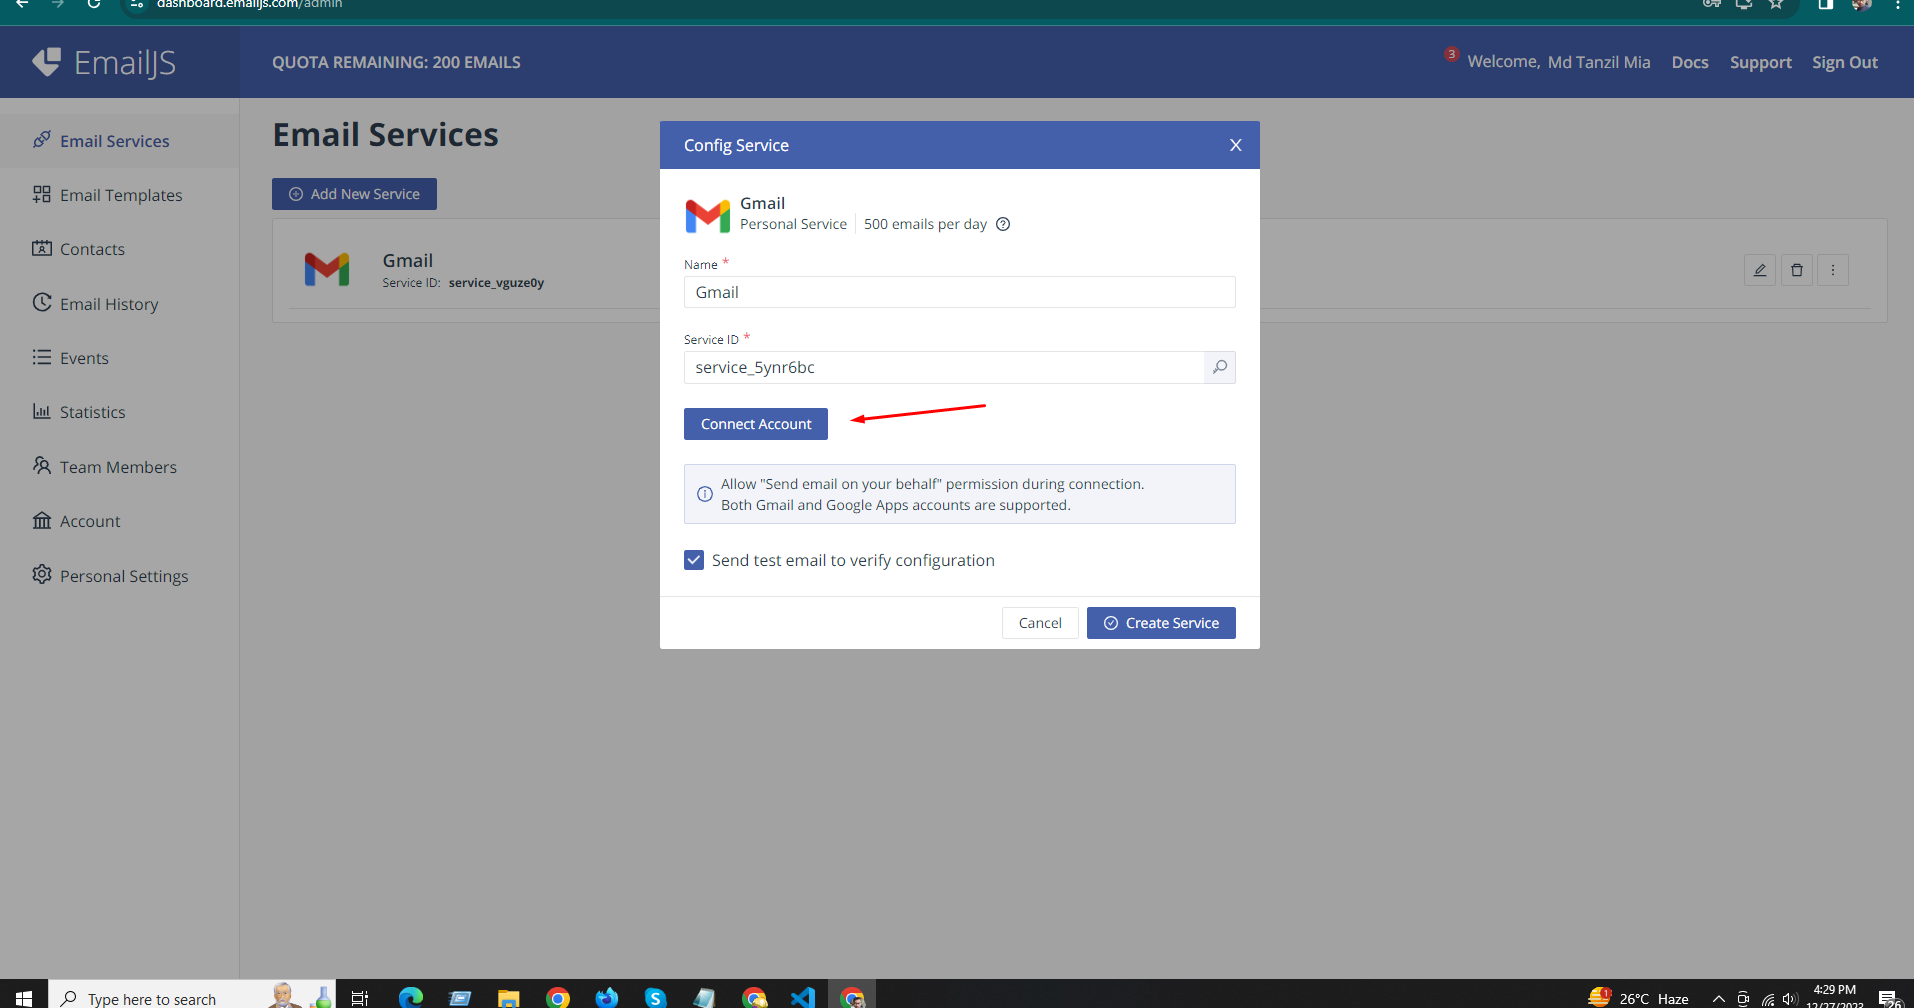
6. Then Create Service
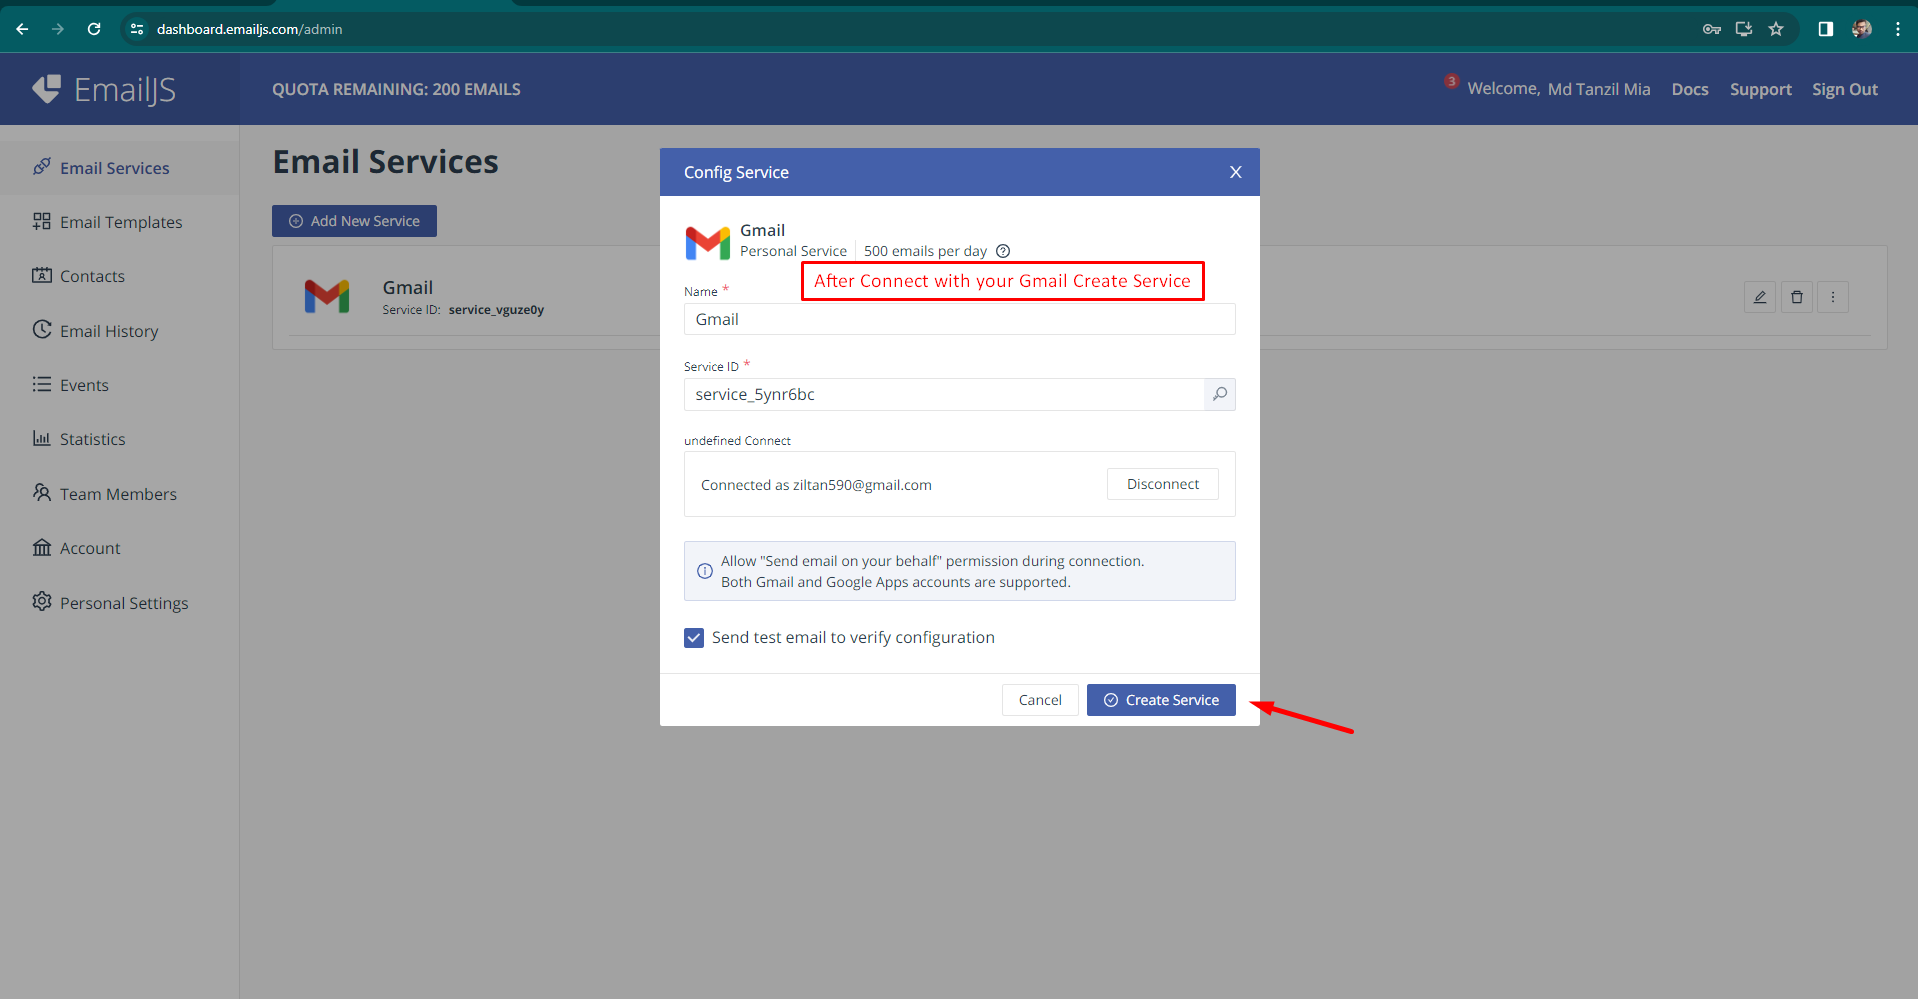
7. Then Create Service One For Client And One For Admin
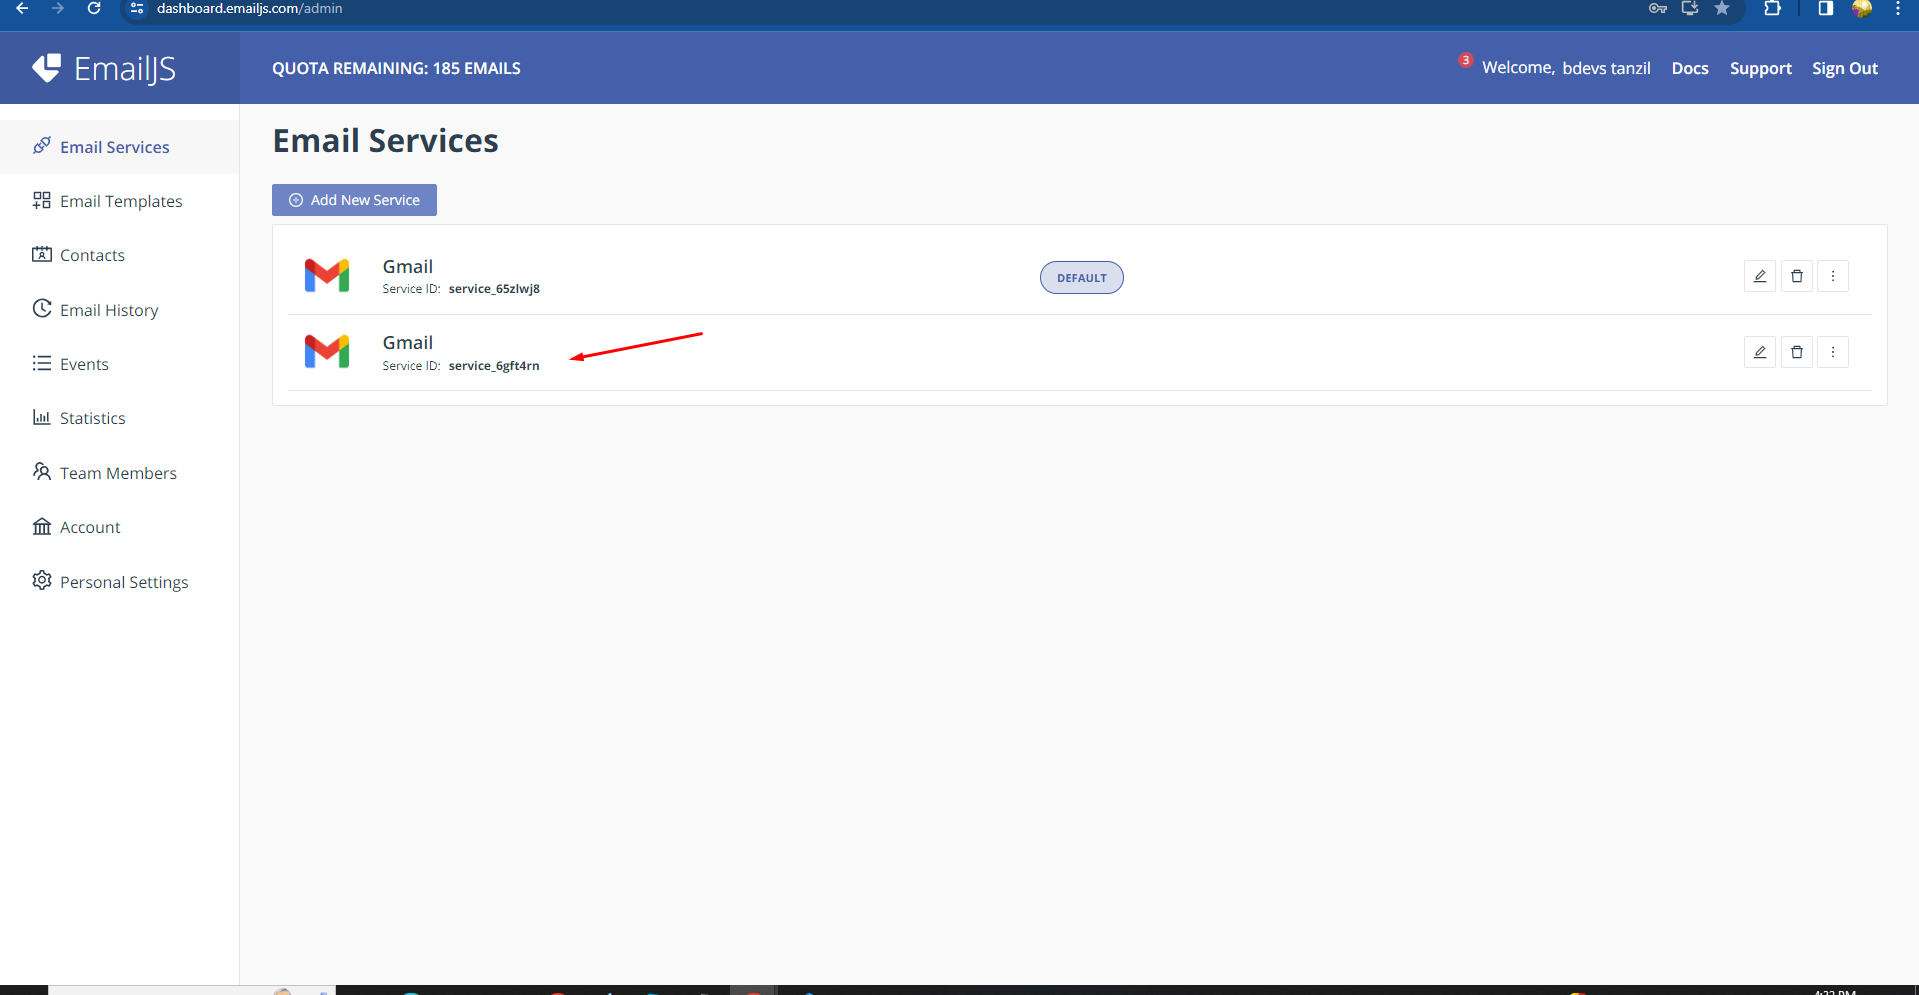
8. Then Copy And Pest Your Service Id To .env file One Will Be Admin And One Will Be Client
9. Create Email Template One For Admin And One For Client
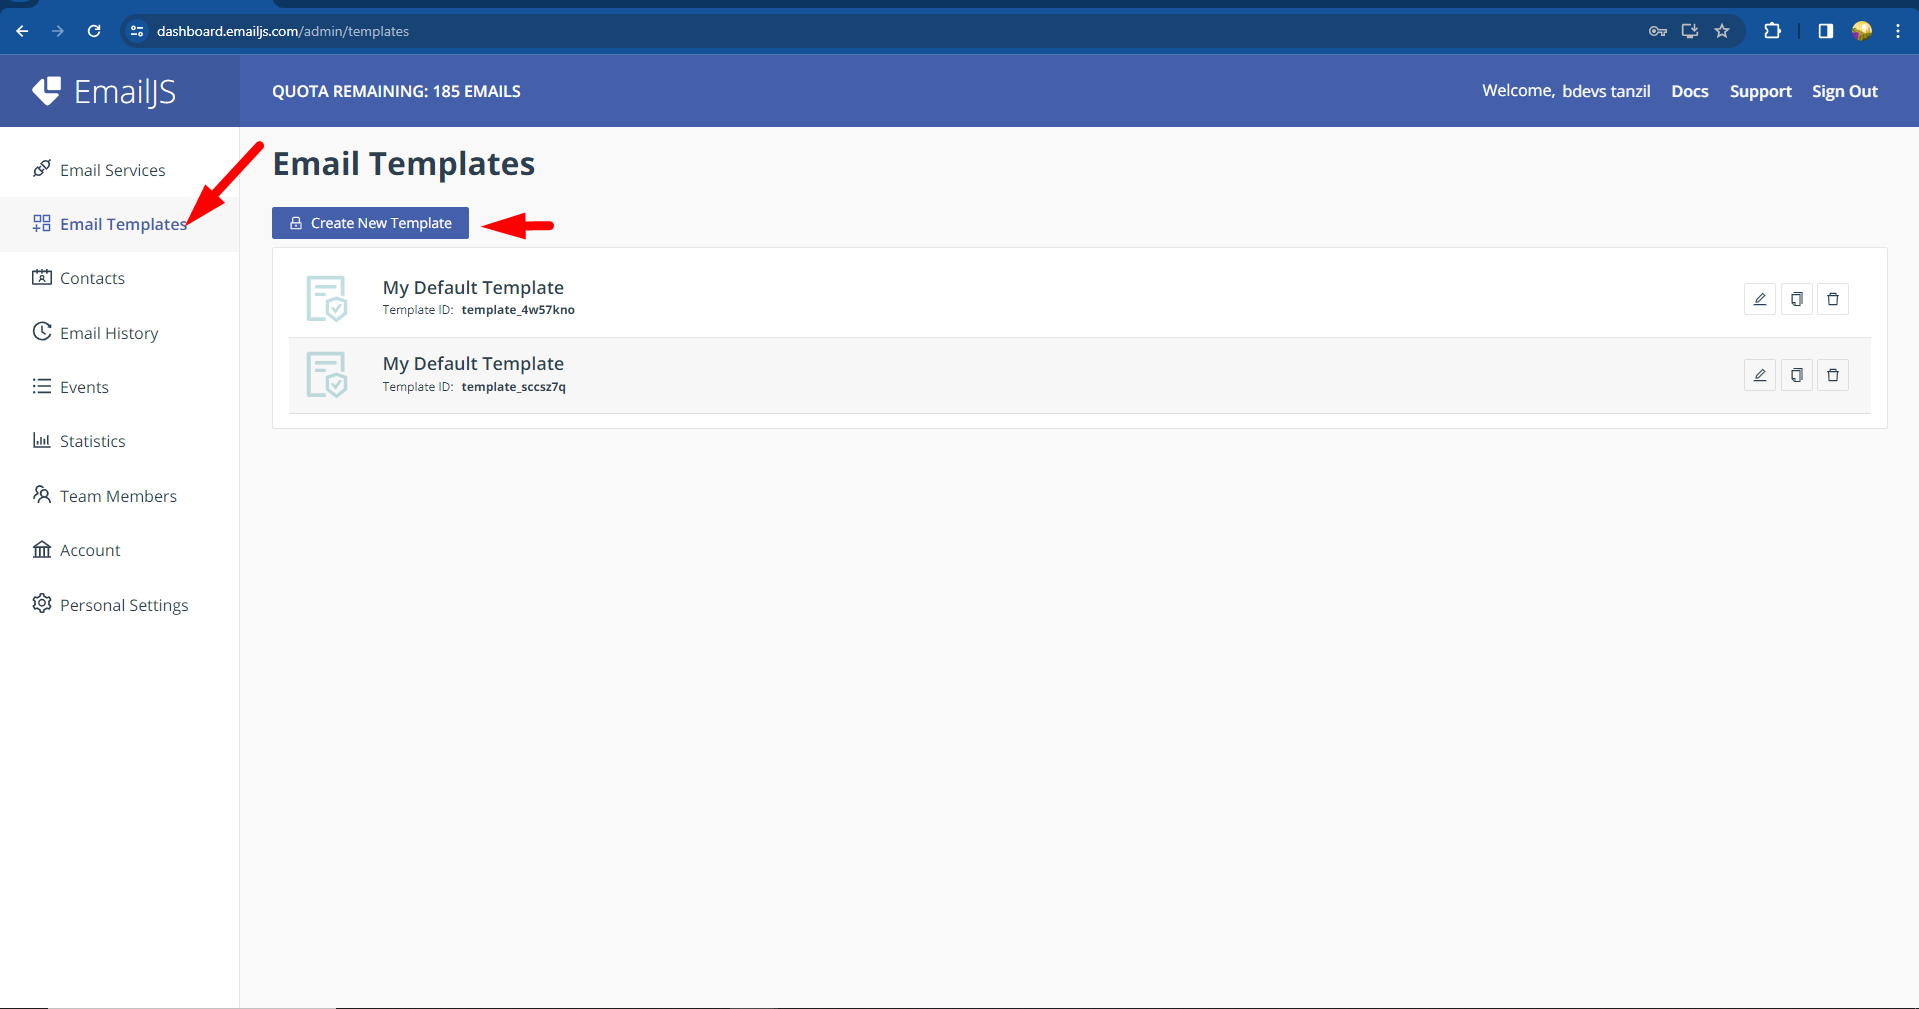
10. Copy Template Id , If Your Template is for Order Proudct Status then Pest It On Admin Project .env File
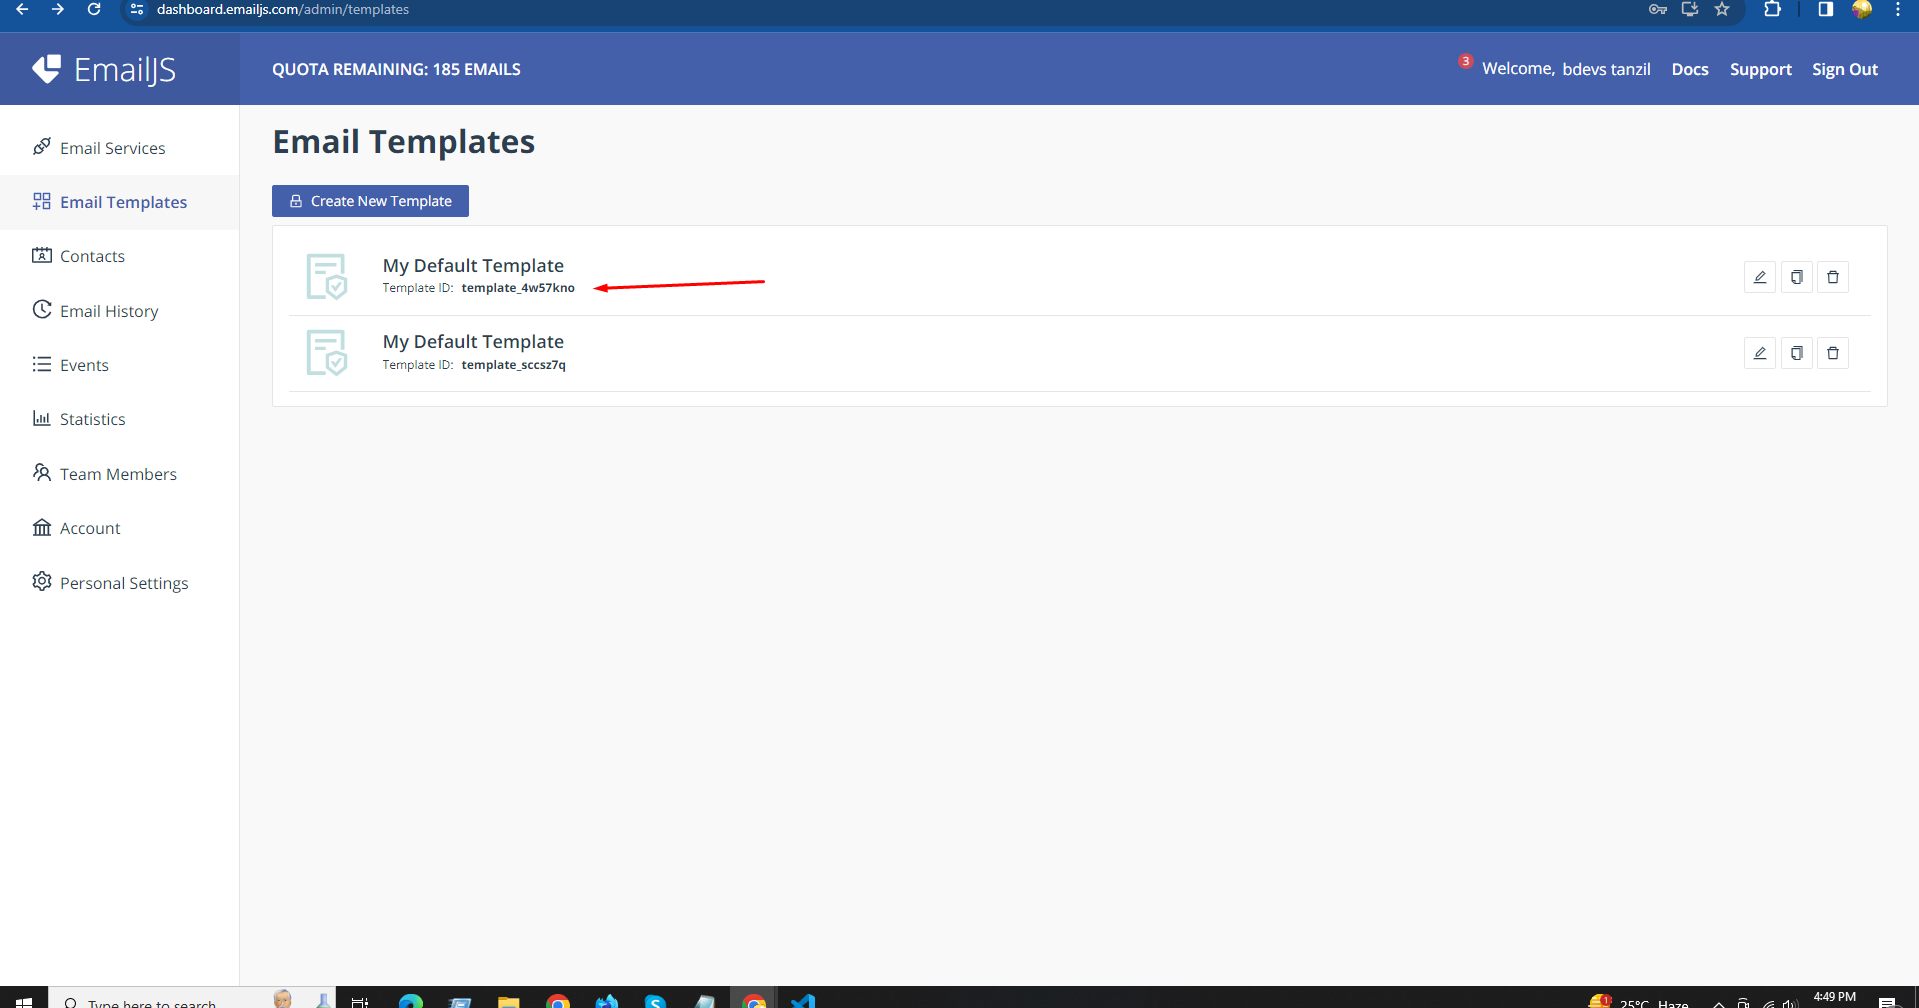
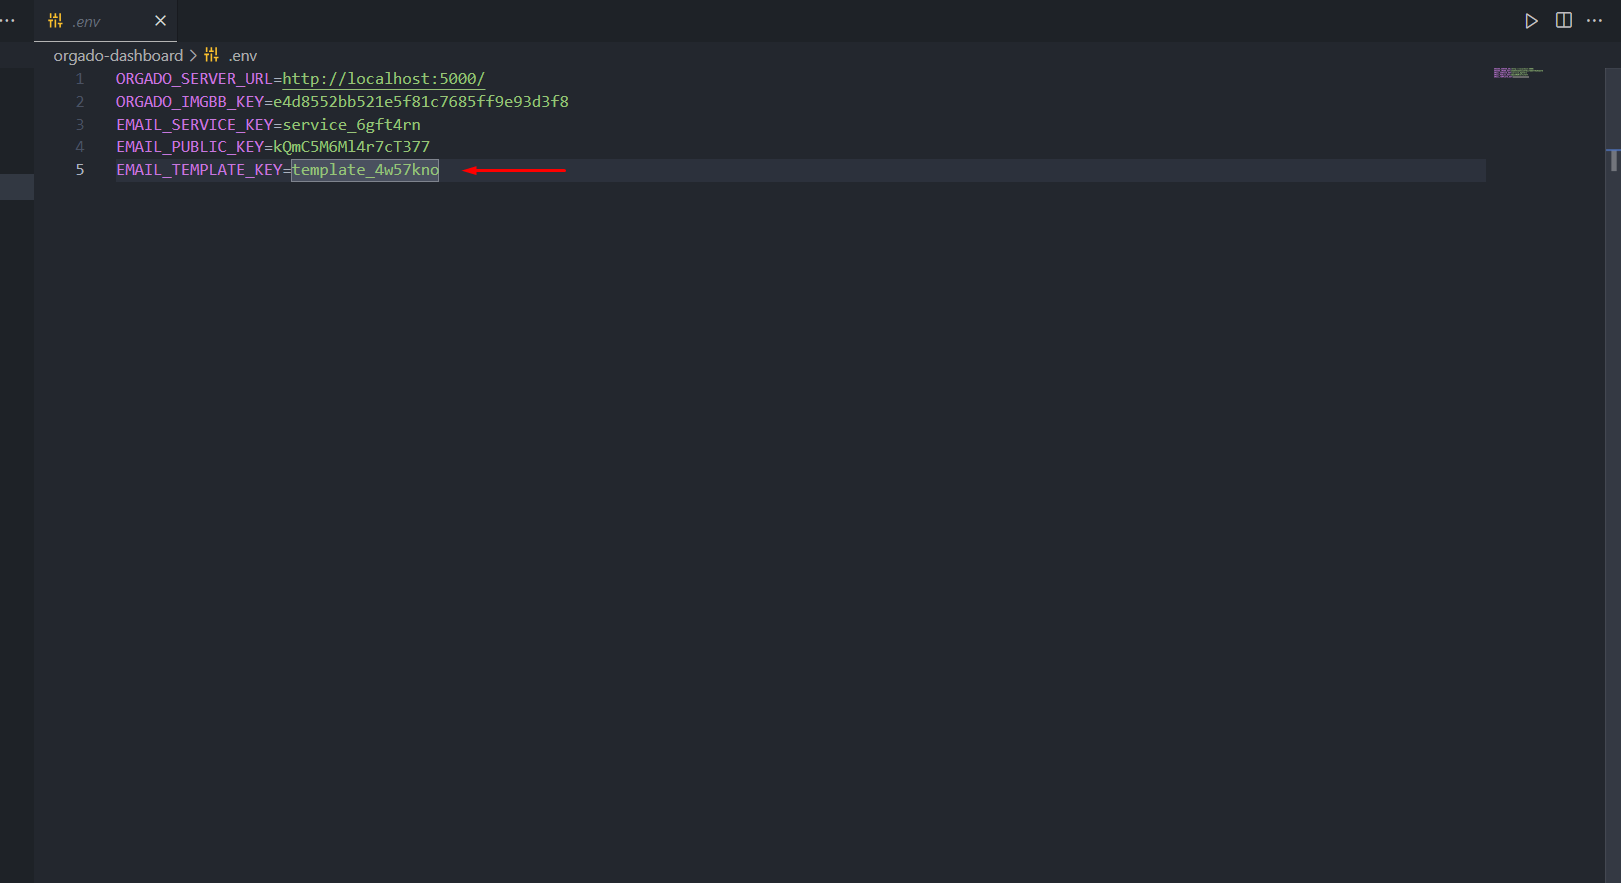
10. Copy Template Id , If Your Template is for Contact then Pest It On client Project .env File
[Note: You Have To Buy Email Service Package For Email Service ]
Want To See Pricing Plan
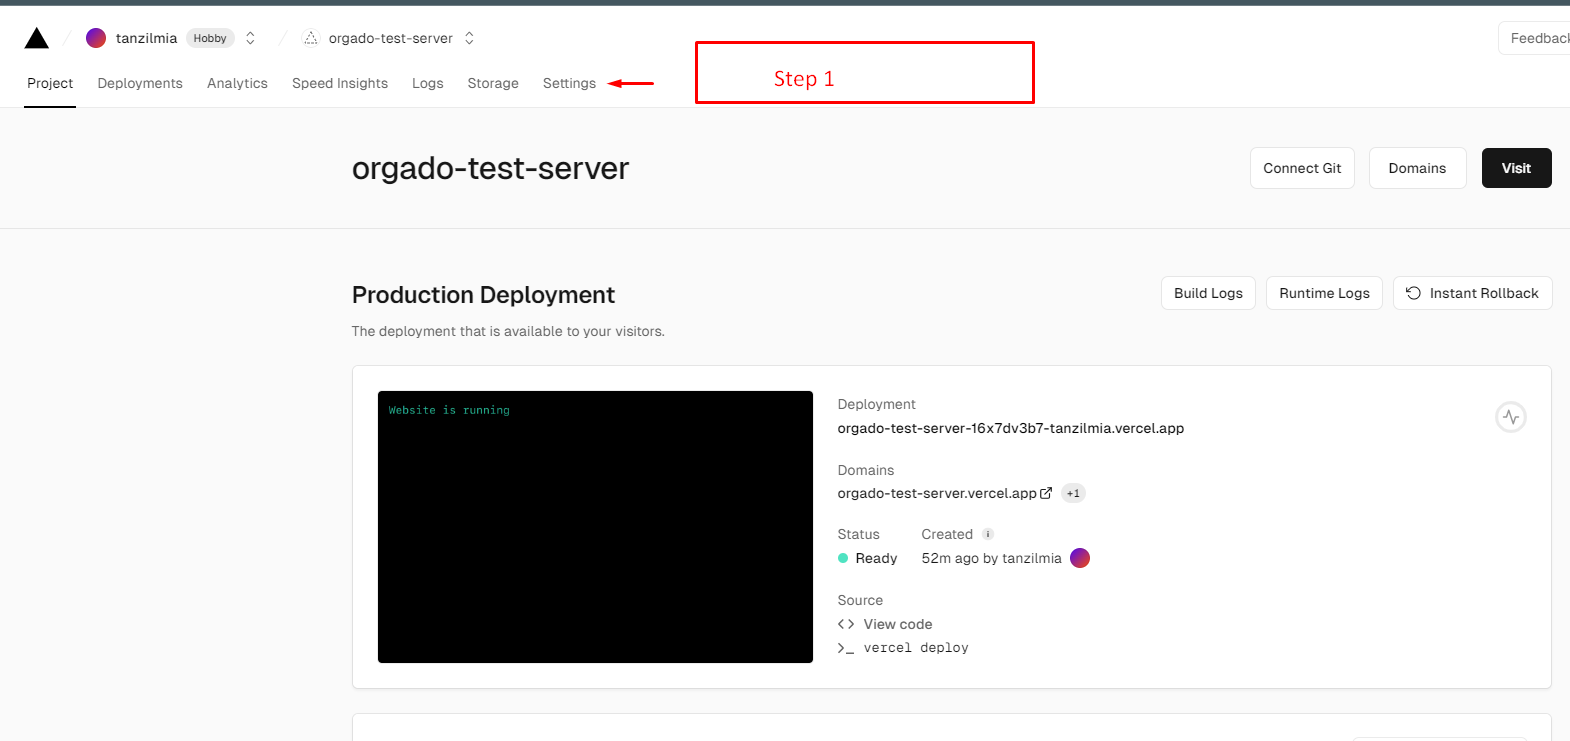
1. Host Your Server Project On Vercel
After Login Follow This Steps
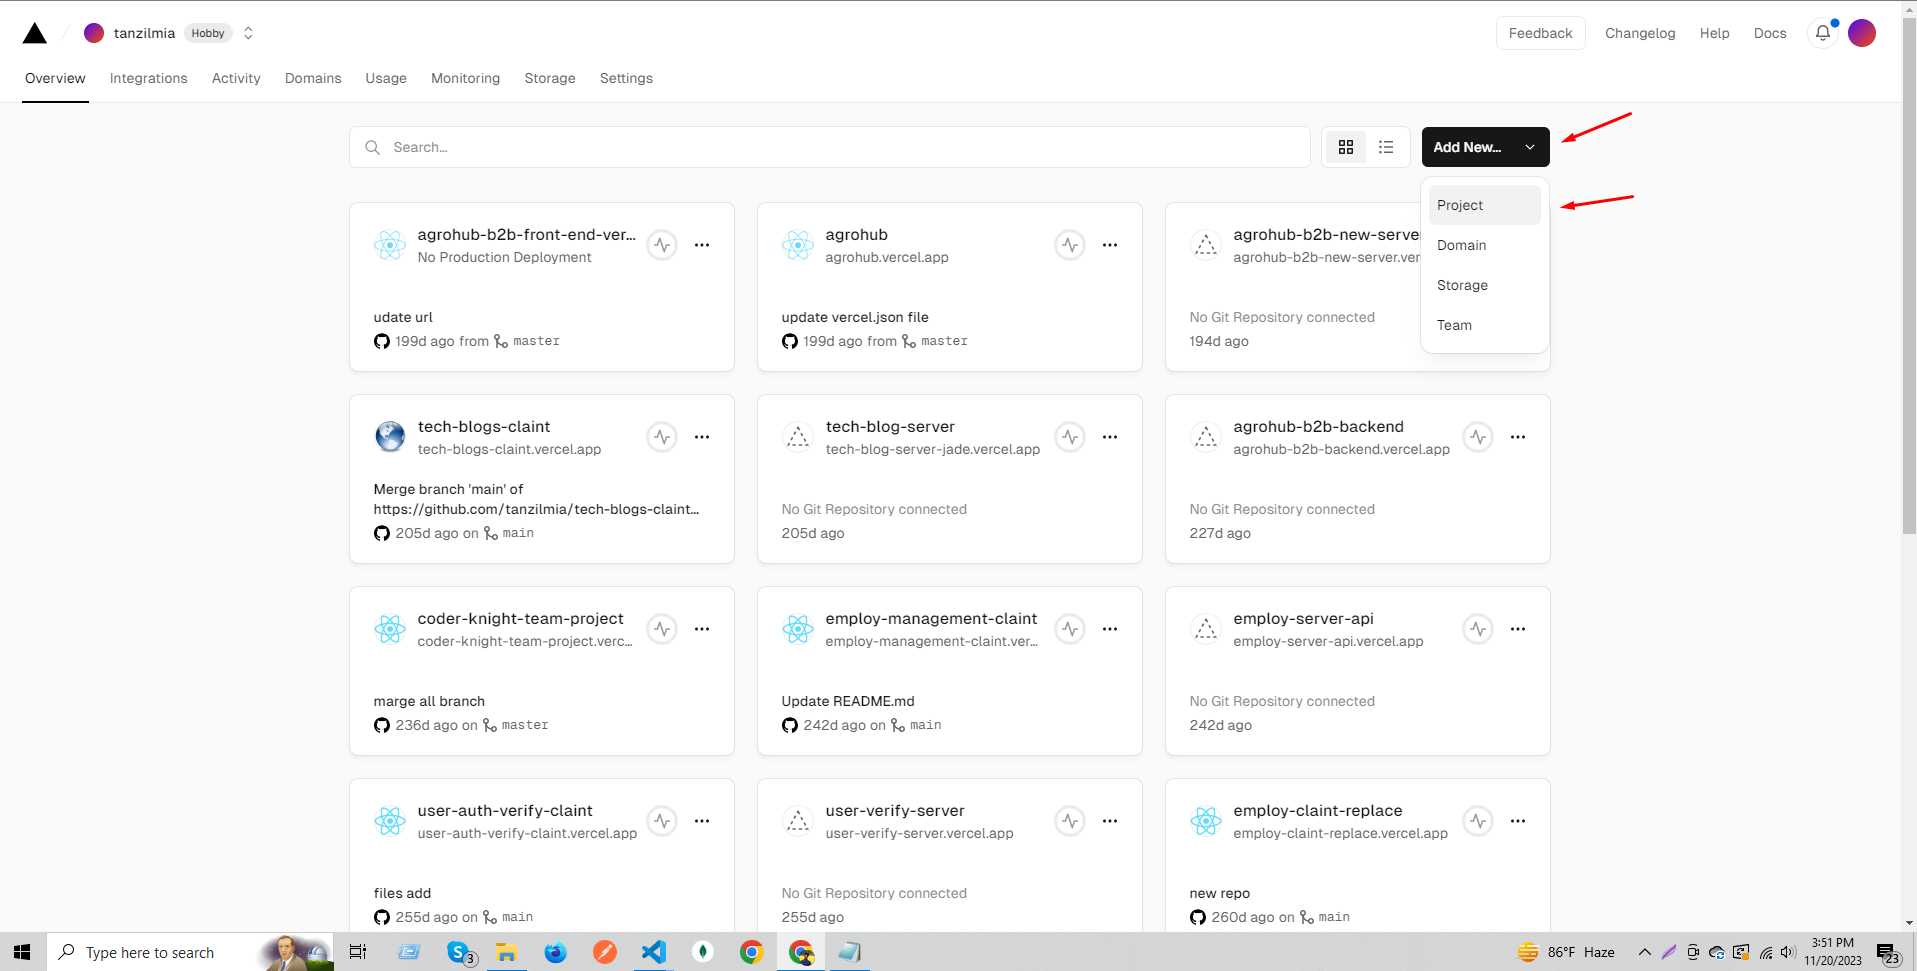
Go To Your vercel Dashboard and follow this steps
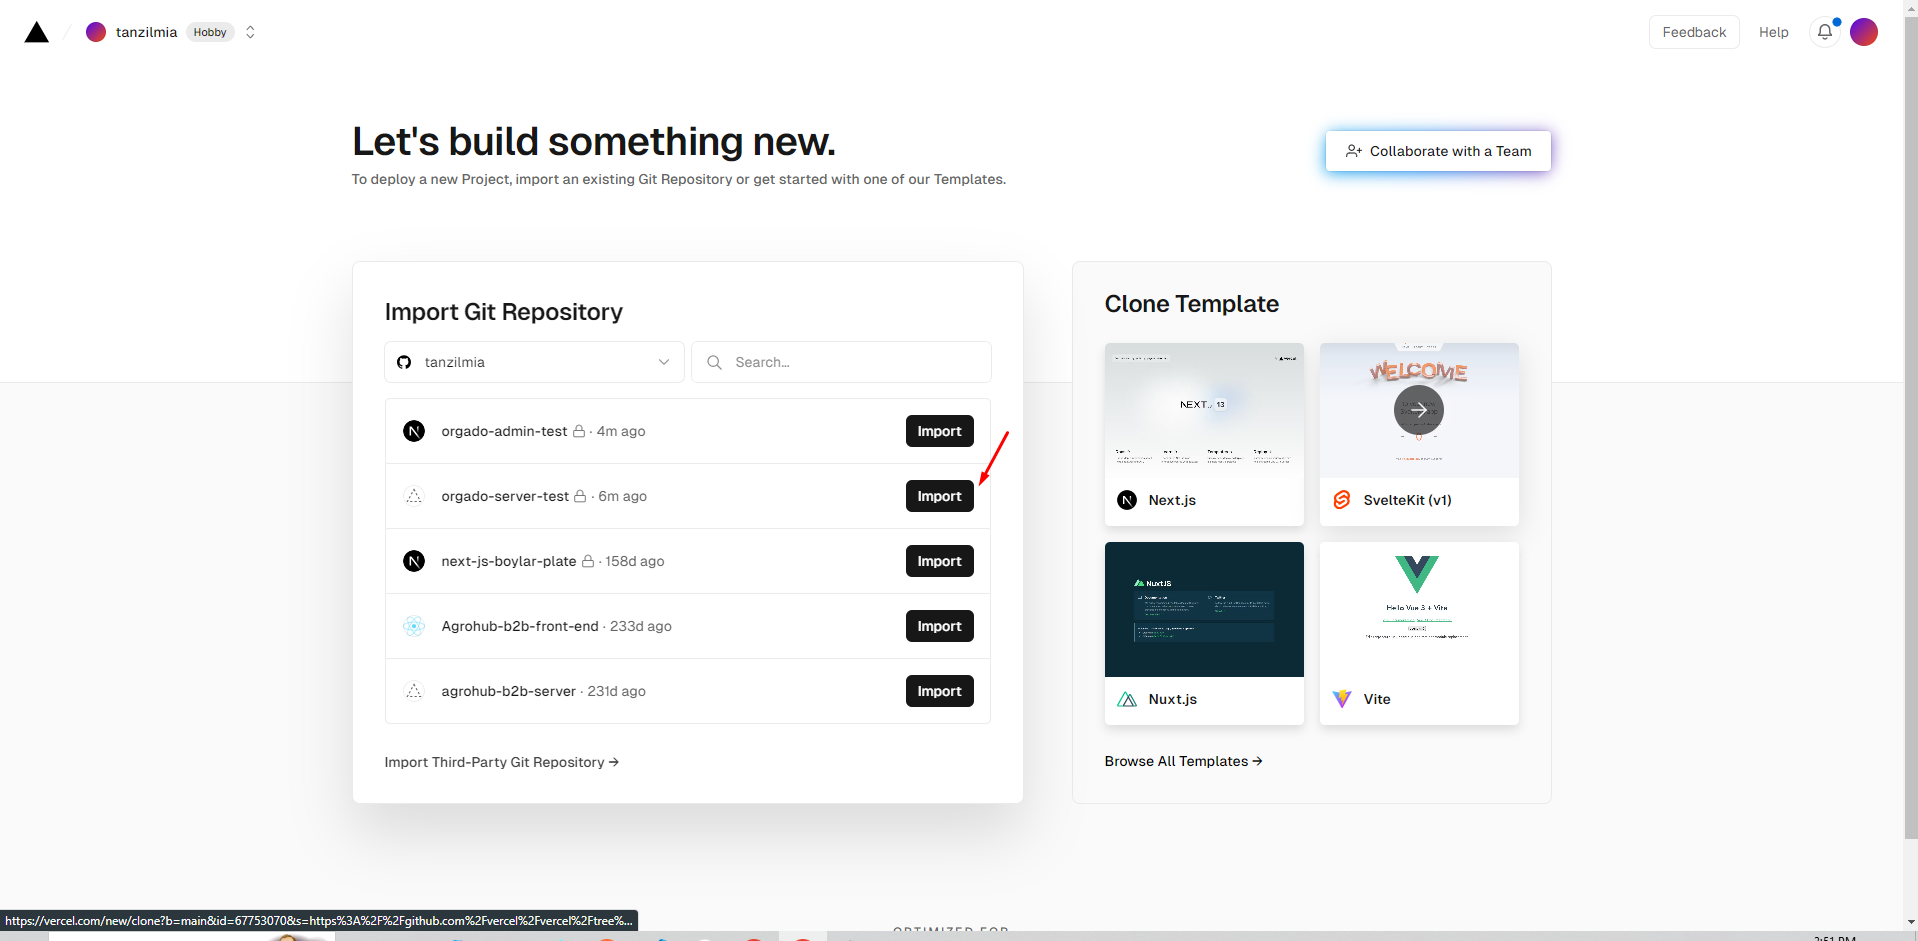
Step 1
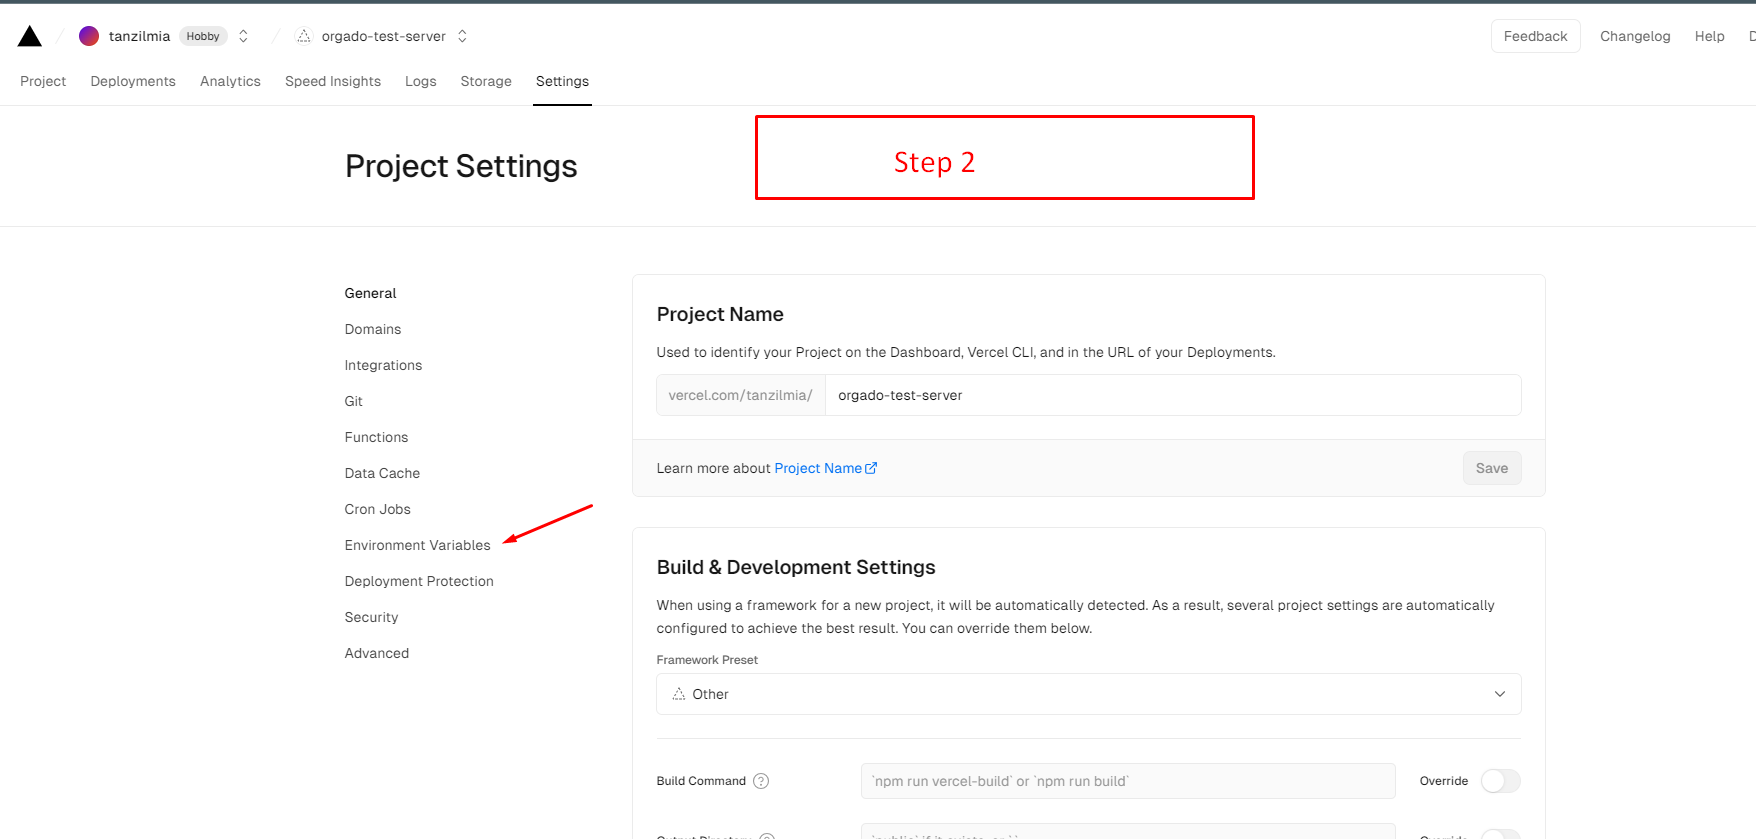
Step 2
Here Will You Find Your Git Ripository then Import It
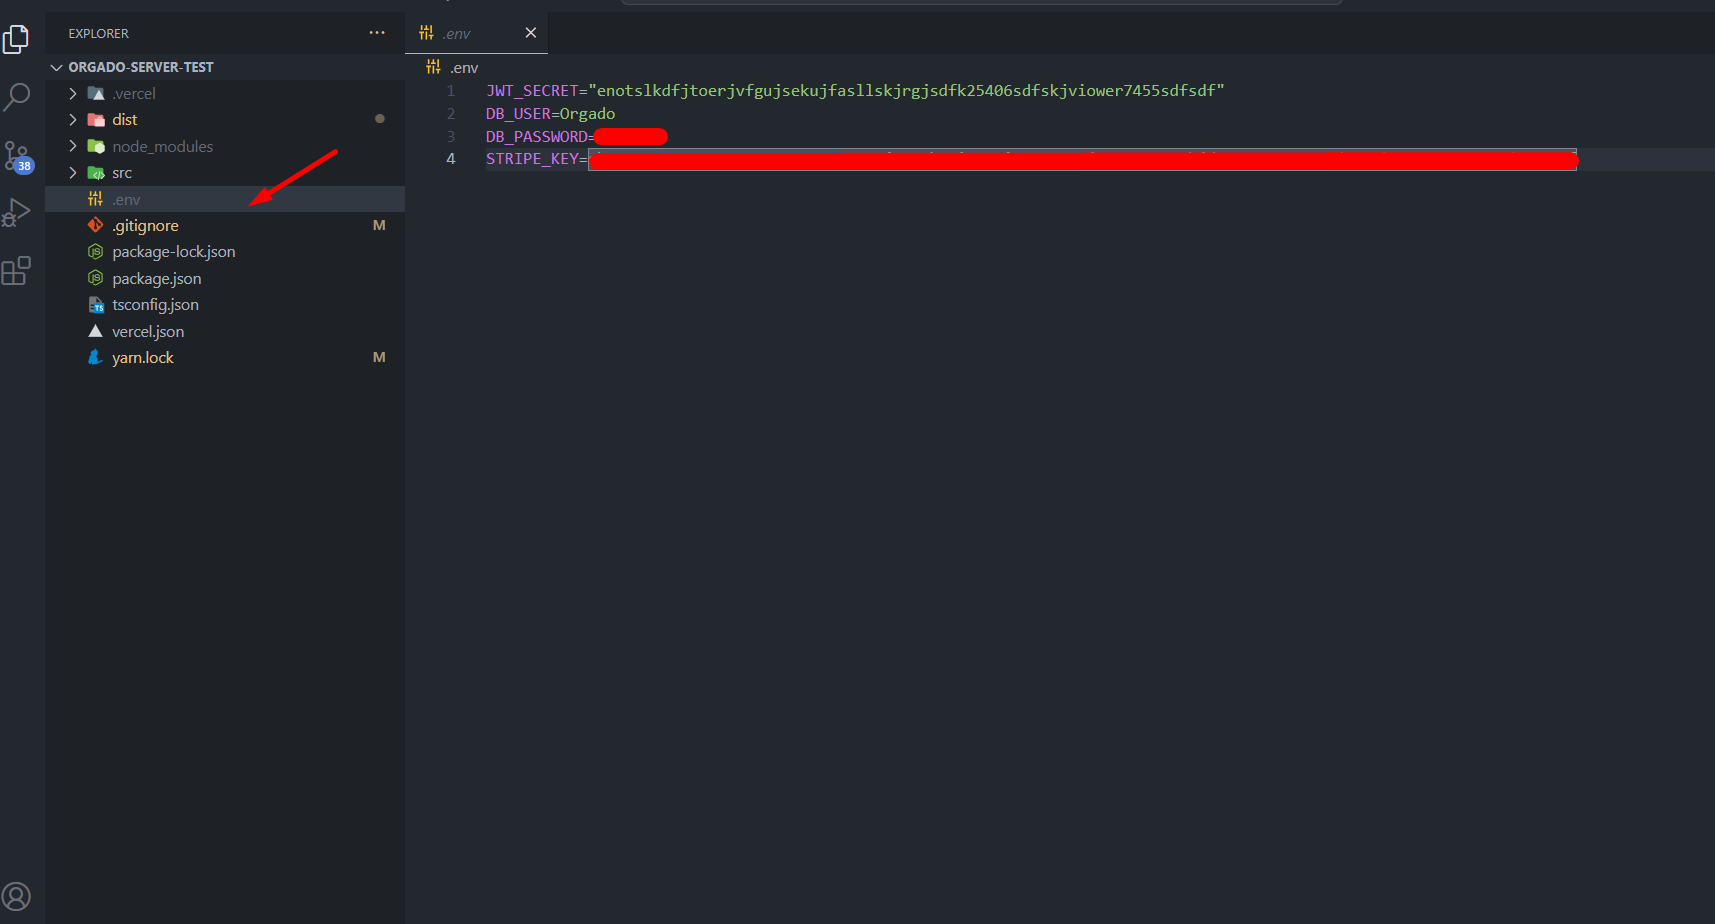
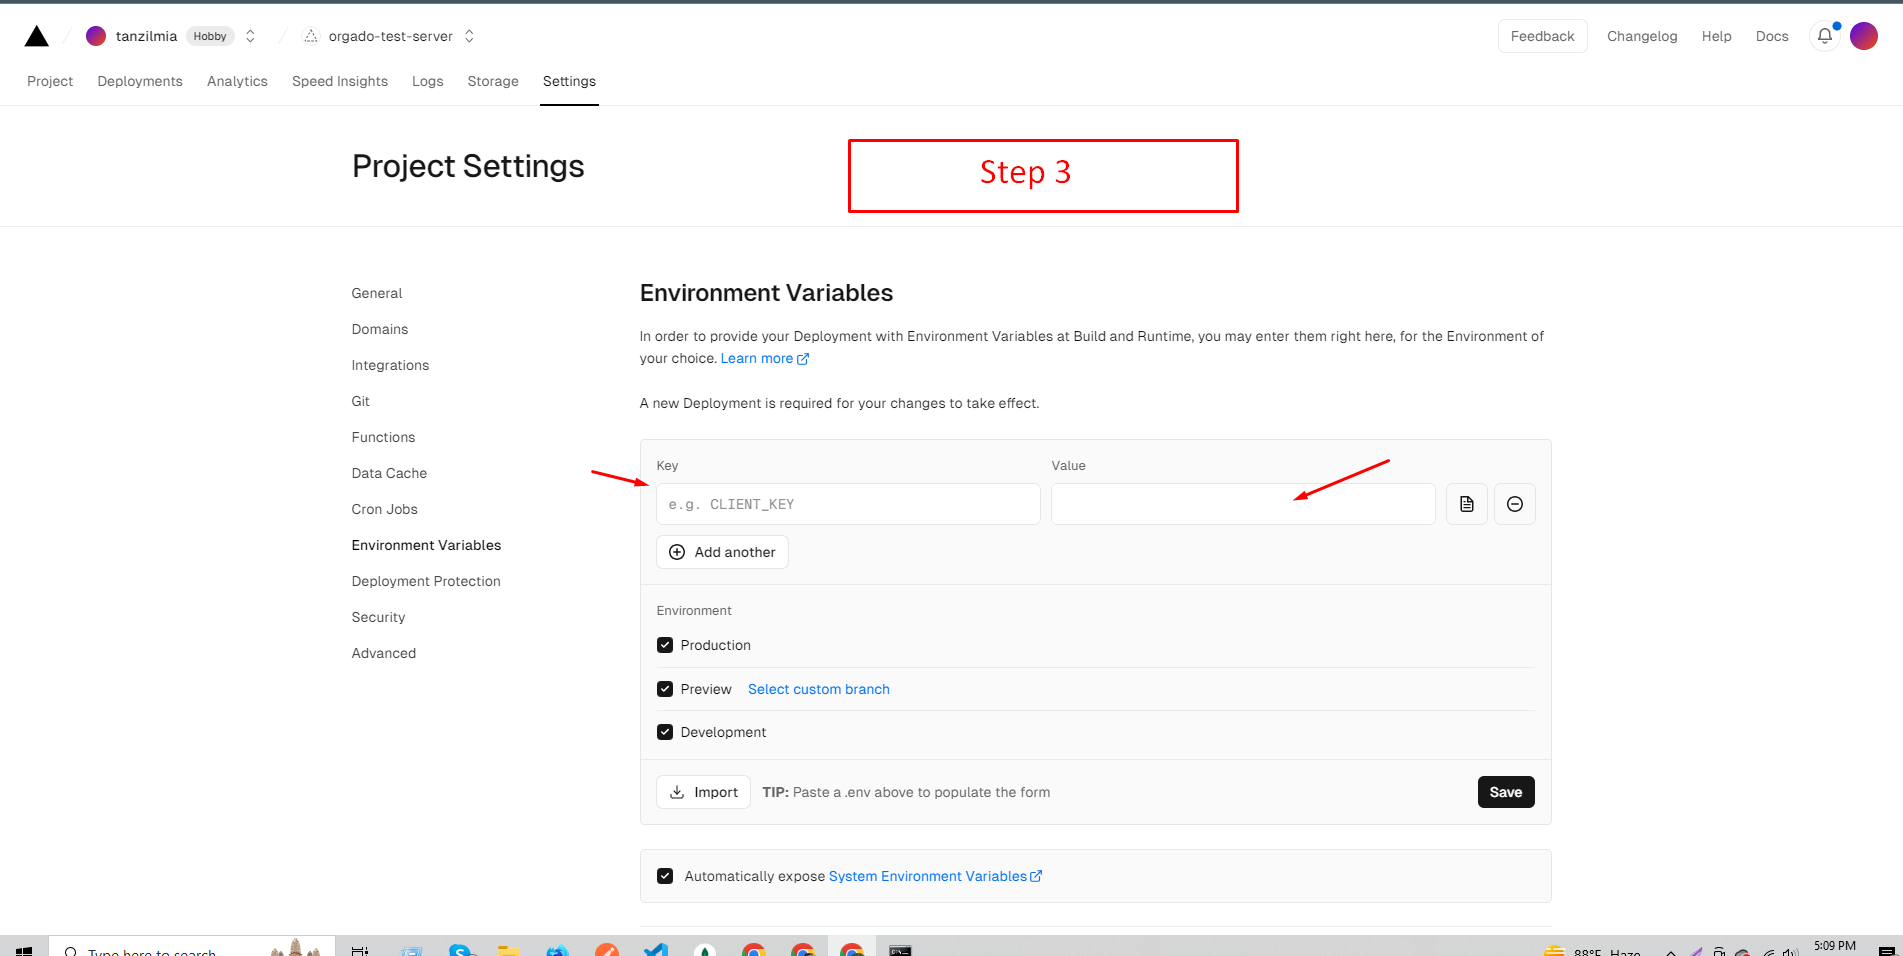
Step 3
Go Your Server File and Copy All .env Variables
Step 4
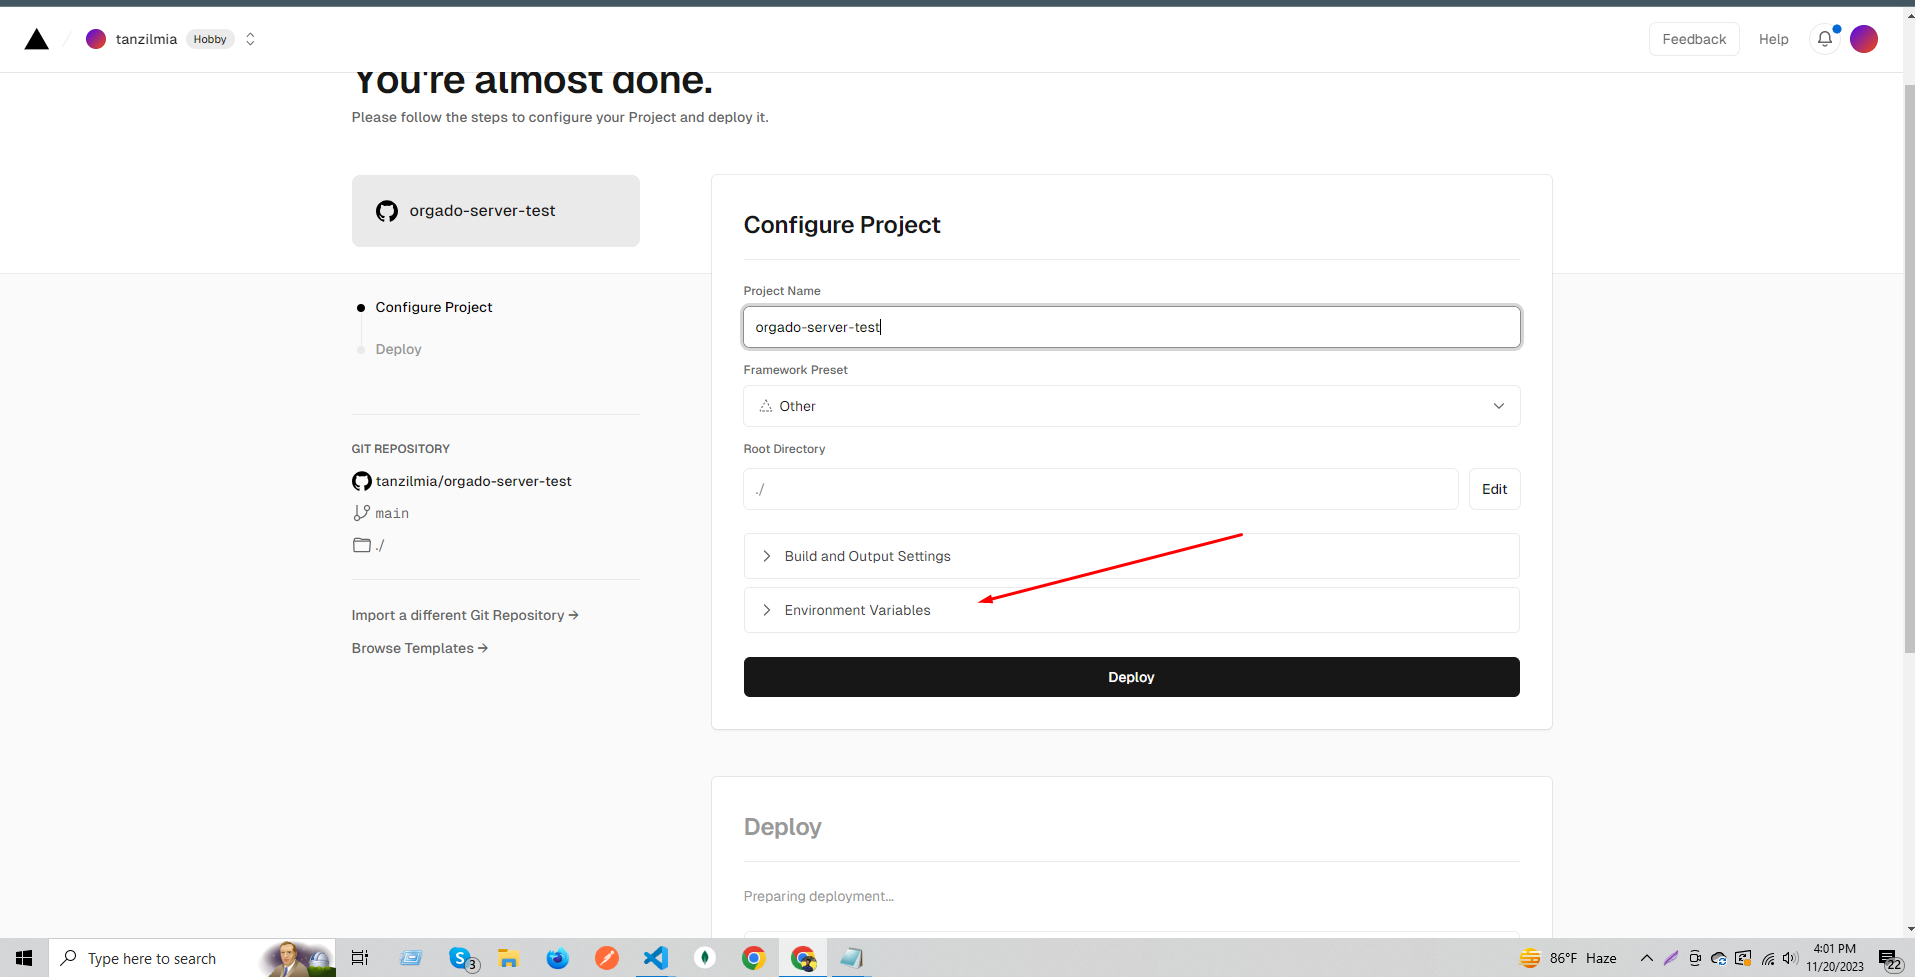
Step 4.1
Step 4.2
Step 5
2. Host Your ( Admin Project ) On Vercel
Follow The similar Steps For the Host Admin Project but be careful when you configure the .env you must give the server URL That You Hosted First
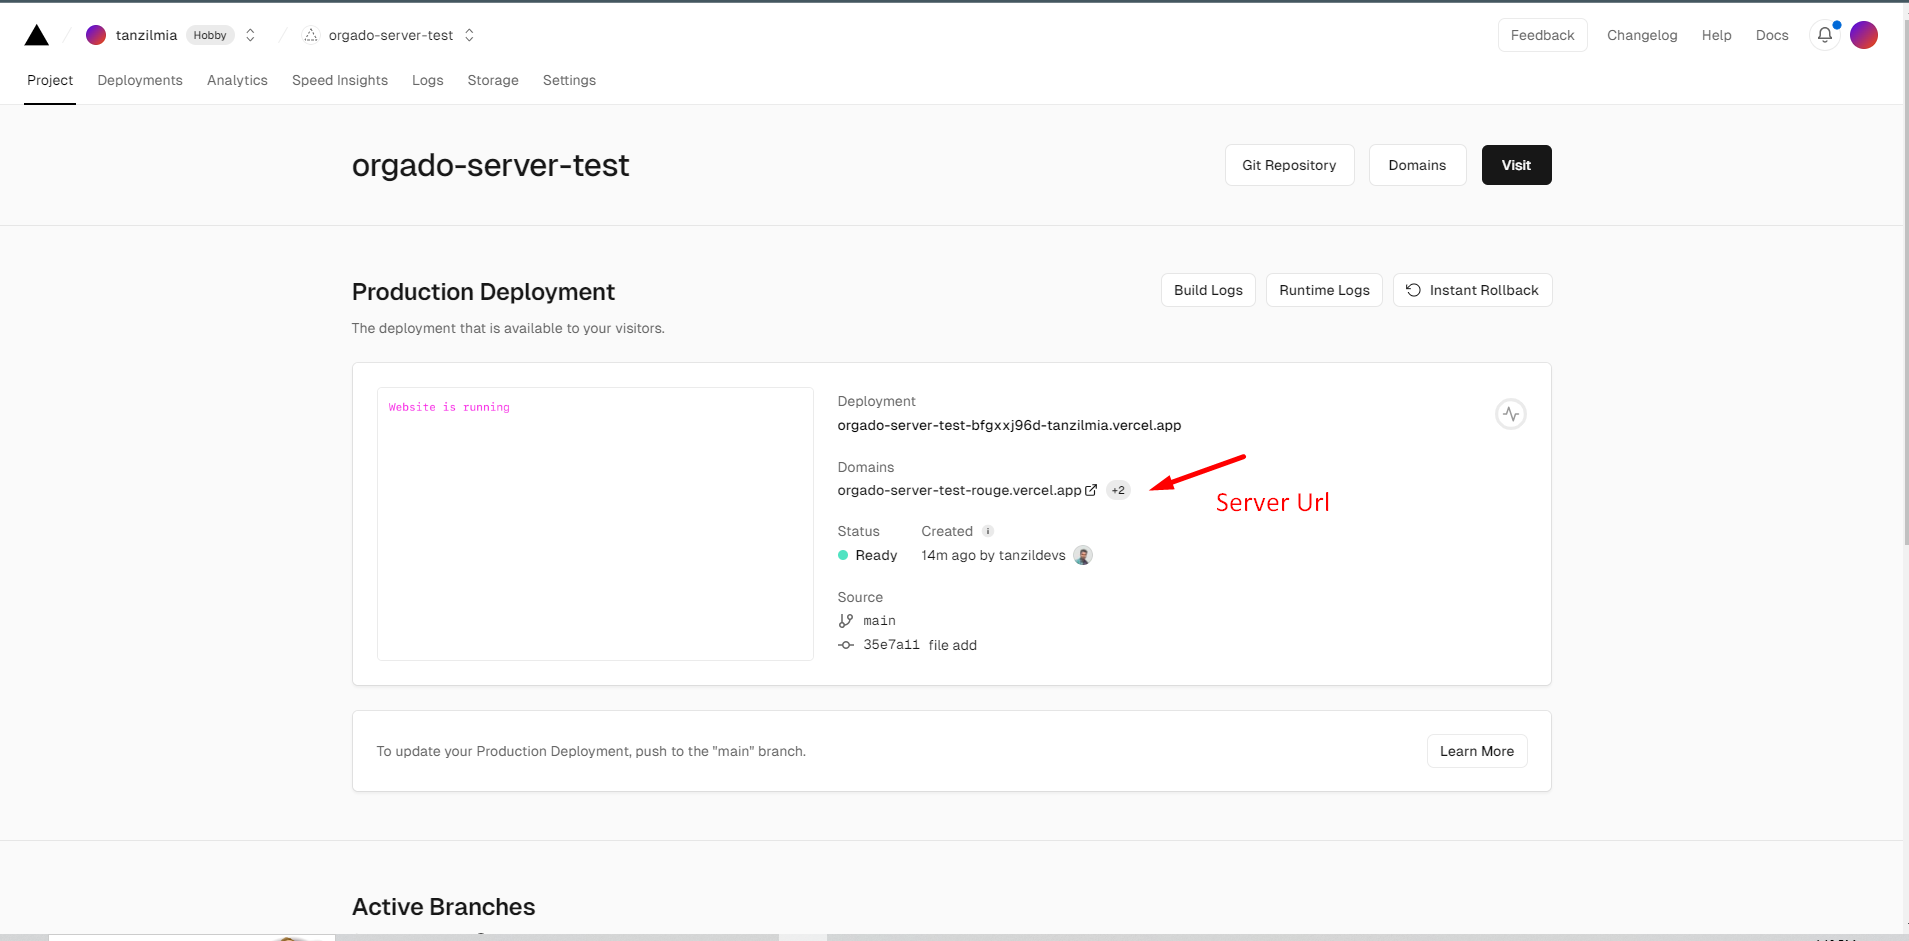
when will you use the server link, link will be like :
https://myapi-example-like/
don't remove last "/" both
admin and server links
set .env Variables in Admin project also
After Deploy It You Have To Create MongoDB Account And More . Follow This steps
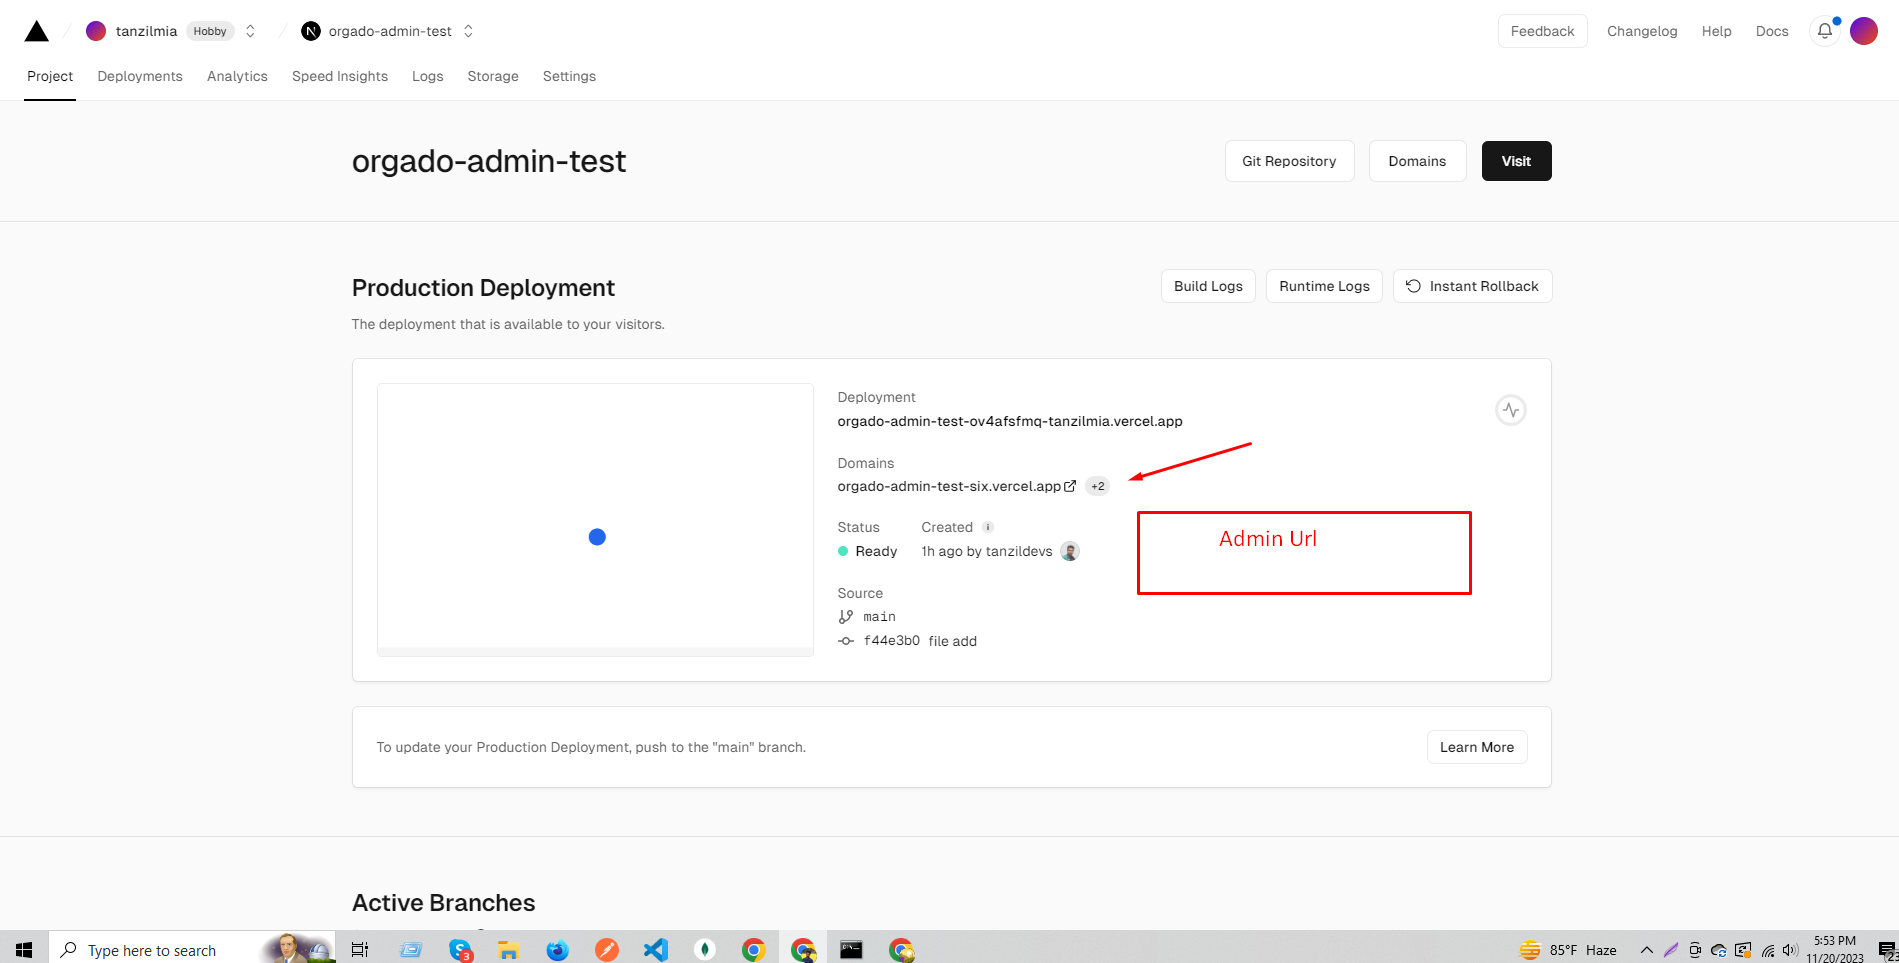
3. Host Your ( Client Project ) On Vercel
Follow The similar Steps For the Host Client Project but be careful when you configure the .env you must give the server and admin URL That You Hosted already
server url
admin url
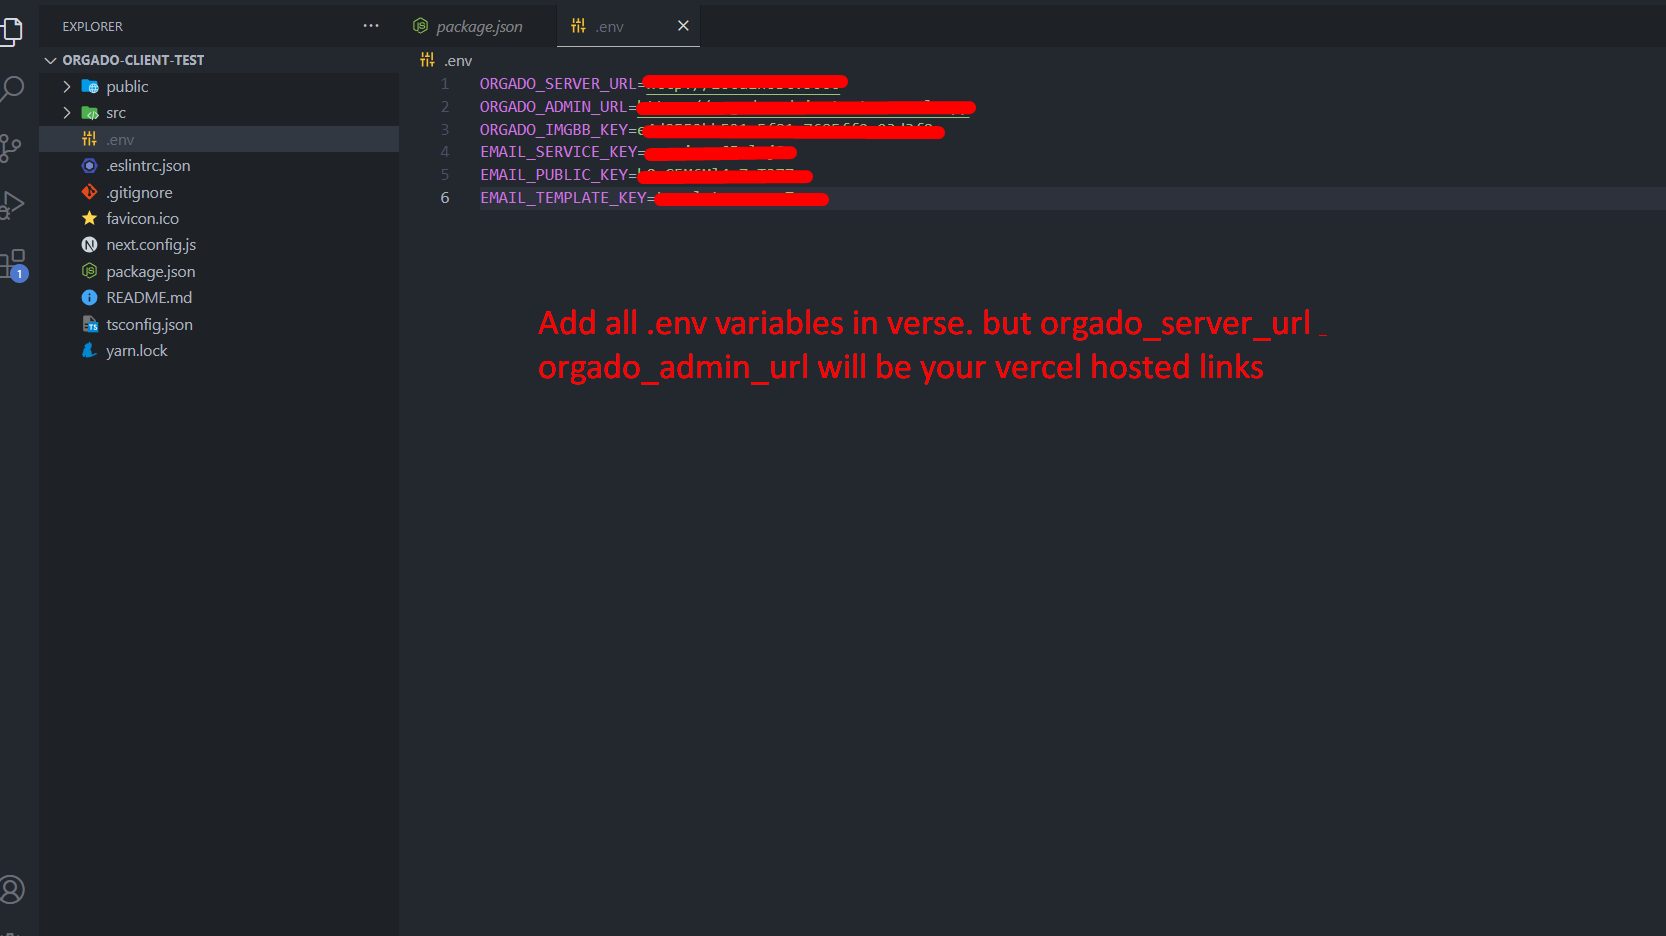
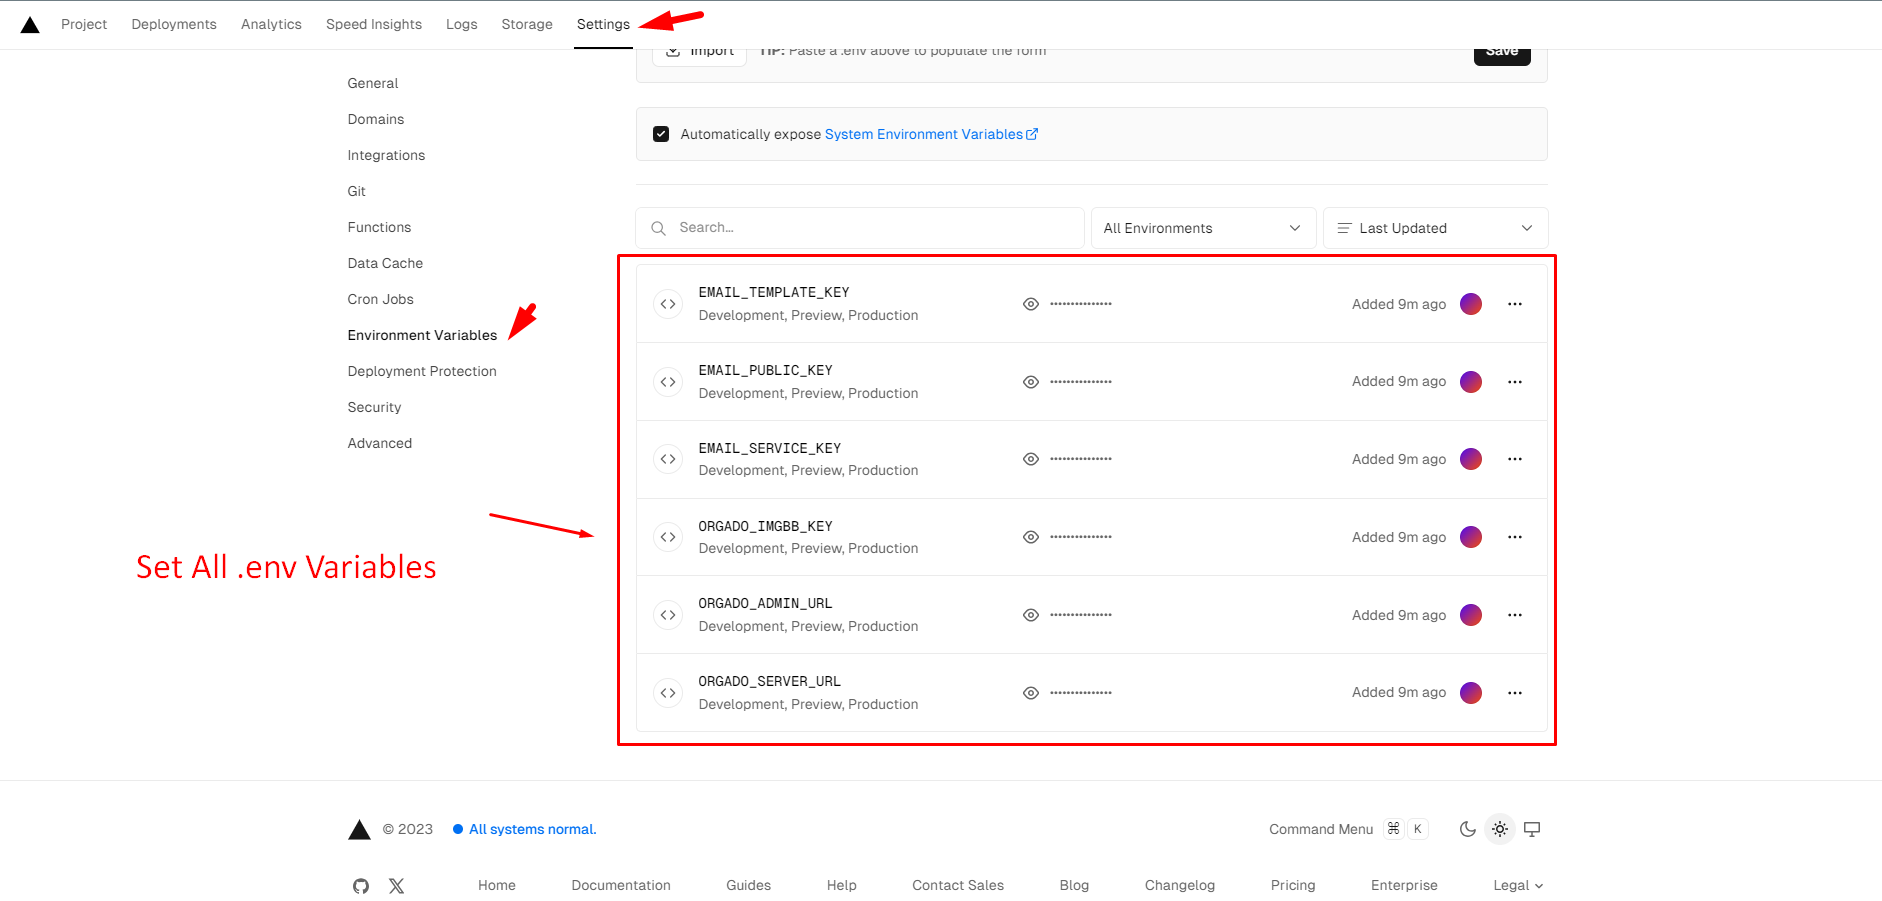
set .env Variables in client project also
After Deploy It You Have To Create MongoDB Account And More . Follow This steps
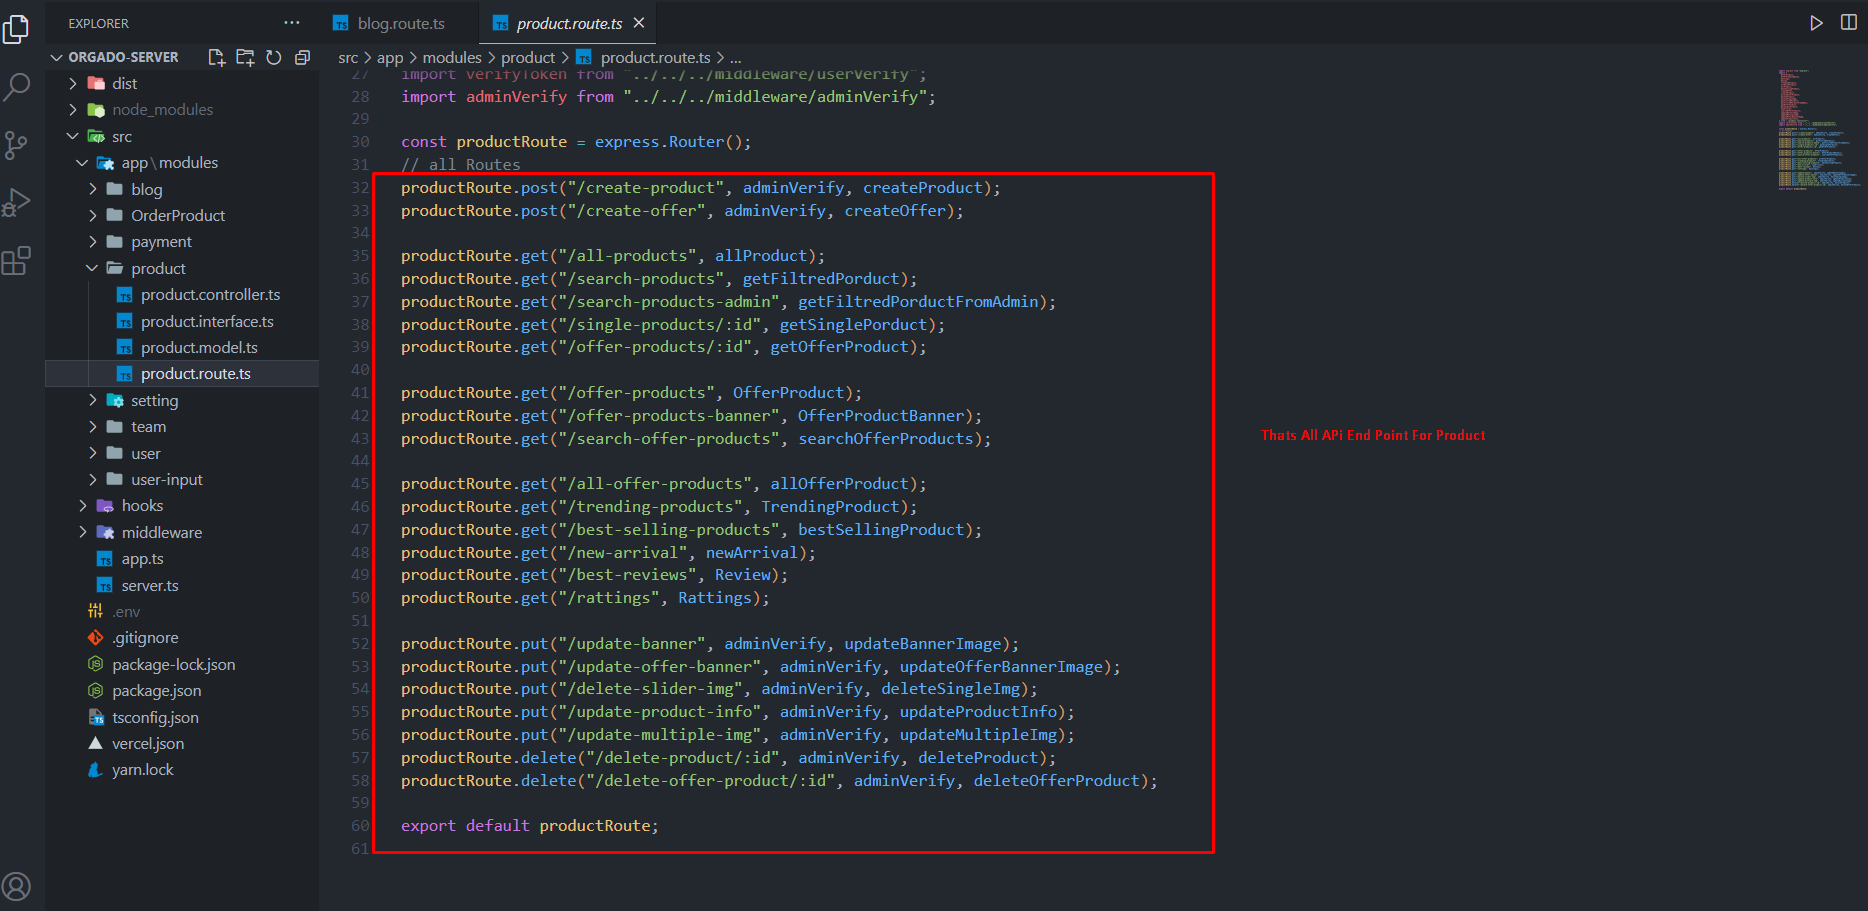
API Documentation
Some Exapmle API List
Here Is Some API List And Use Case Of Privet API
Here Is Product Related API Route List
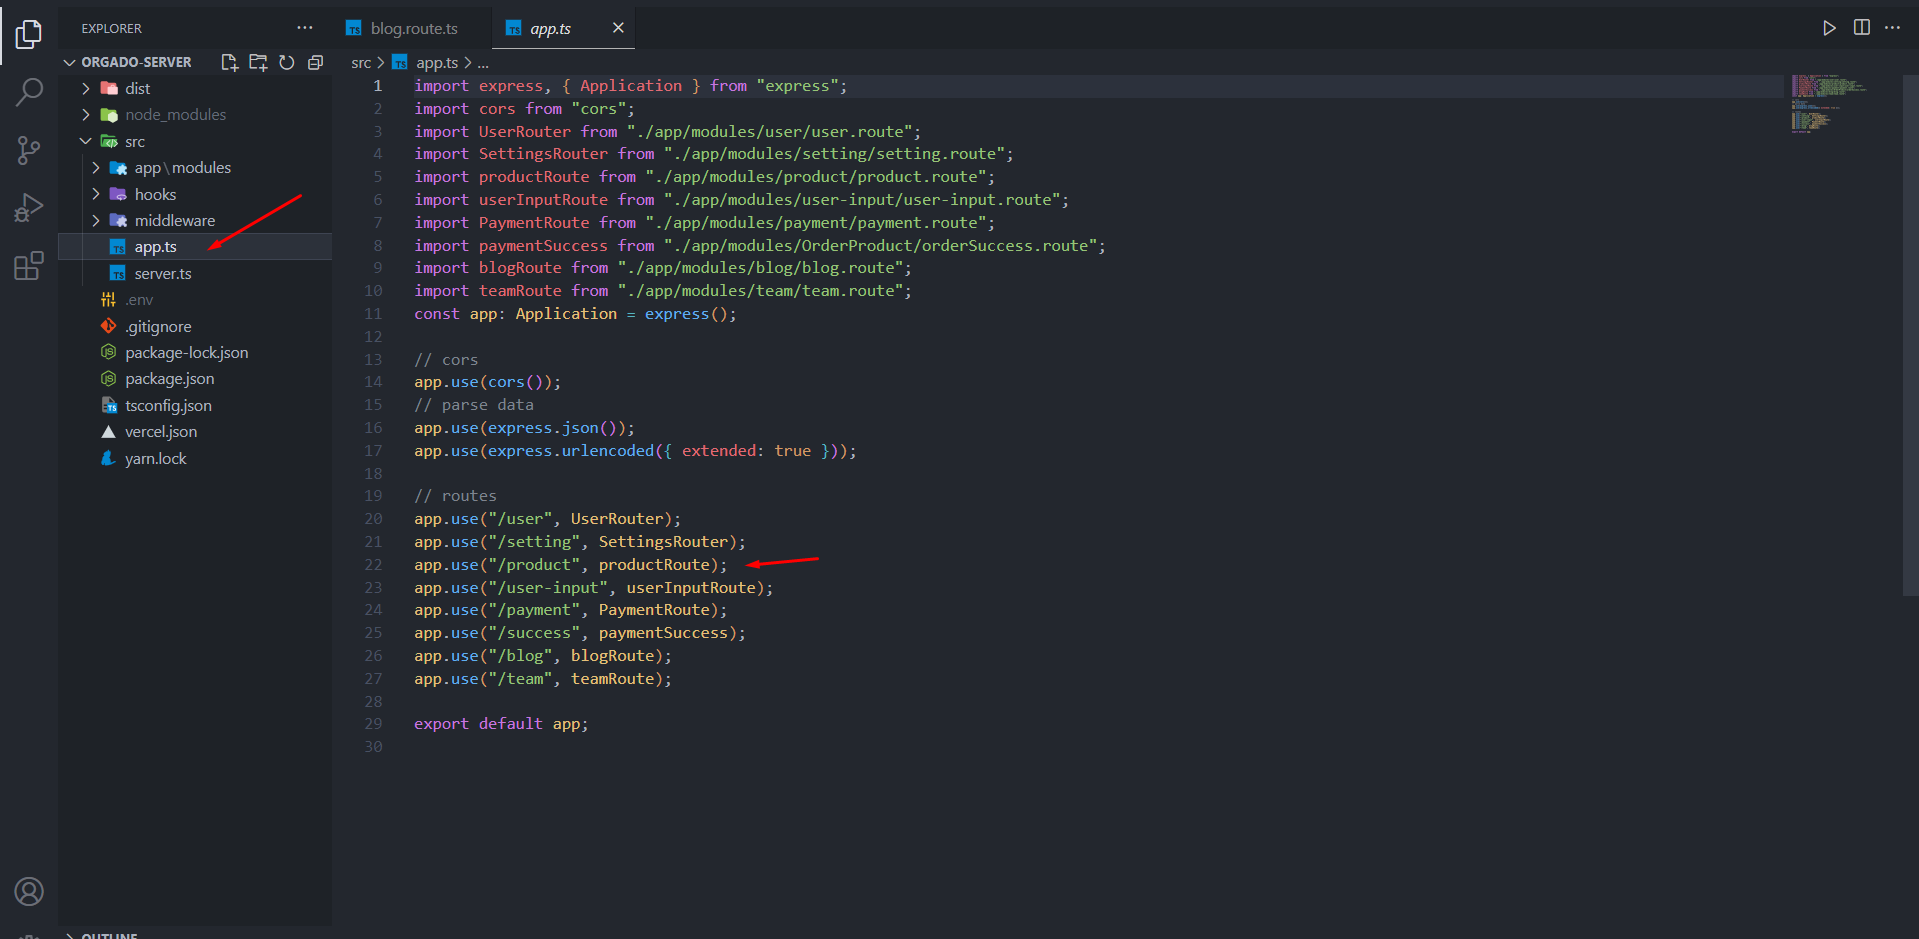
Connect With App Js
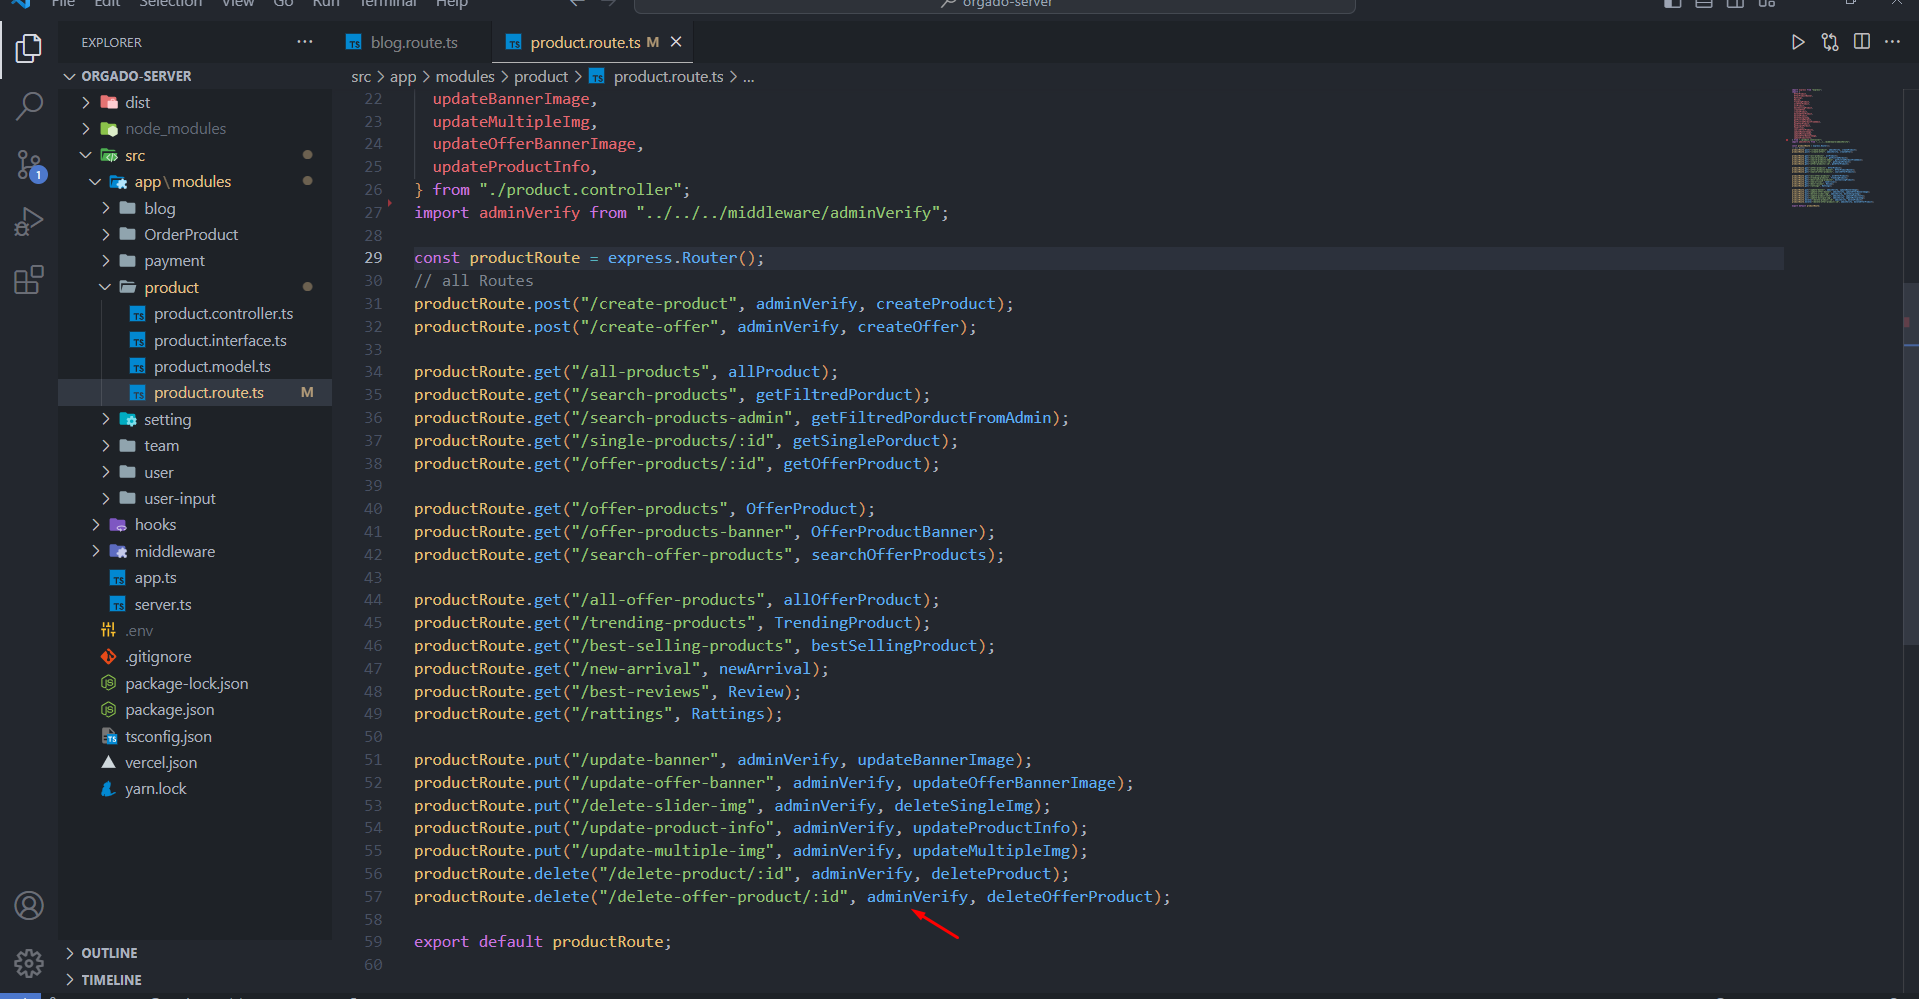
Use Admin Middleware For Protected API
Initial Header Token In AppProvider In Admin Pannel For Admin API Request
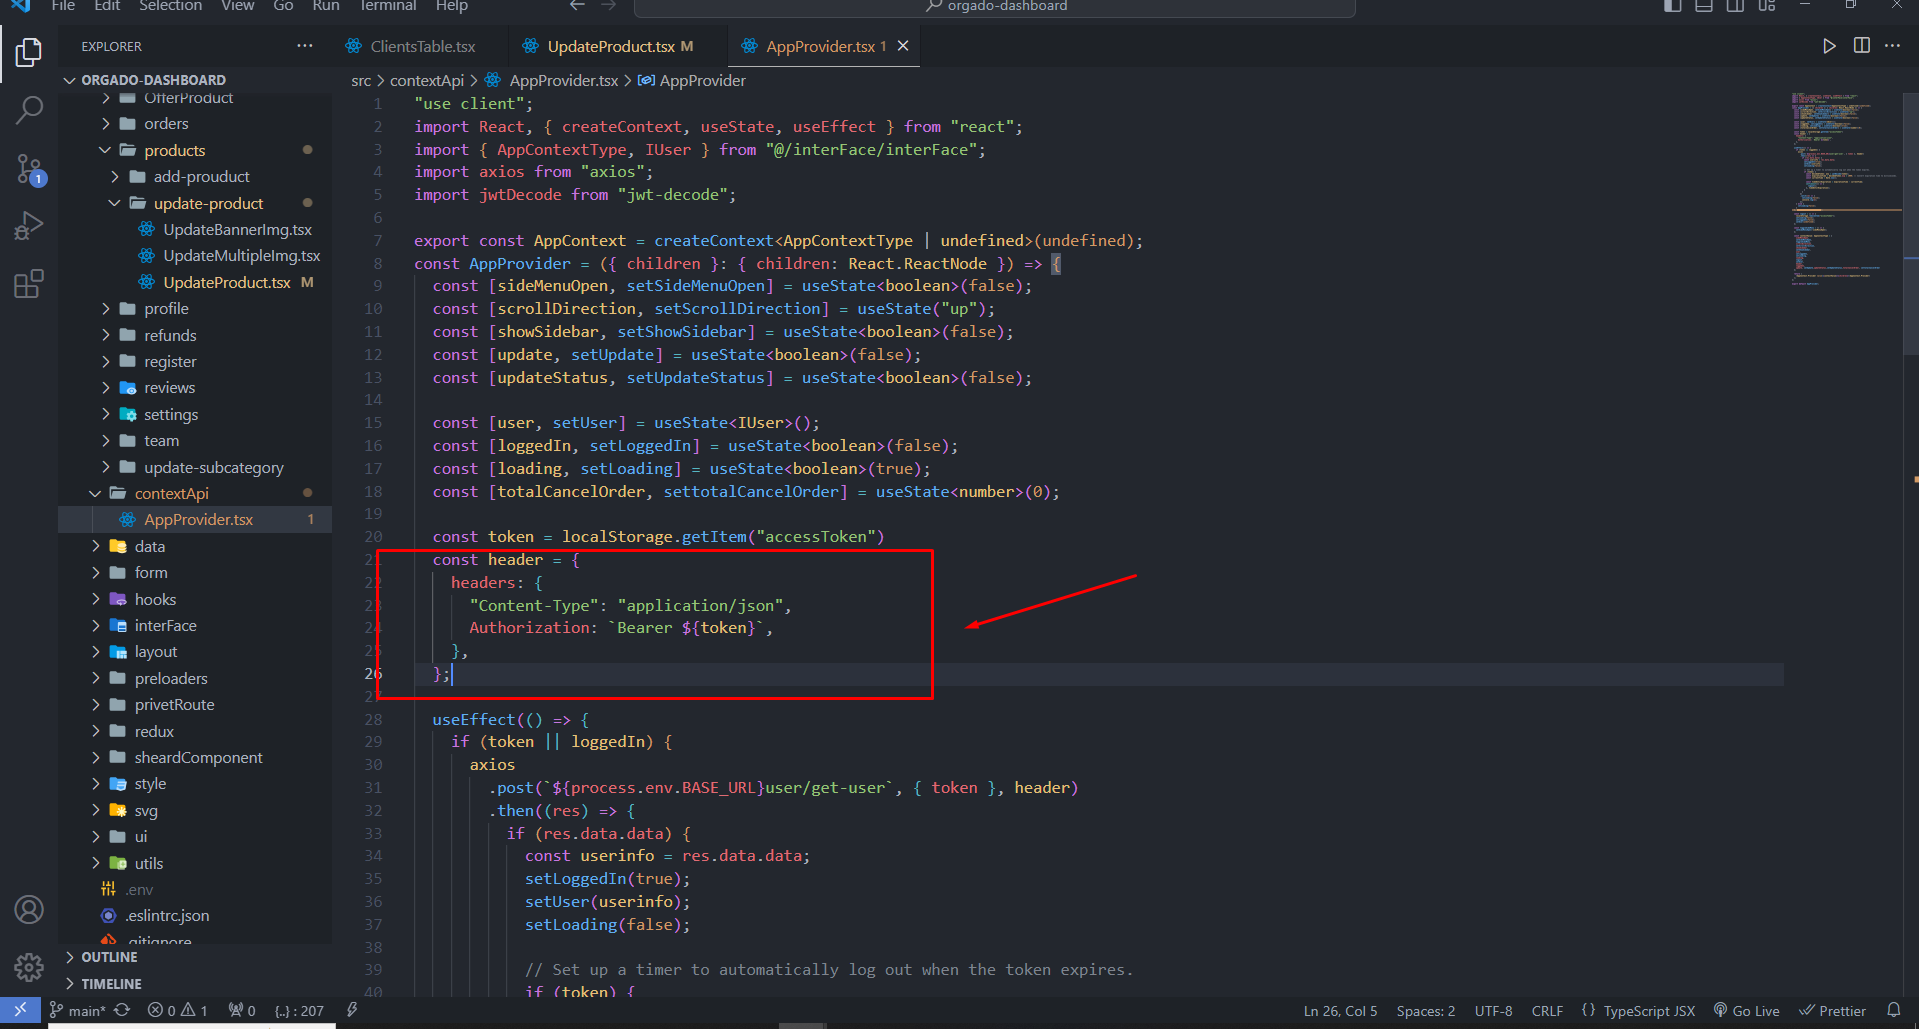
Import Header From AppProvider
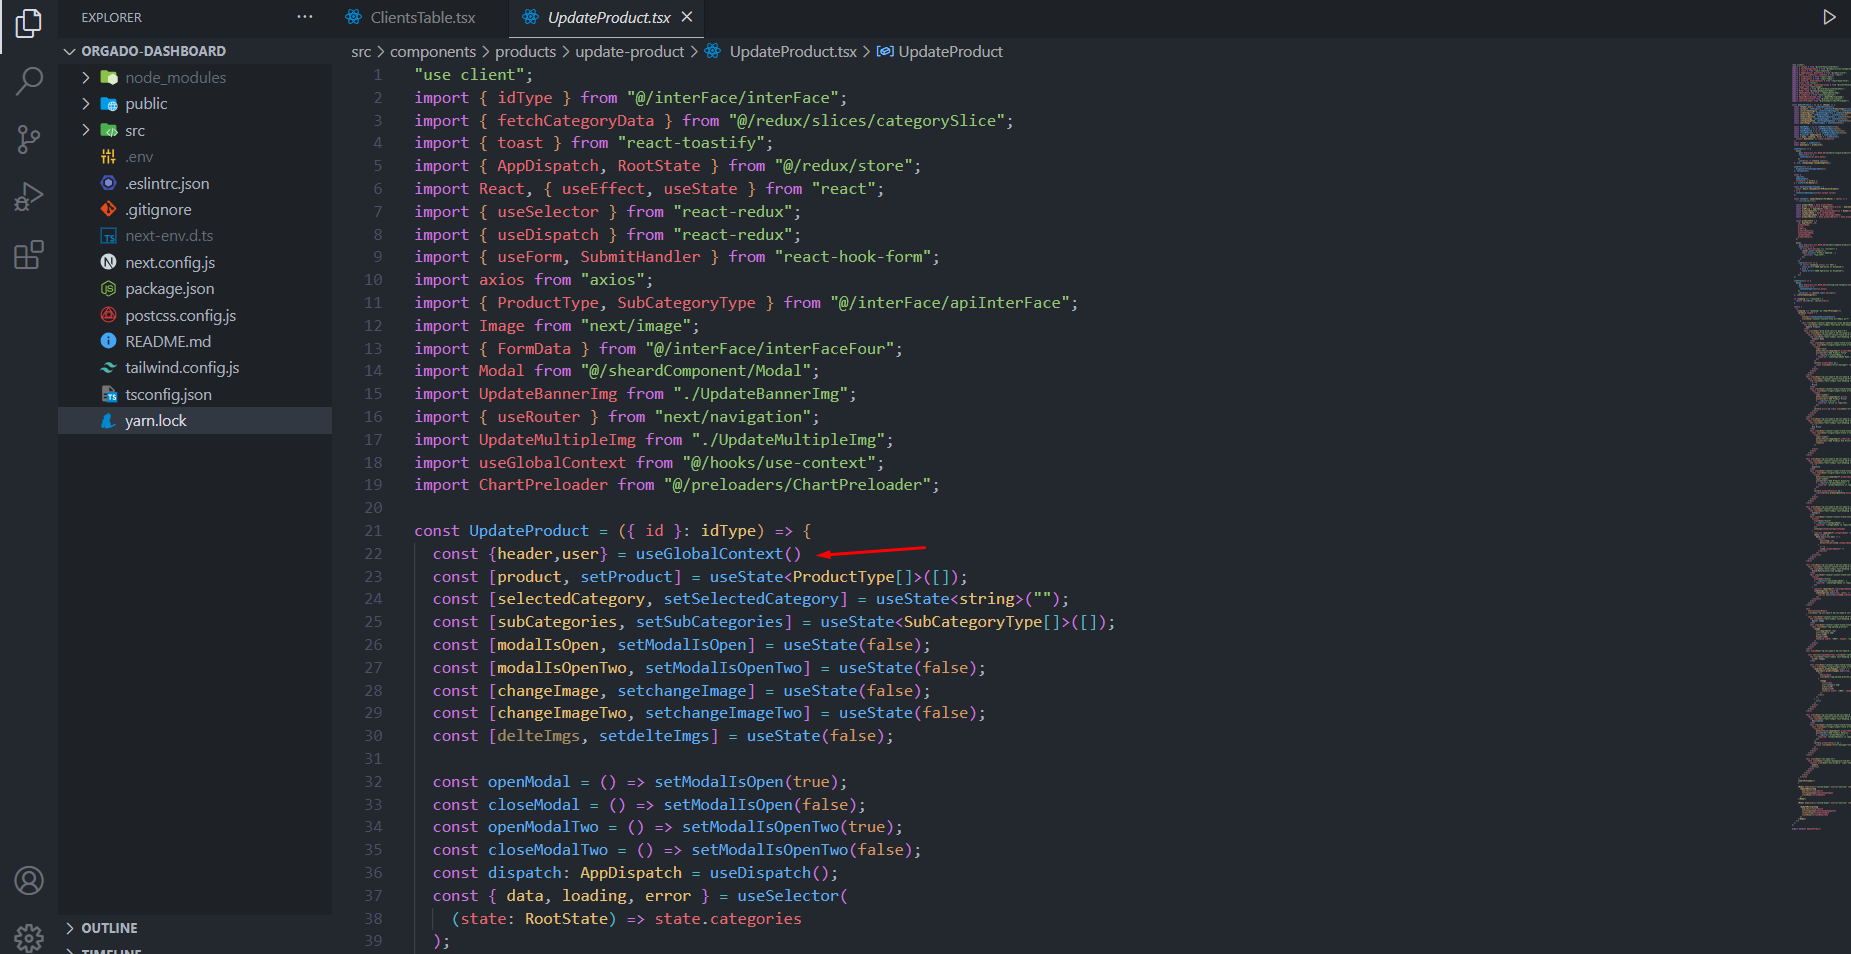
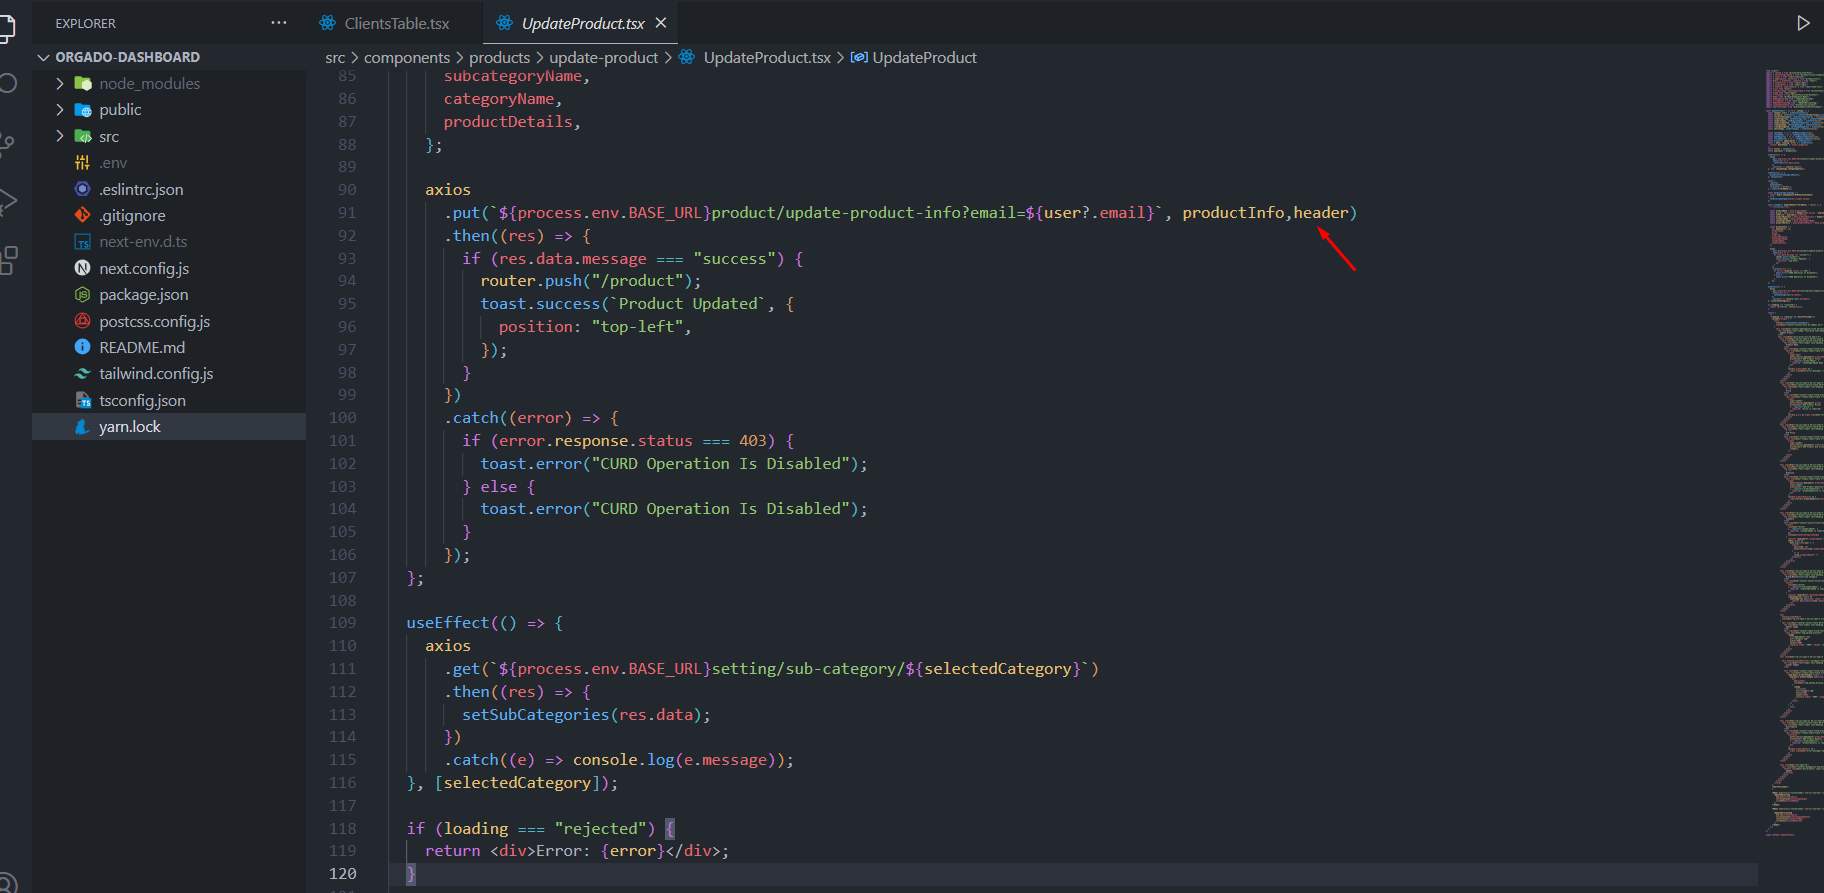
Admin API Request From Admin Pannel And Pass The Header Token
2. Host Your ( Admin Project ) On Vercel
Follow The similar Steps For the Host Admin Project but be careful when you configure the .env you must give the server URL That You Hosted First
when will you use the server link, link will be like :
https://myapi-example-like/
don't remove last "/" both
admin and server links
set .env Variables in Admin project also
After Deploy It You Have To Create MongoDB Account And More . Follow This steps
3. Host Your ( Client Project ) On Vercel
Follow The similar Steps For the Host Client Project but be careful when you configure the .env you must give the server and admin URL That You Hosted already
server url
admin url
set .env Variables in client project also
After Deploy It You Have To Create MongoDB Account And More . Follow This steps
How To Deploy Your Project On Vercel (With Git Ripository)
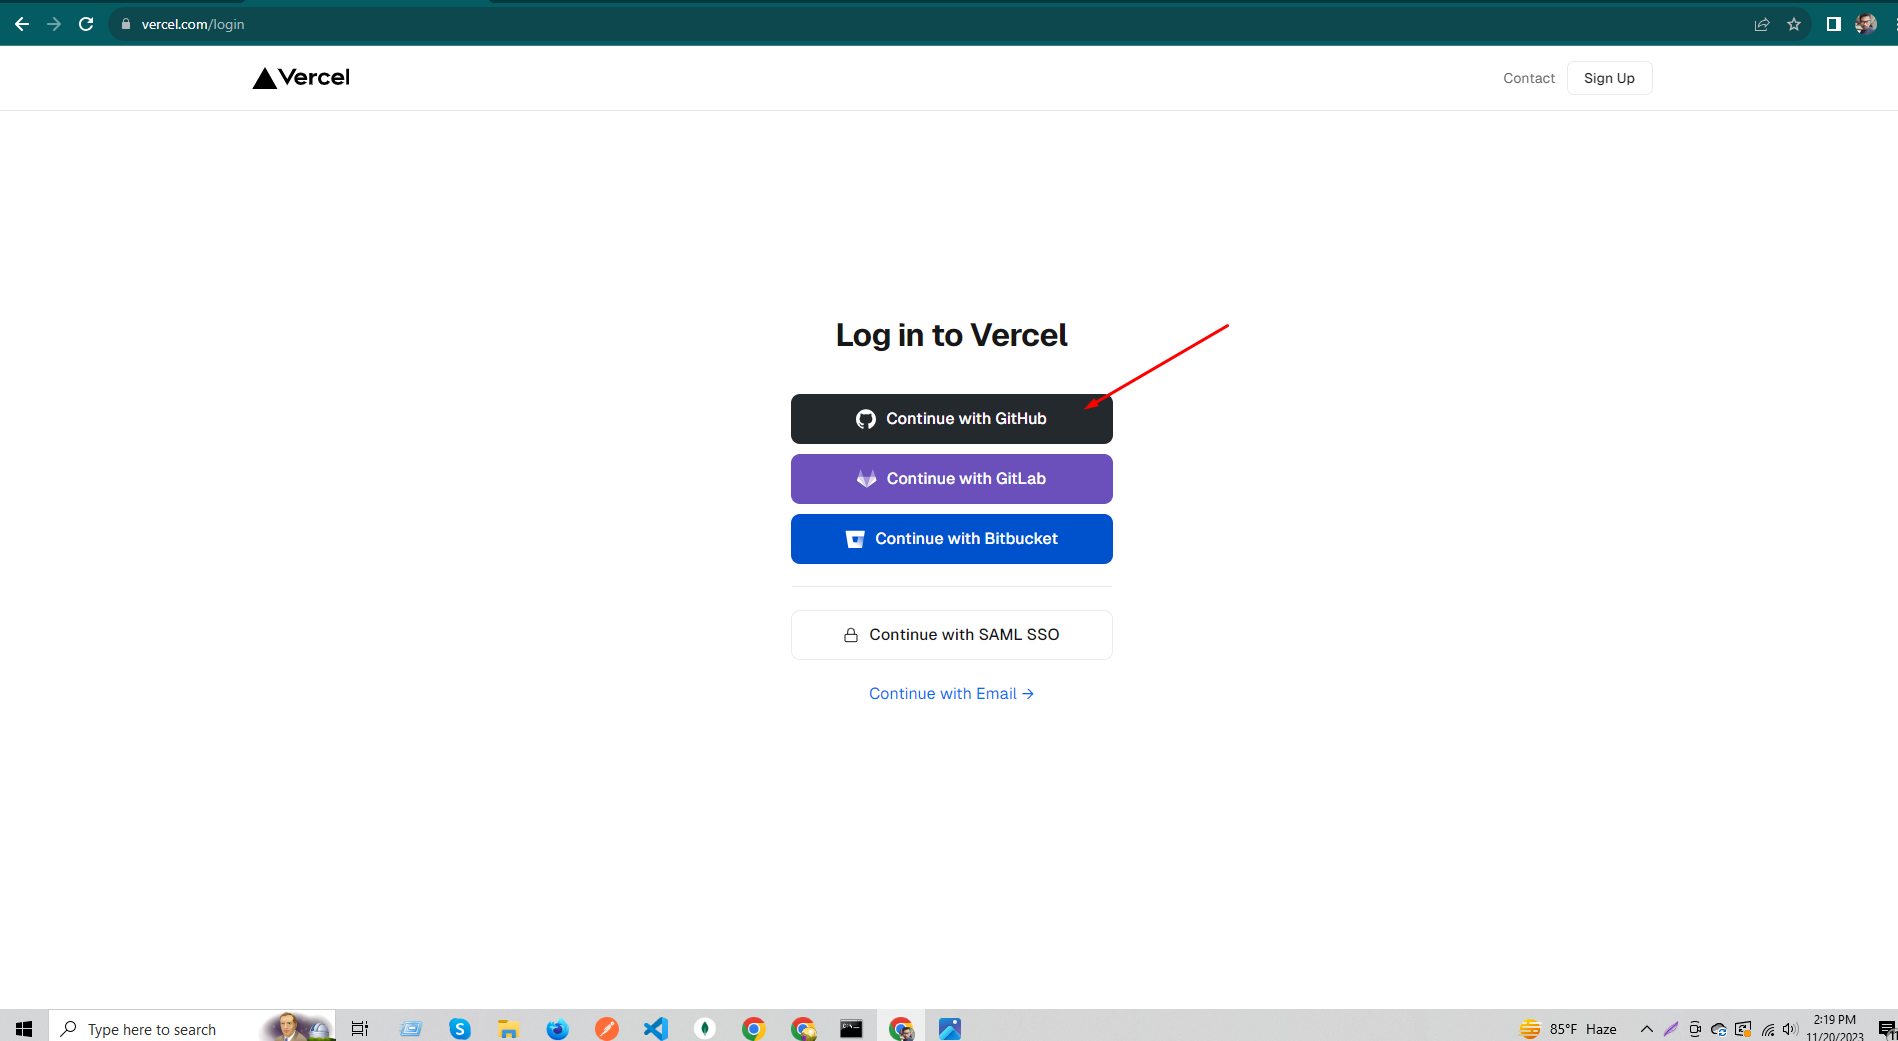
Login In vercel
Want Sign Up In Vercel ? Click Here
1. Host Your Server Project On Vercel
After Login Follow This Steps
Go To Your vercel Dashboard and follow this steps
Step 1
Step 2
Here Will You Find Your Git Ripository then Import It
Step 3
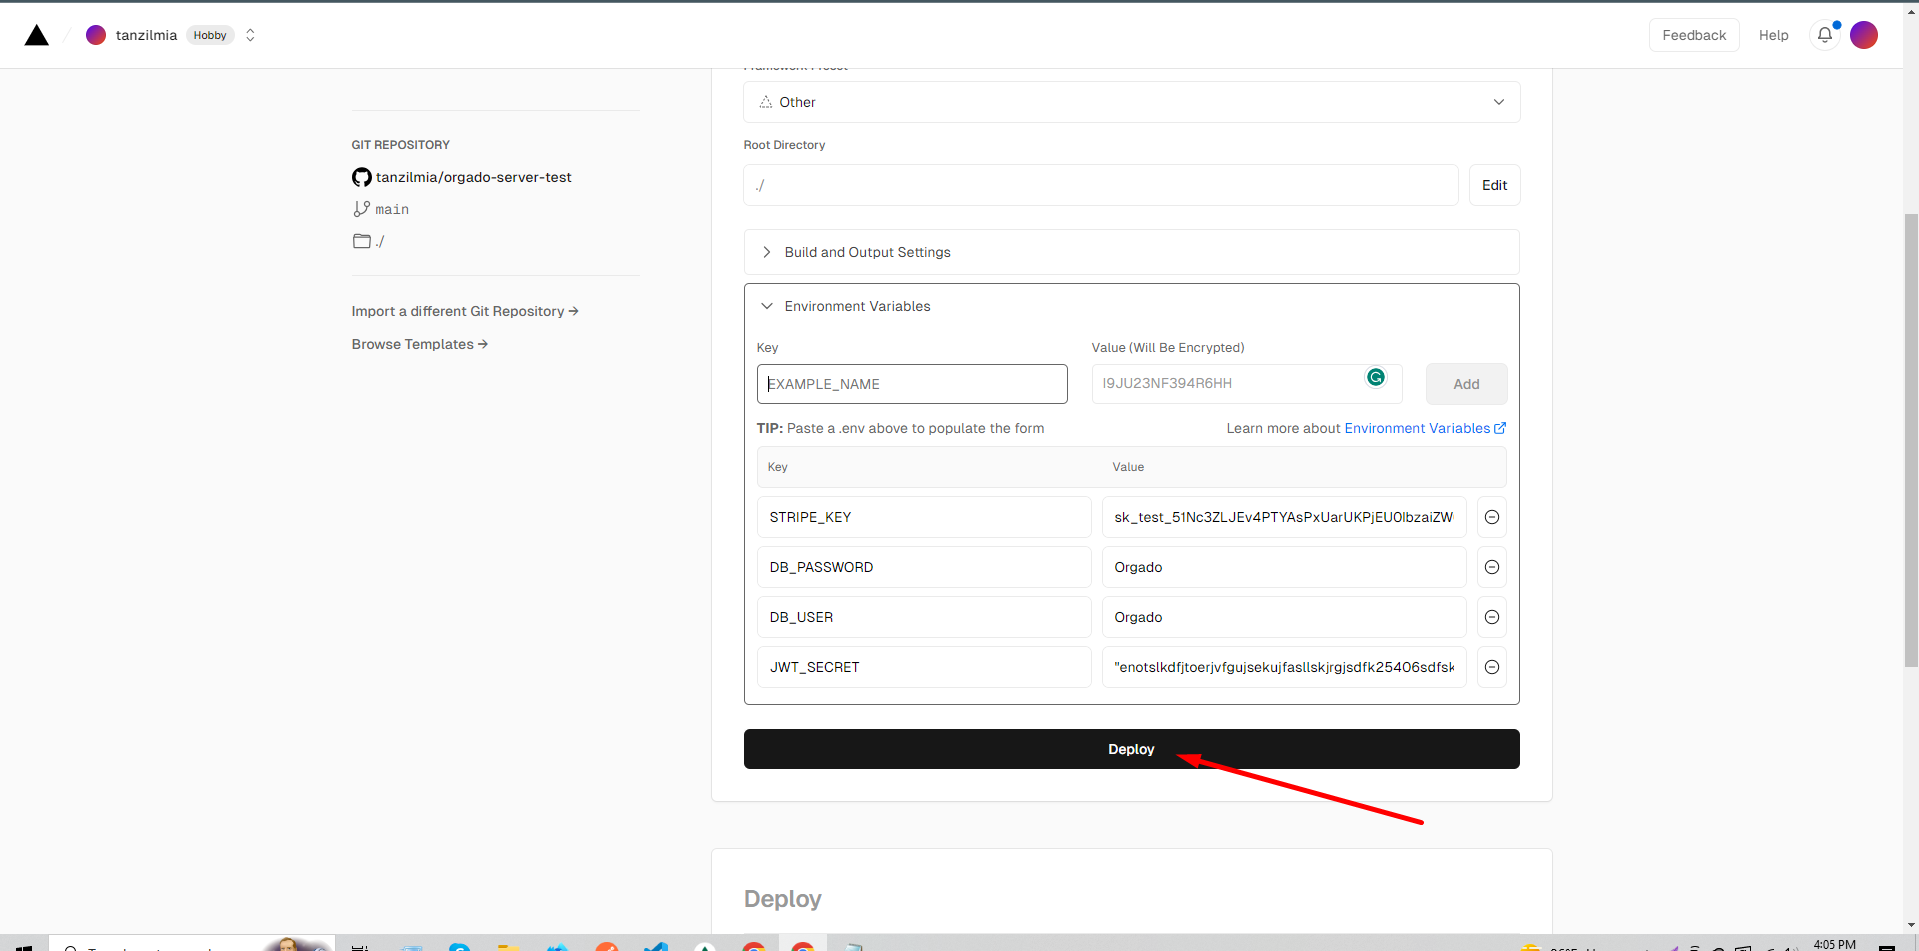
Go Your Server File and Copy All .env Variables
Step 4
Step 4.1
Step 4.2
Step 5
2. Host Your ( Admin Project ) On Vercel
Follow The similar Steps For the Host Admin Project but be careful when you configure the .env you must give the server URL That You Hosted First
when will you use the server link, link will be like :
https://myapi-example-like/
don't remove last "/" both
admin and server links
set .env Variables in Admin project also
After Deploy It You Have To Create MongoDB Account And More . Follow This steps
3. Host Your ( Client Project ) On Vercel
Follow The similar Steps For the Host Client Project but be careful when you configure the .env you must give the server and admin URL That You Hosted already
server url
admin url
set .env Variables in client project also
After Deploy It You Have To Create MongoDB Account And More . Follow This steps
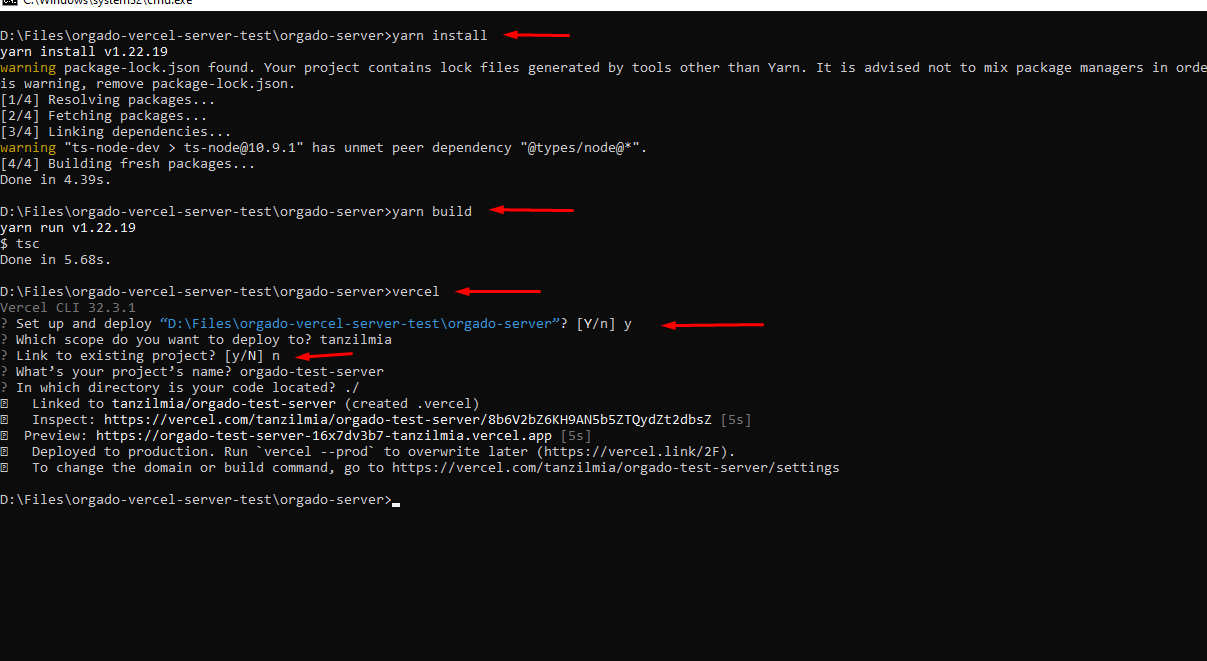
How Can I Host Server In Vercel manualy ?
[Note: Vercel Or Any Site Can't Run Directly TypeScript Code. If You Want To Host This Server File Then First You Have To Install Dependency and Yarn Build Then it Will Generate A Dist Folder which Contains Javascript Code And Then Vercel Will Work. Follow The Screen Short ]
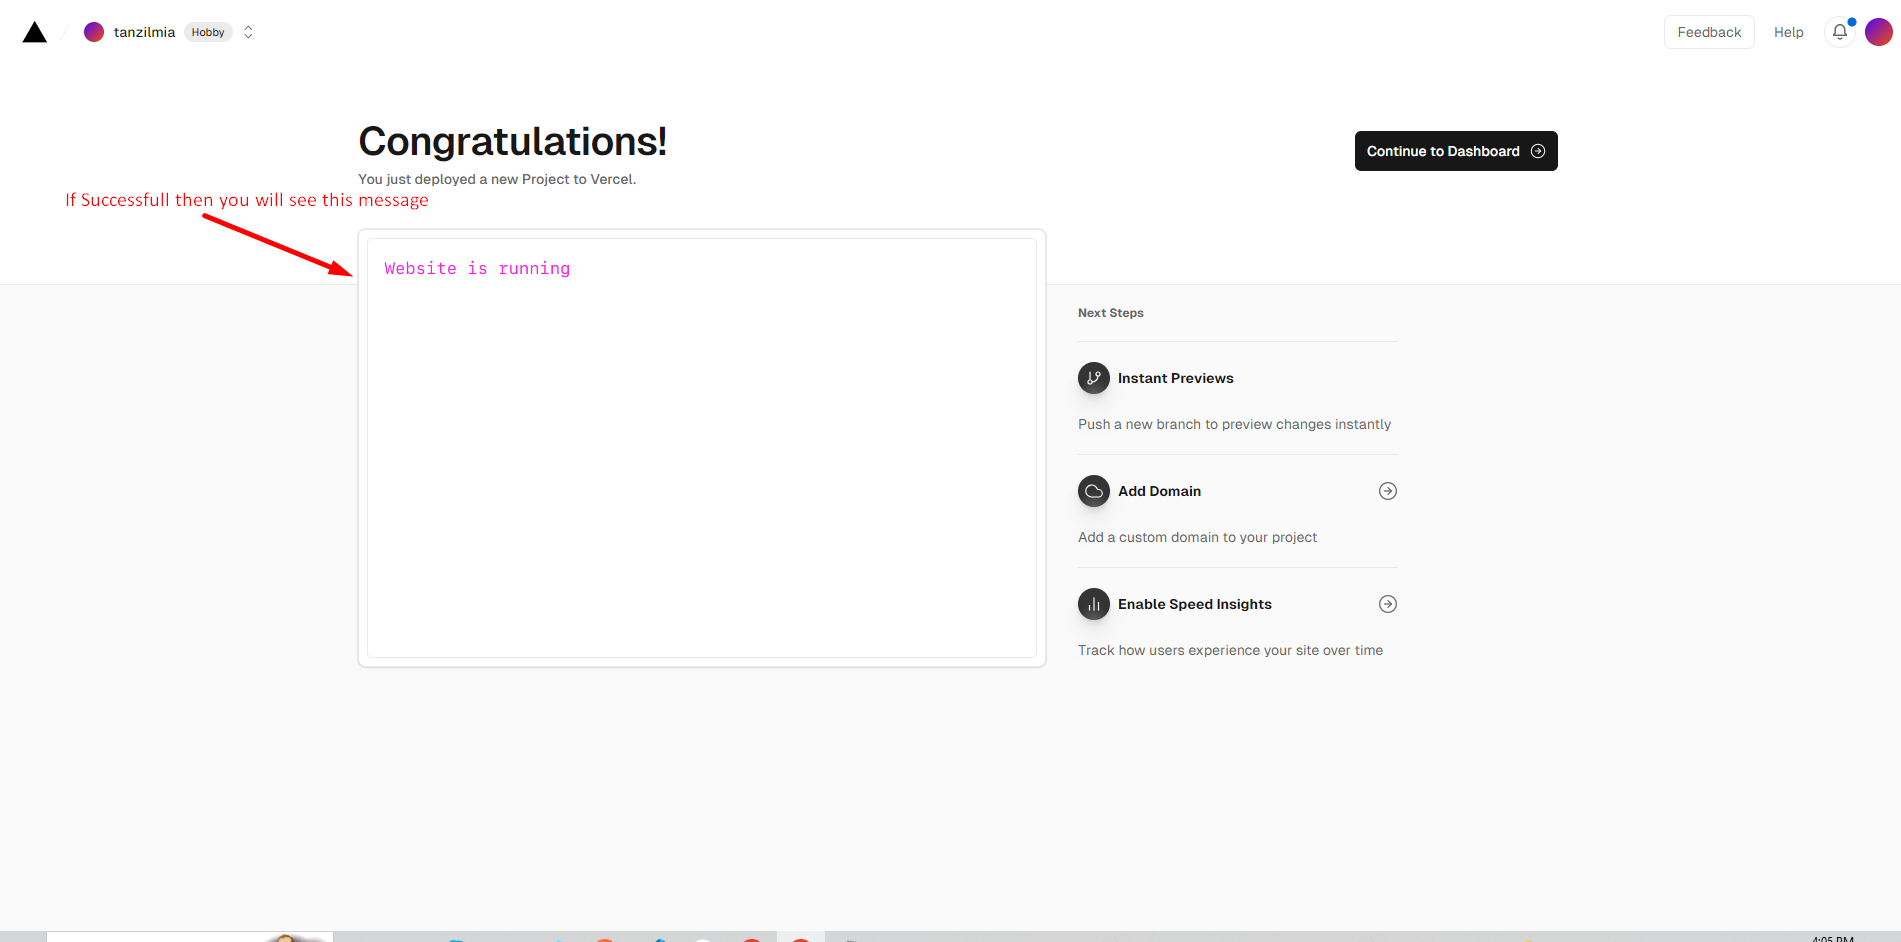
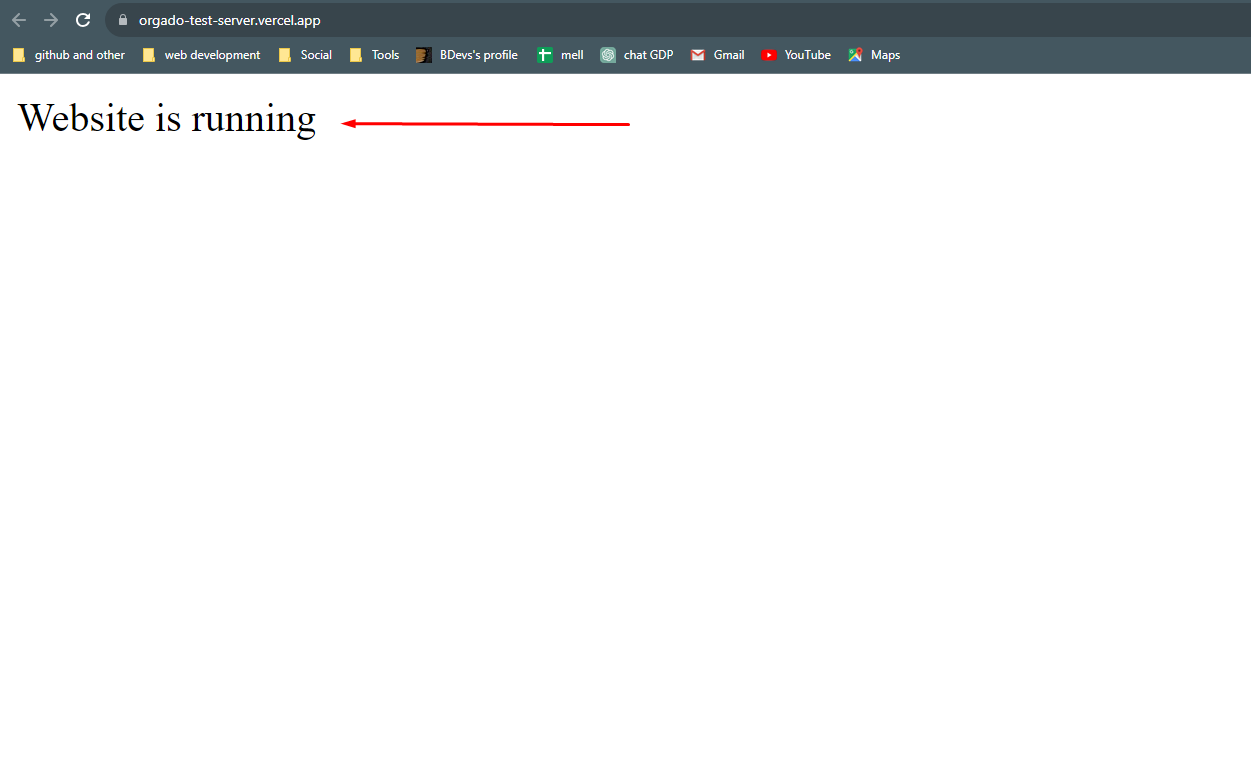
How can I Check Server Is Running On Vercel ?
[Note: Vercel Will Give You A Preview Link For Check Your API Link , Open This Link On Your Browser Or PostMan Then You Will See This Text .]
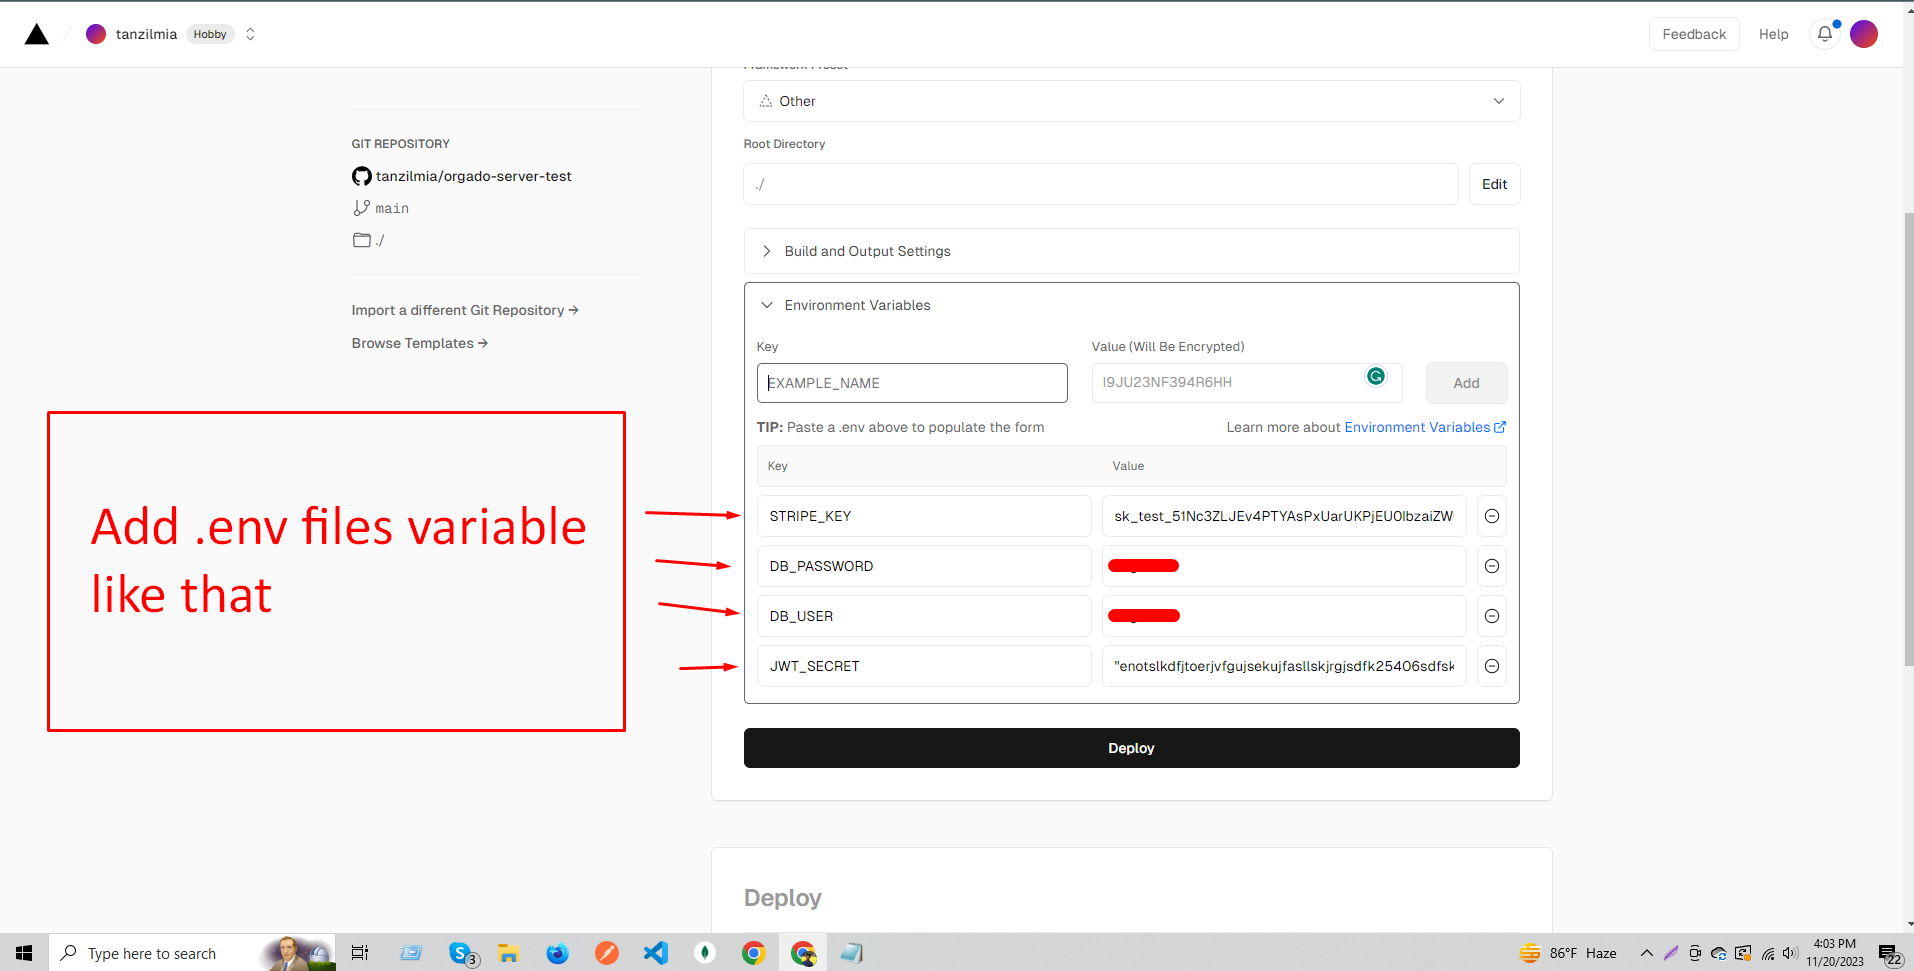
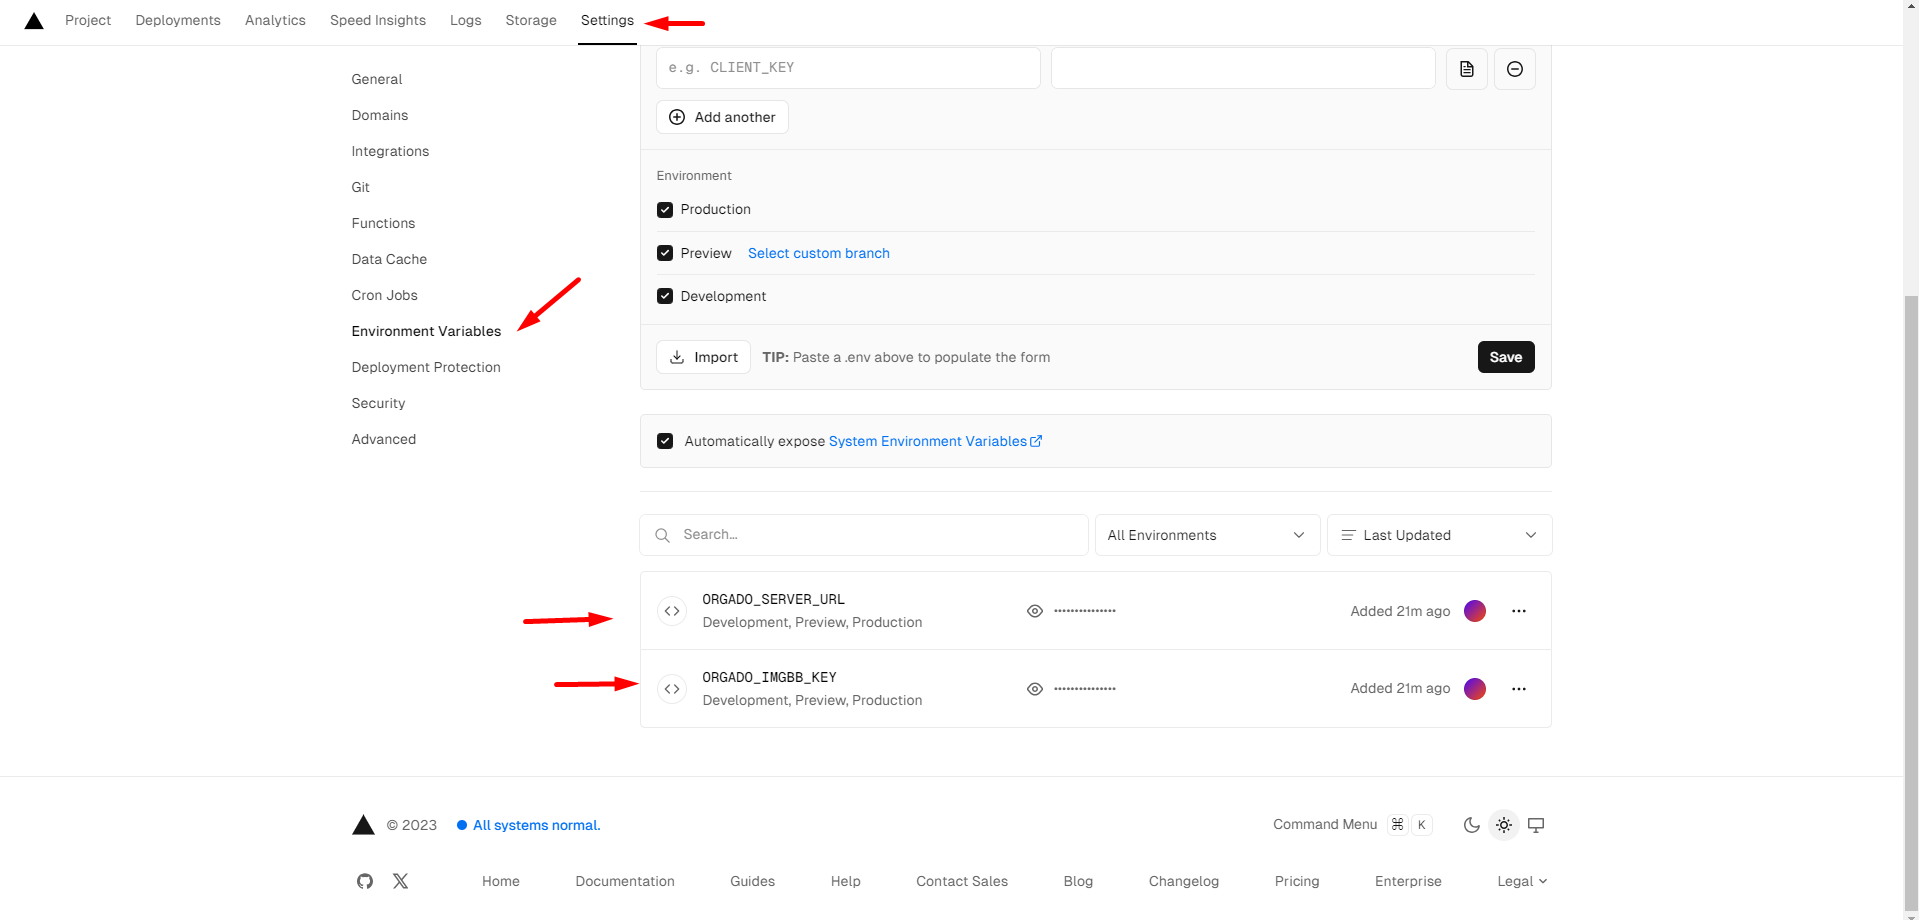
How can Add .env File On Vercel ?
[Note: It's Important To Add .env File text and Variables otherwise Your API will Not Work Properly]
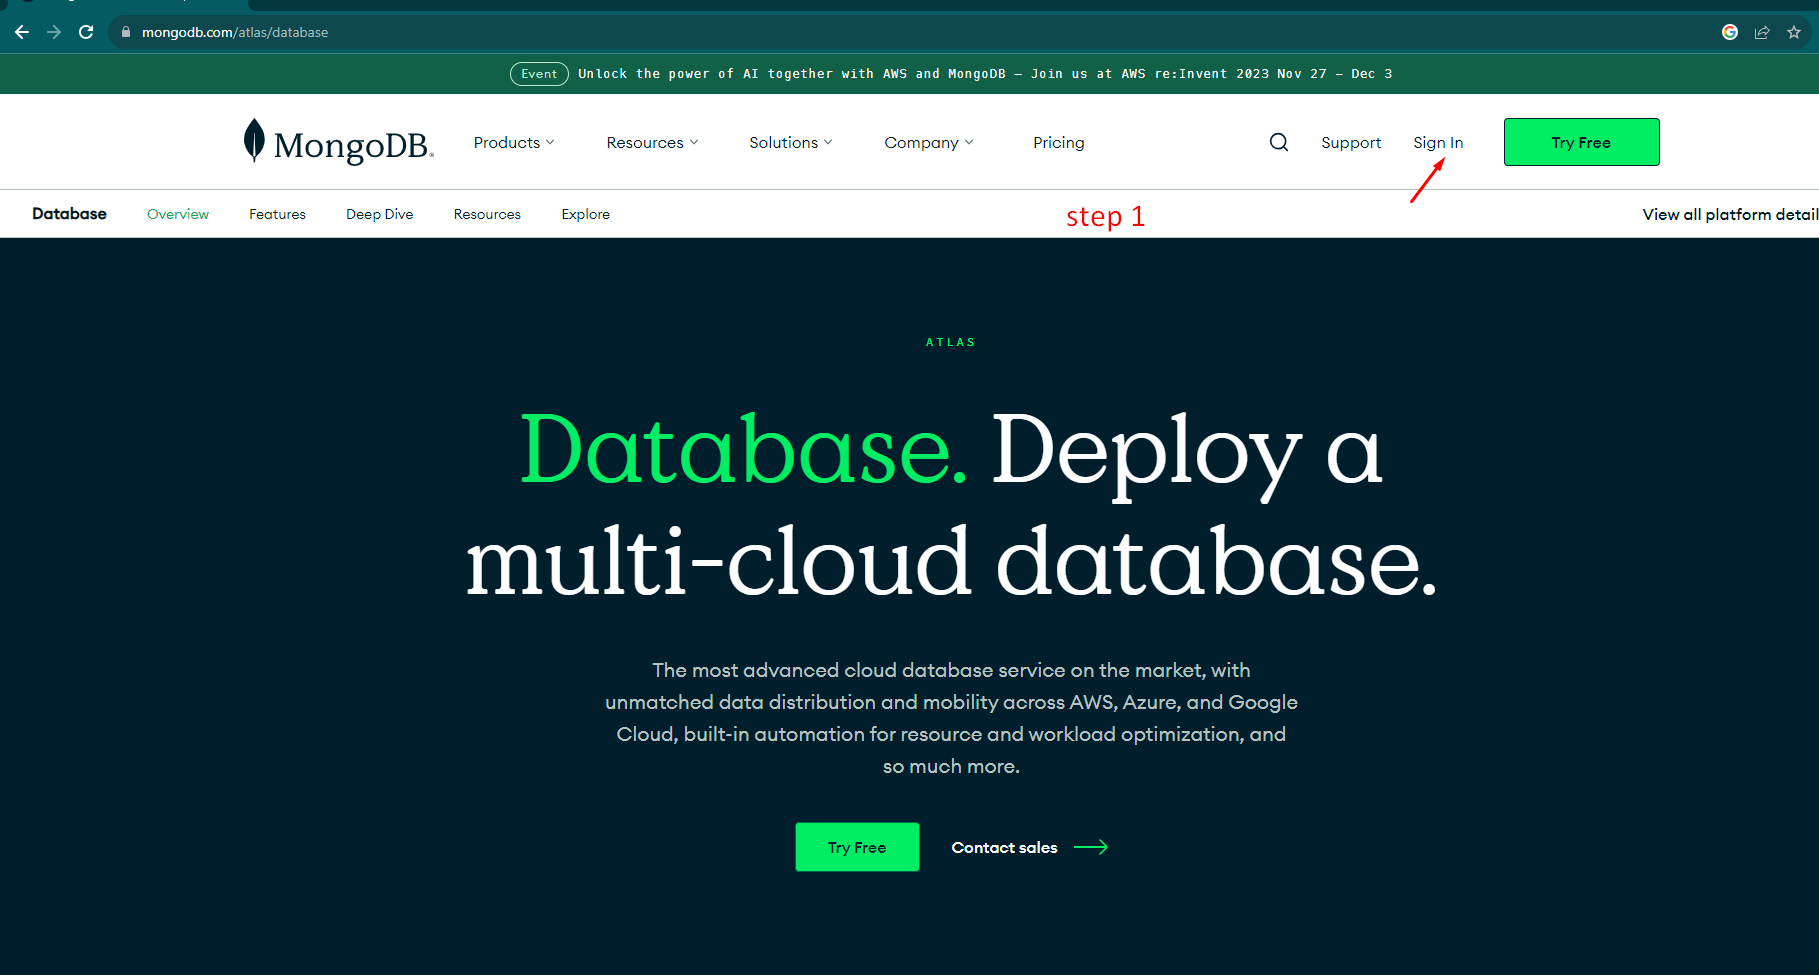
How To Login in MongoDB (Free Version)
Login Stapes In MongoDB
Step 1
Want Sign Up In MongoDB ? Click Here
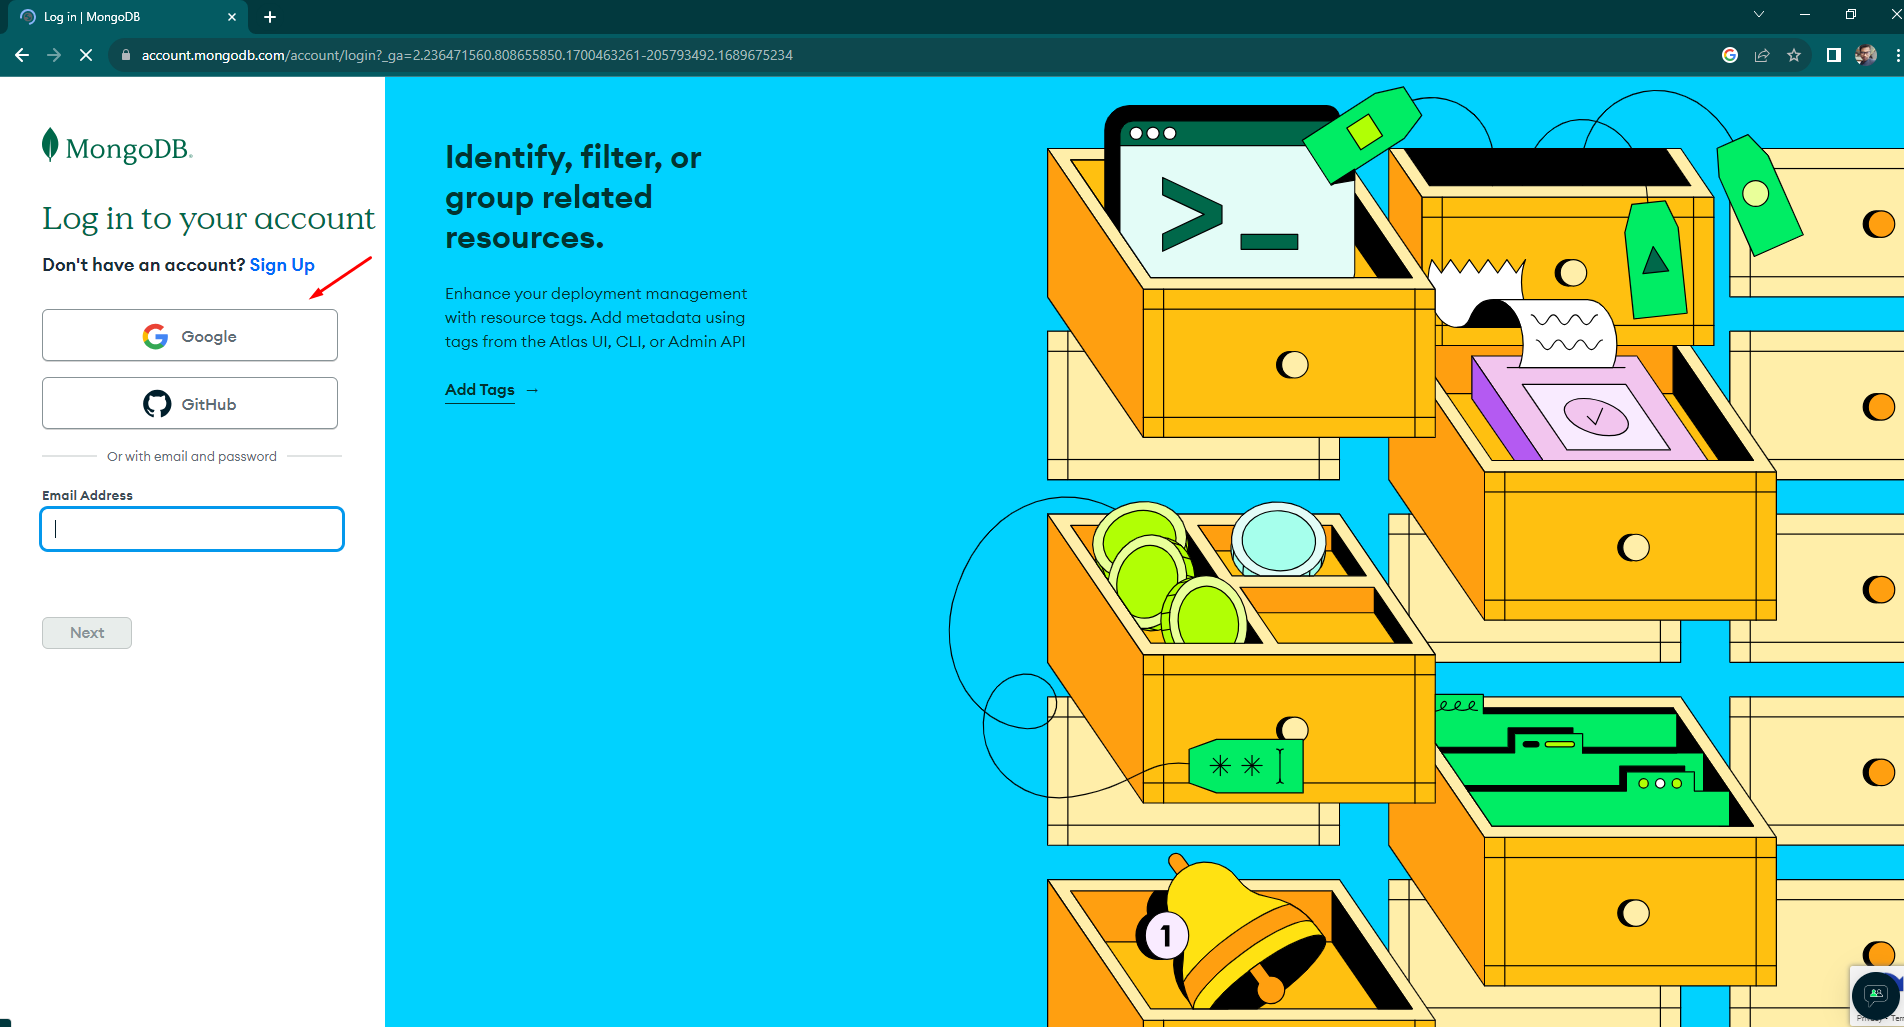
Step 2
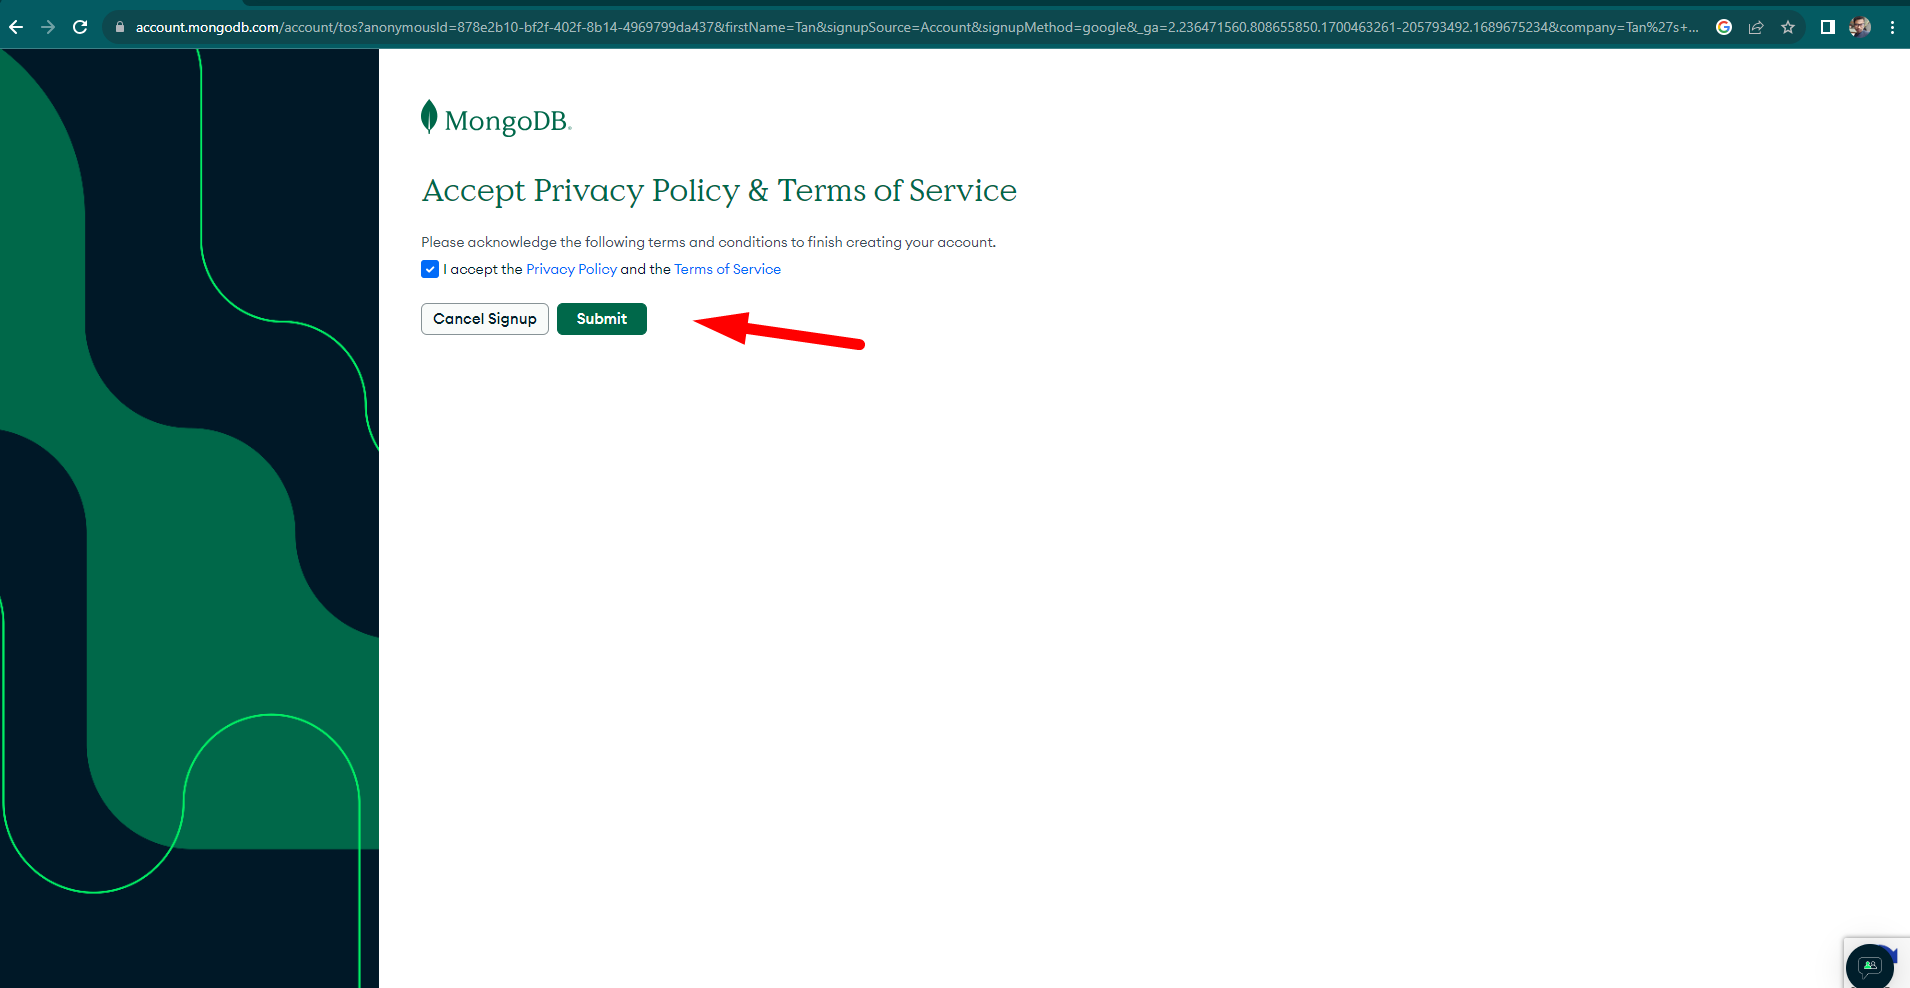
Step 3
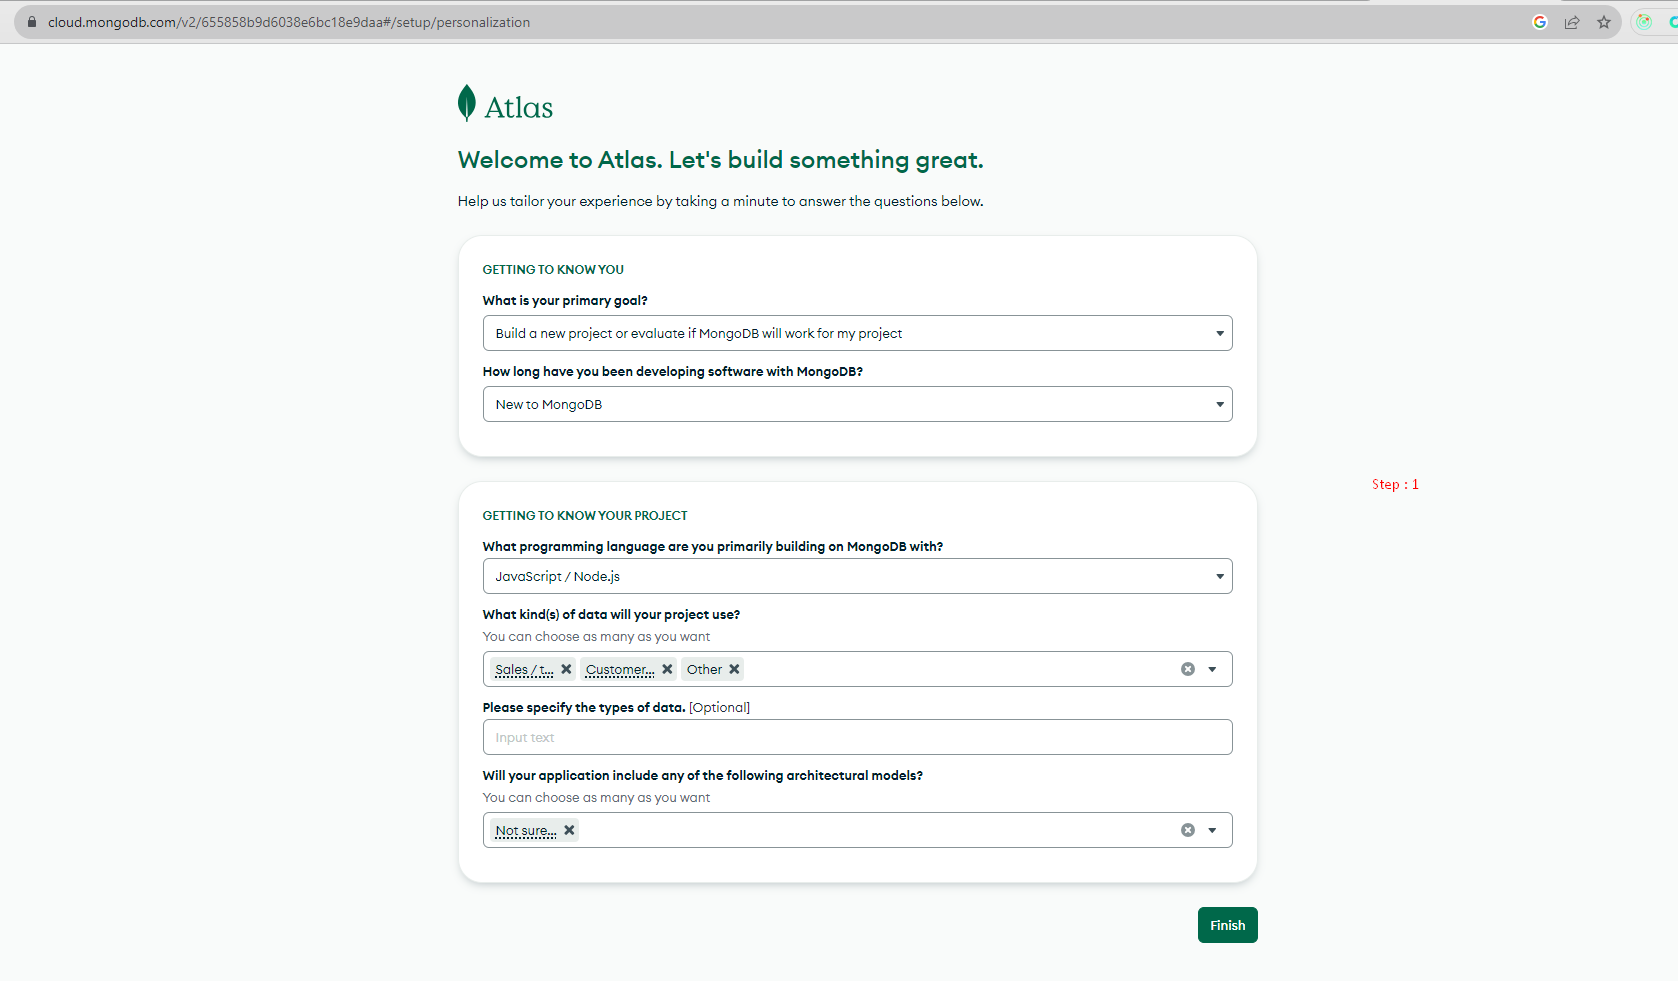
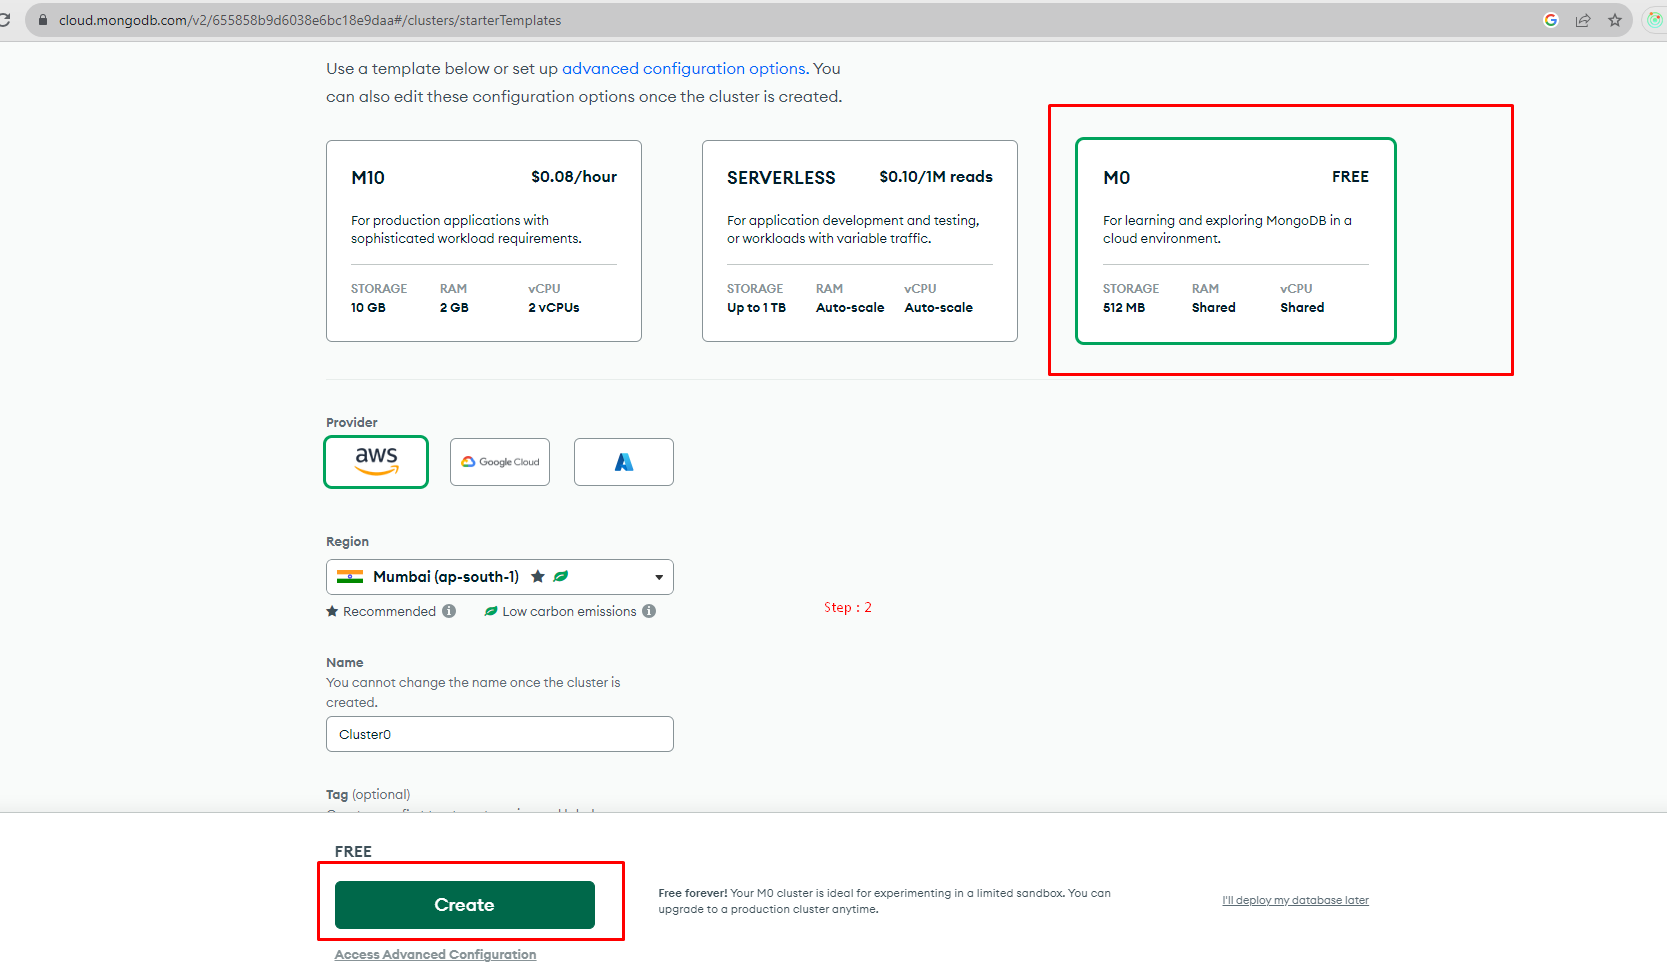
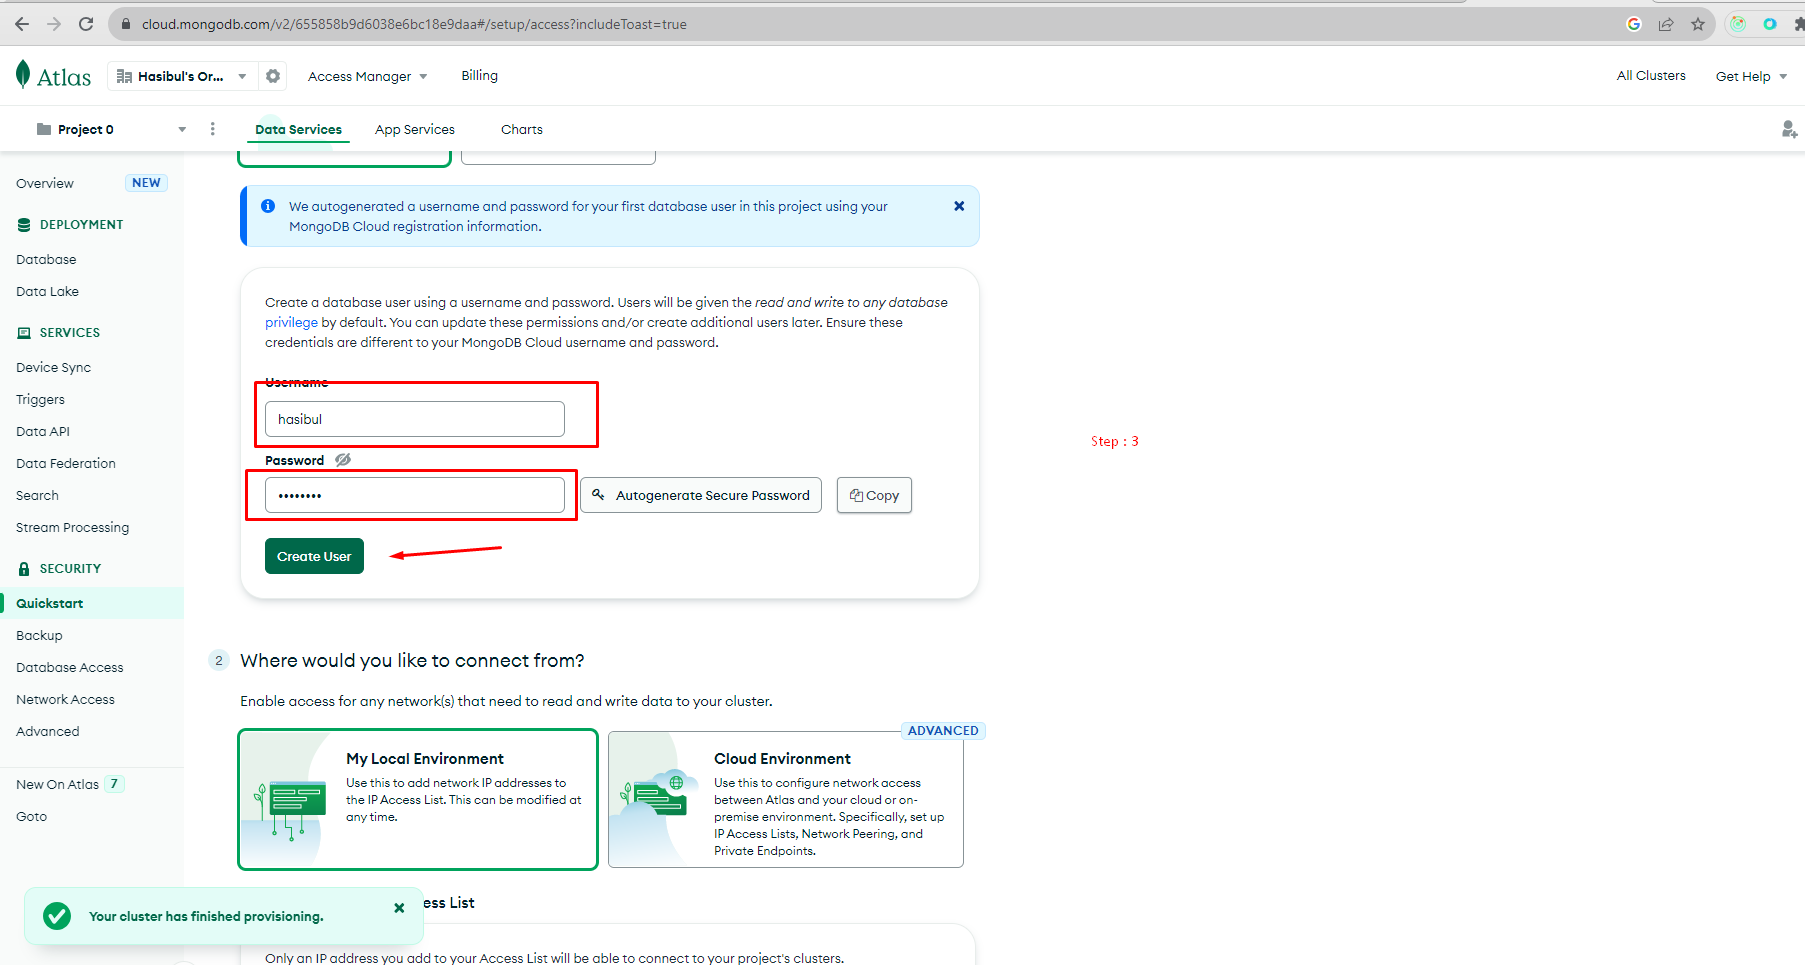
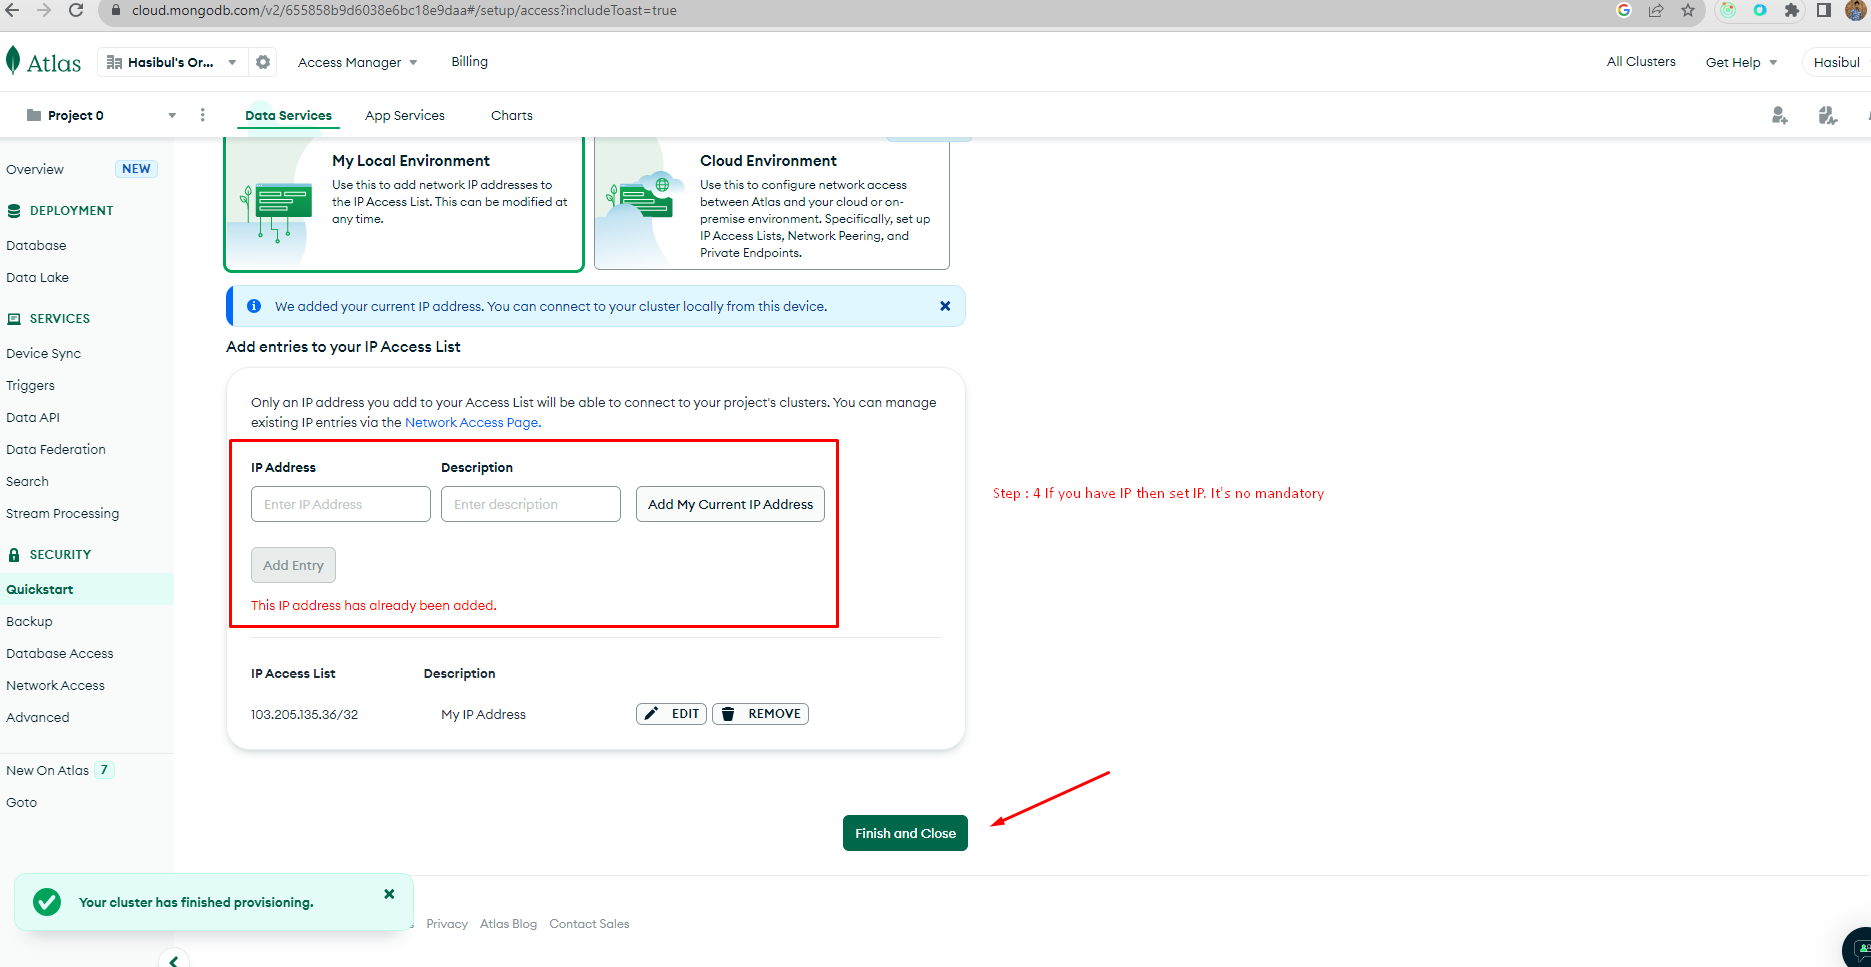
How To Create Database in MongoDB (Free Version)
After Login Follow This Steps
Step 1
Step 2
Step 3
Step 4
Step 5
Step 6
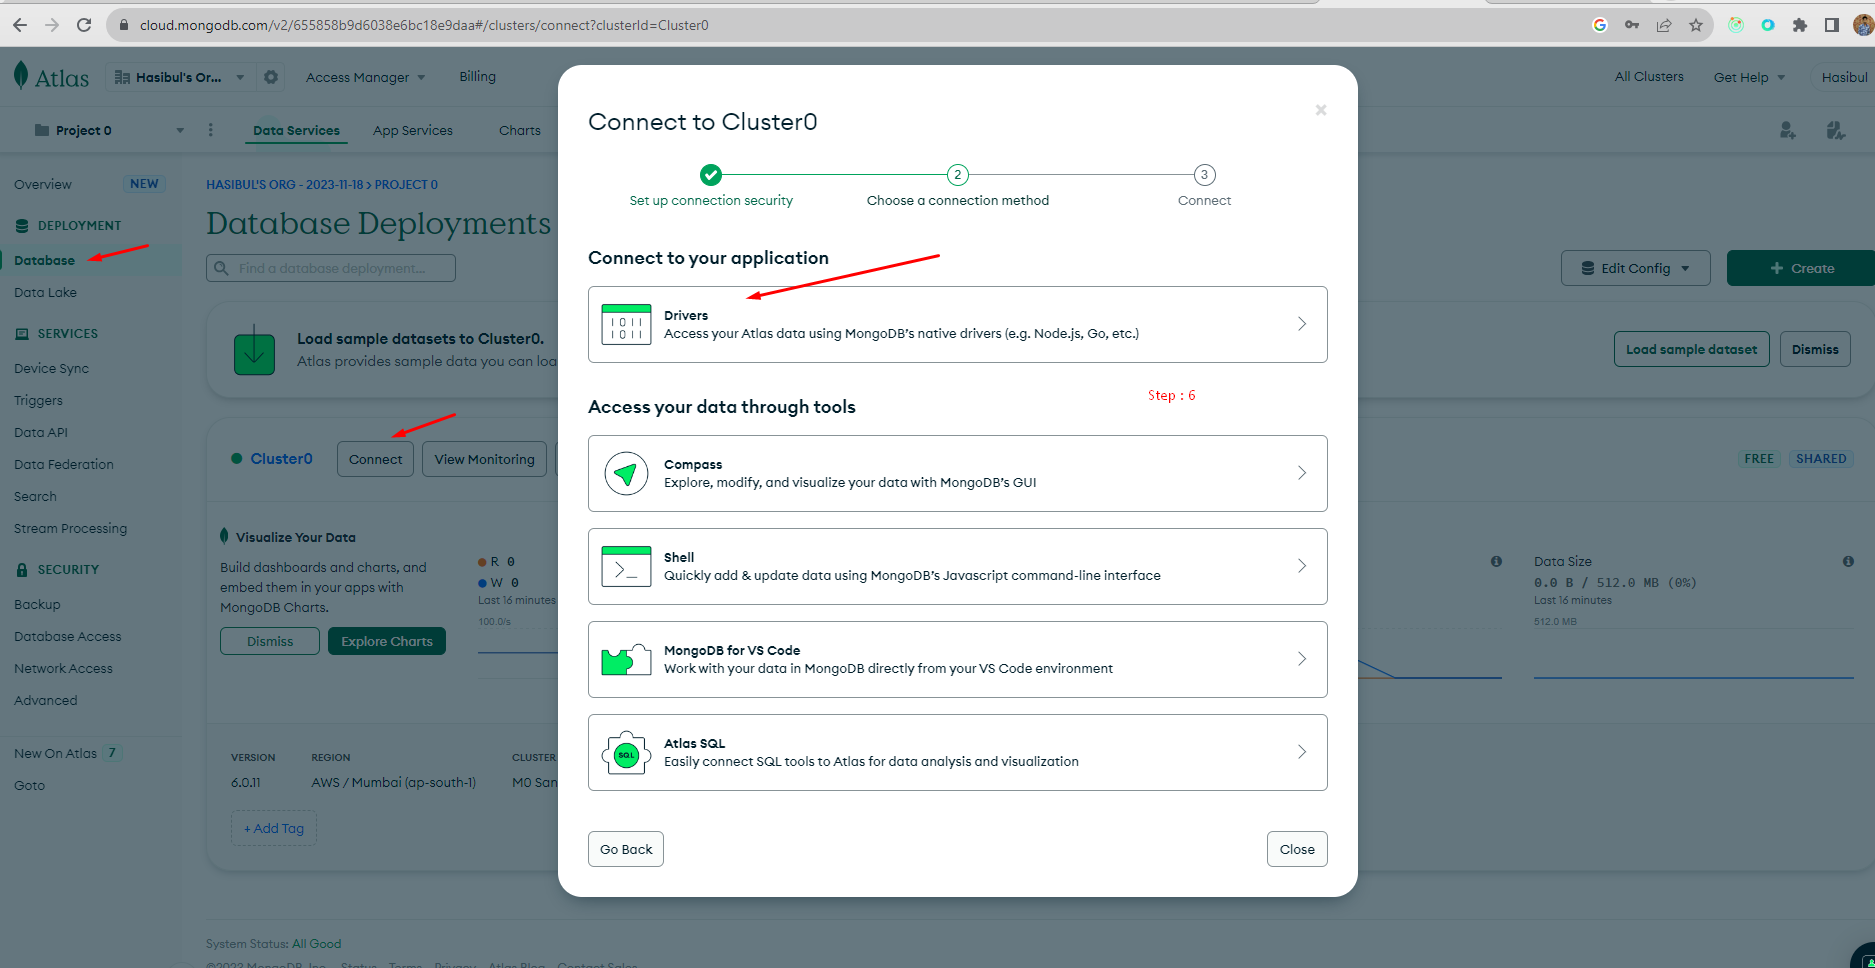
Step 7
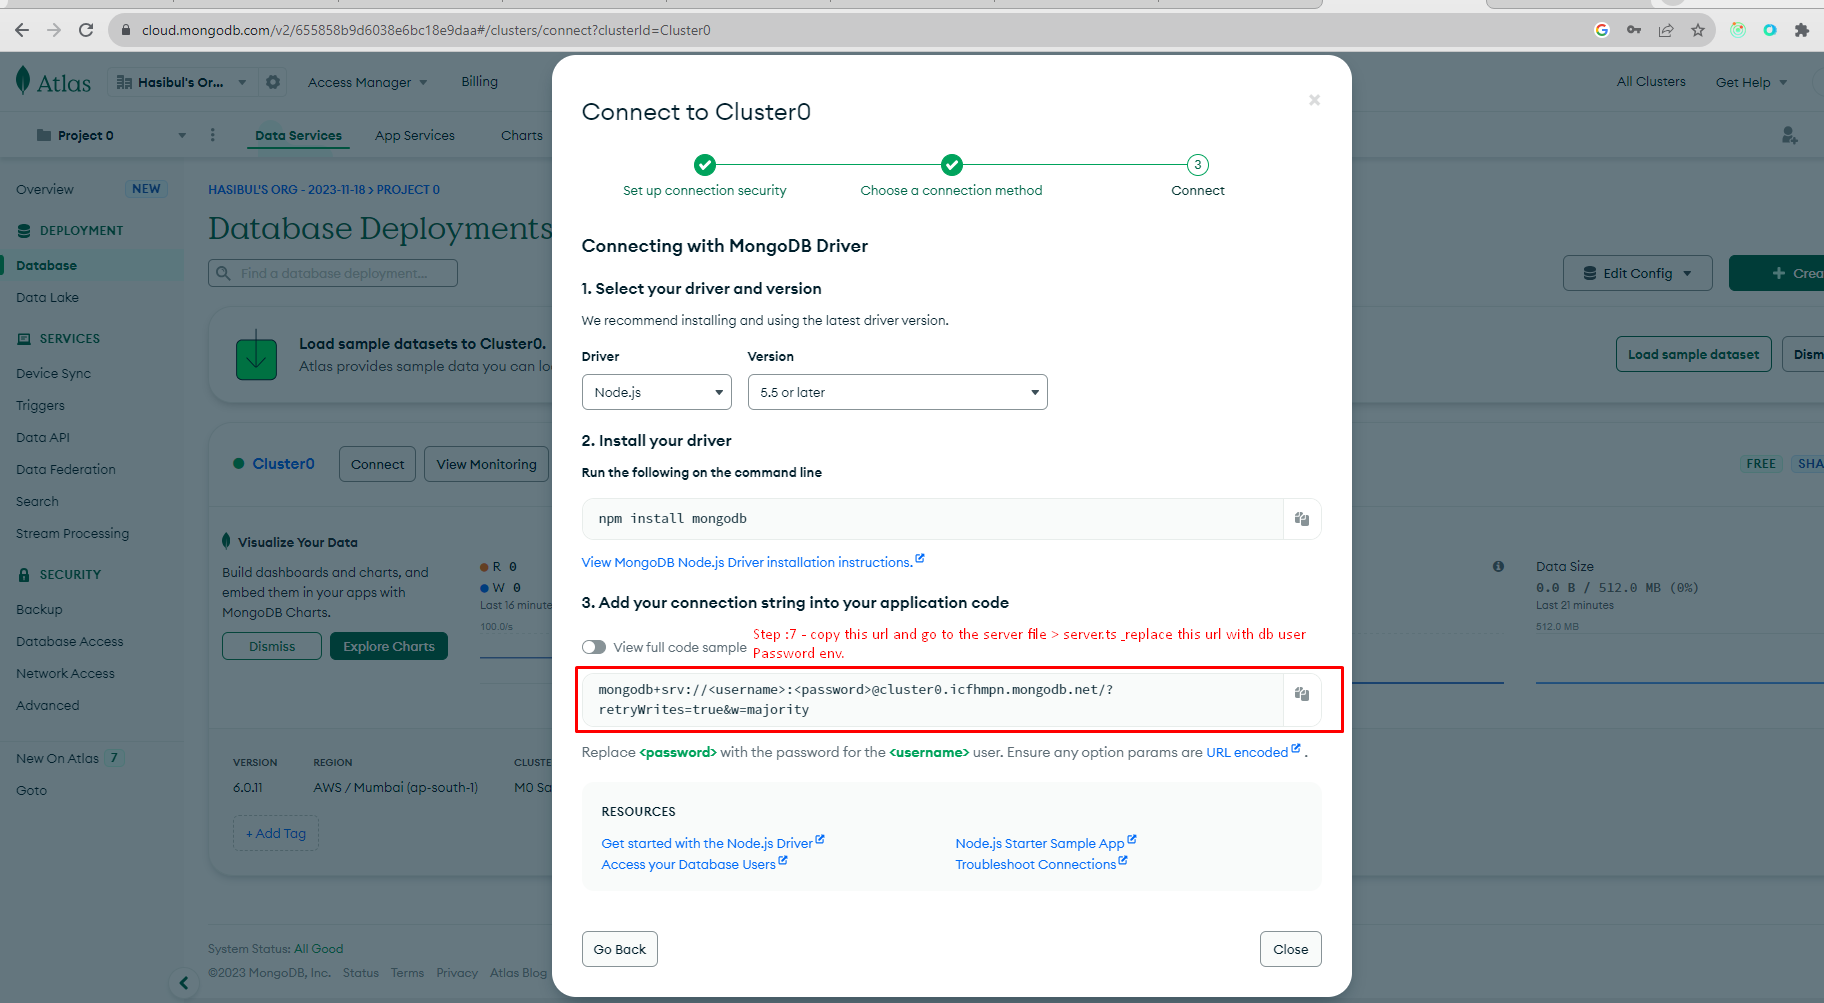
Step 8
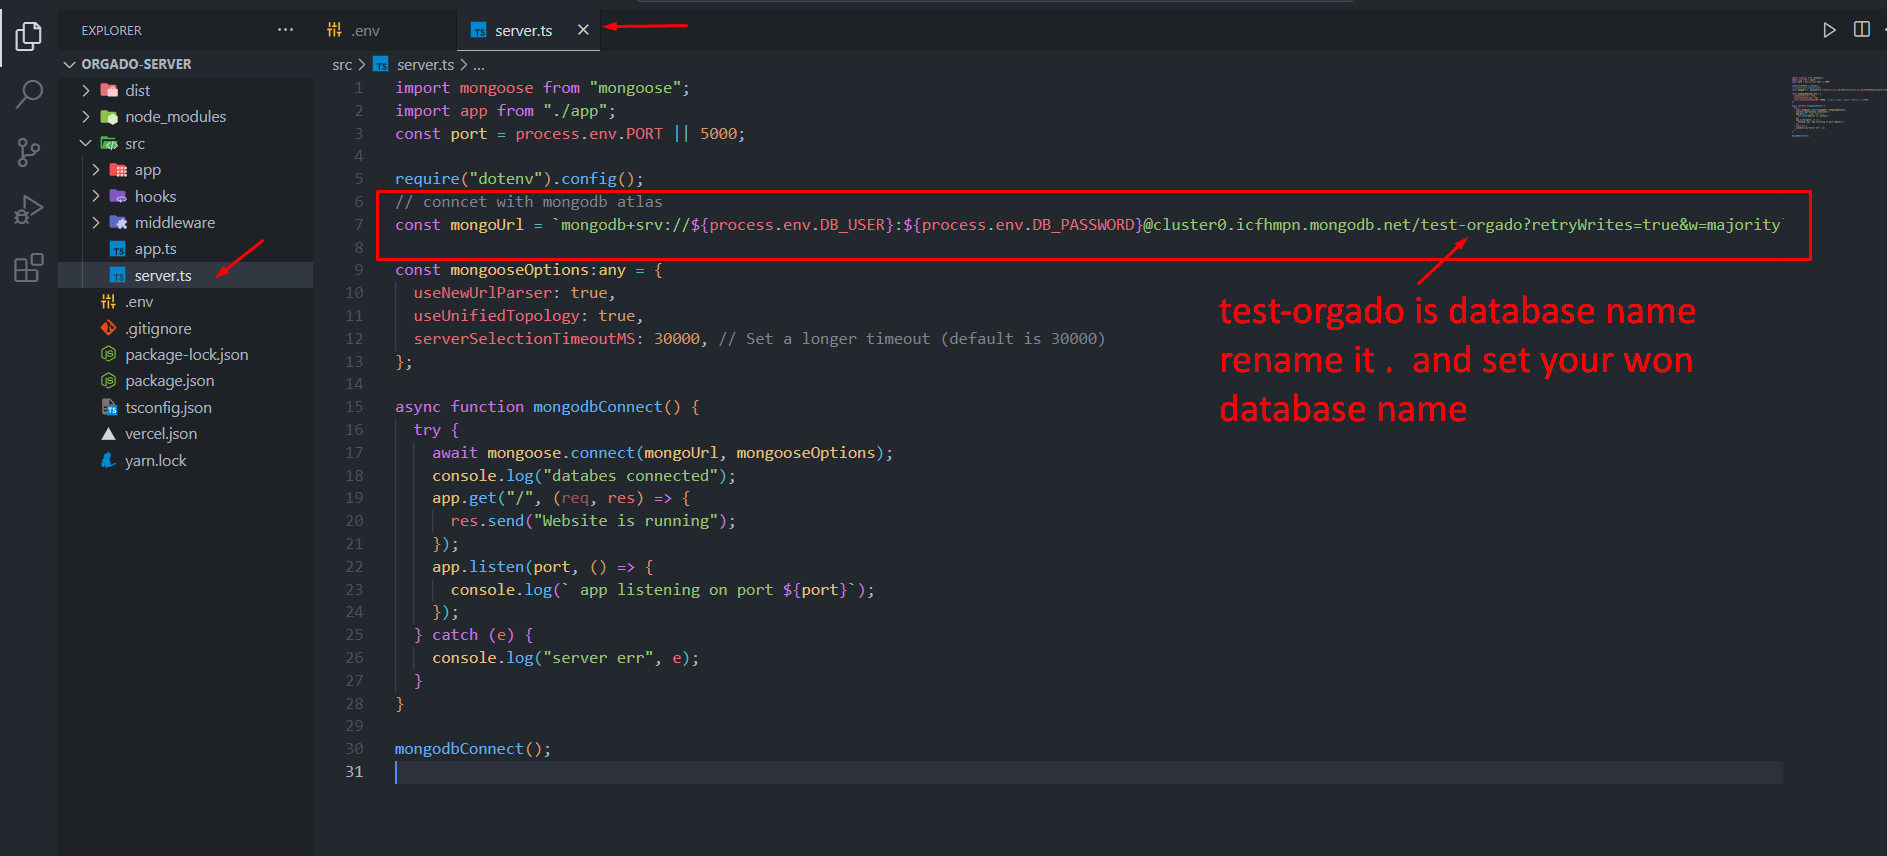
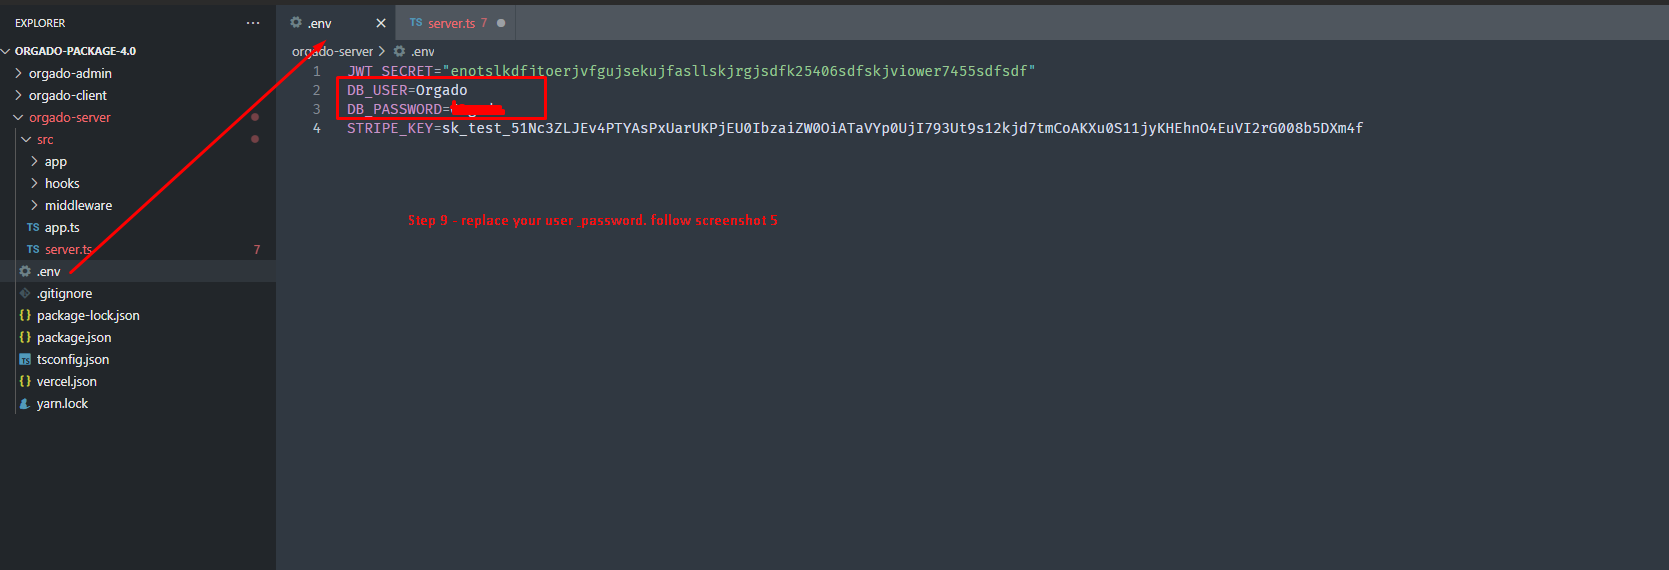
Go To Your Server Project And Replace The Url Link , And befor ? Add Your Database Name. Follow The Img
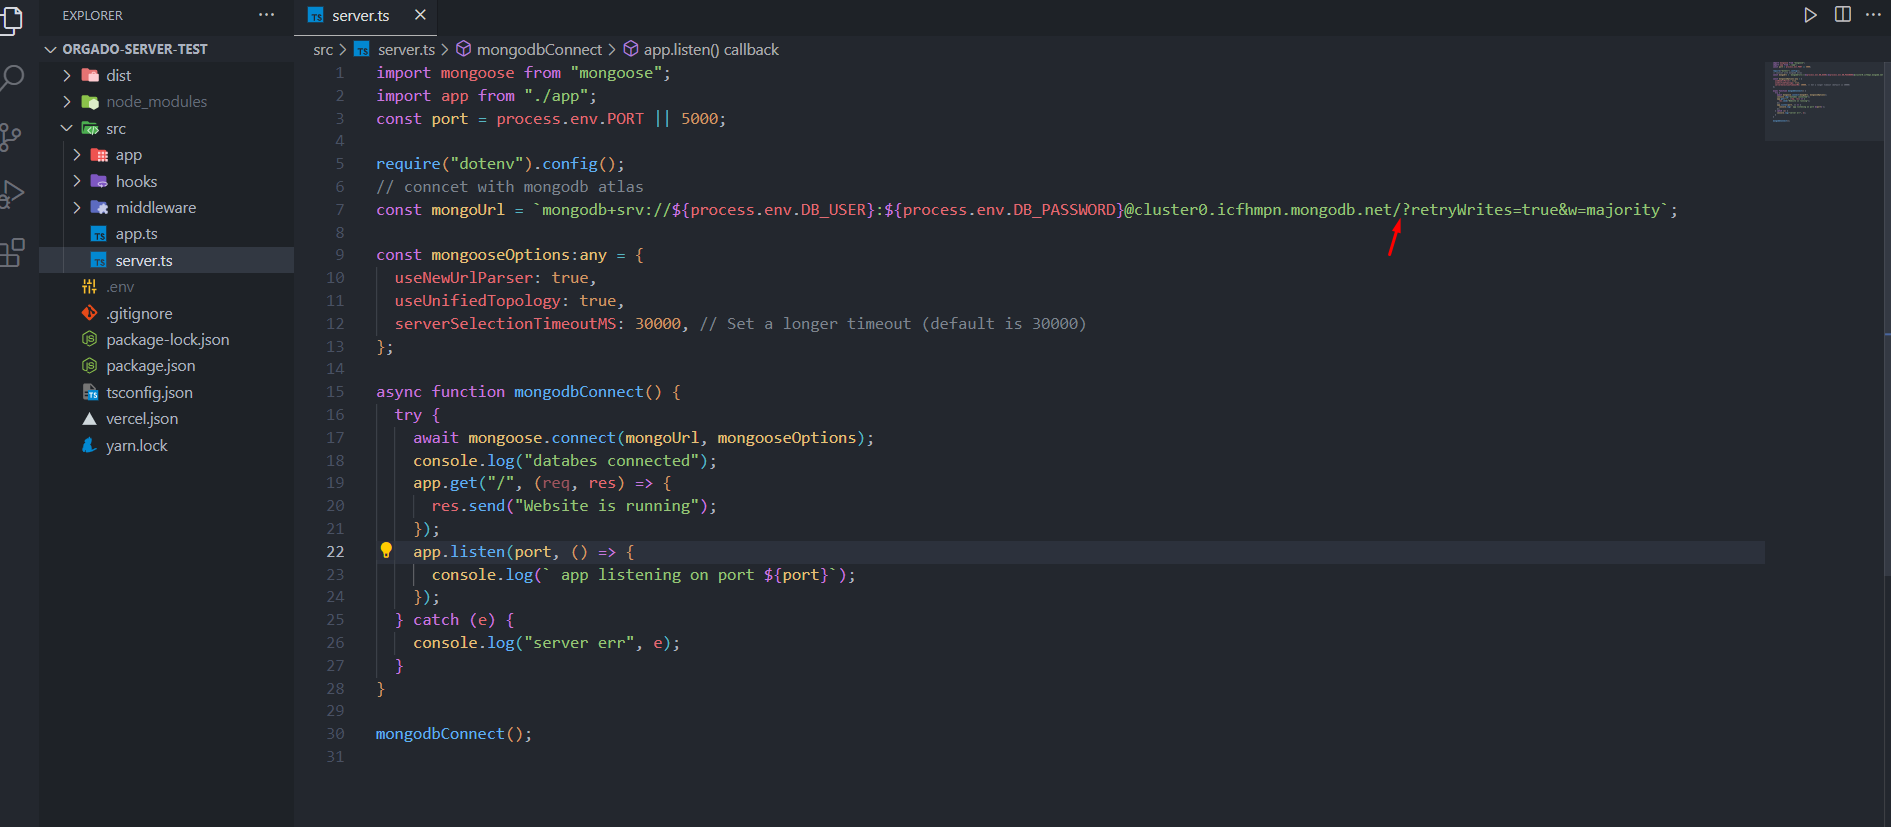
Step 9
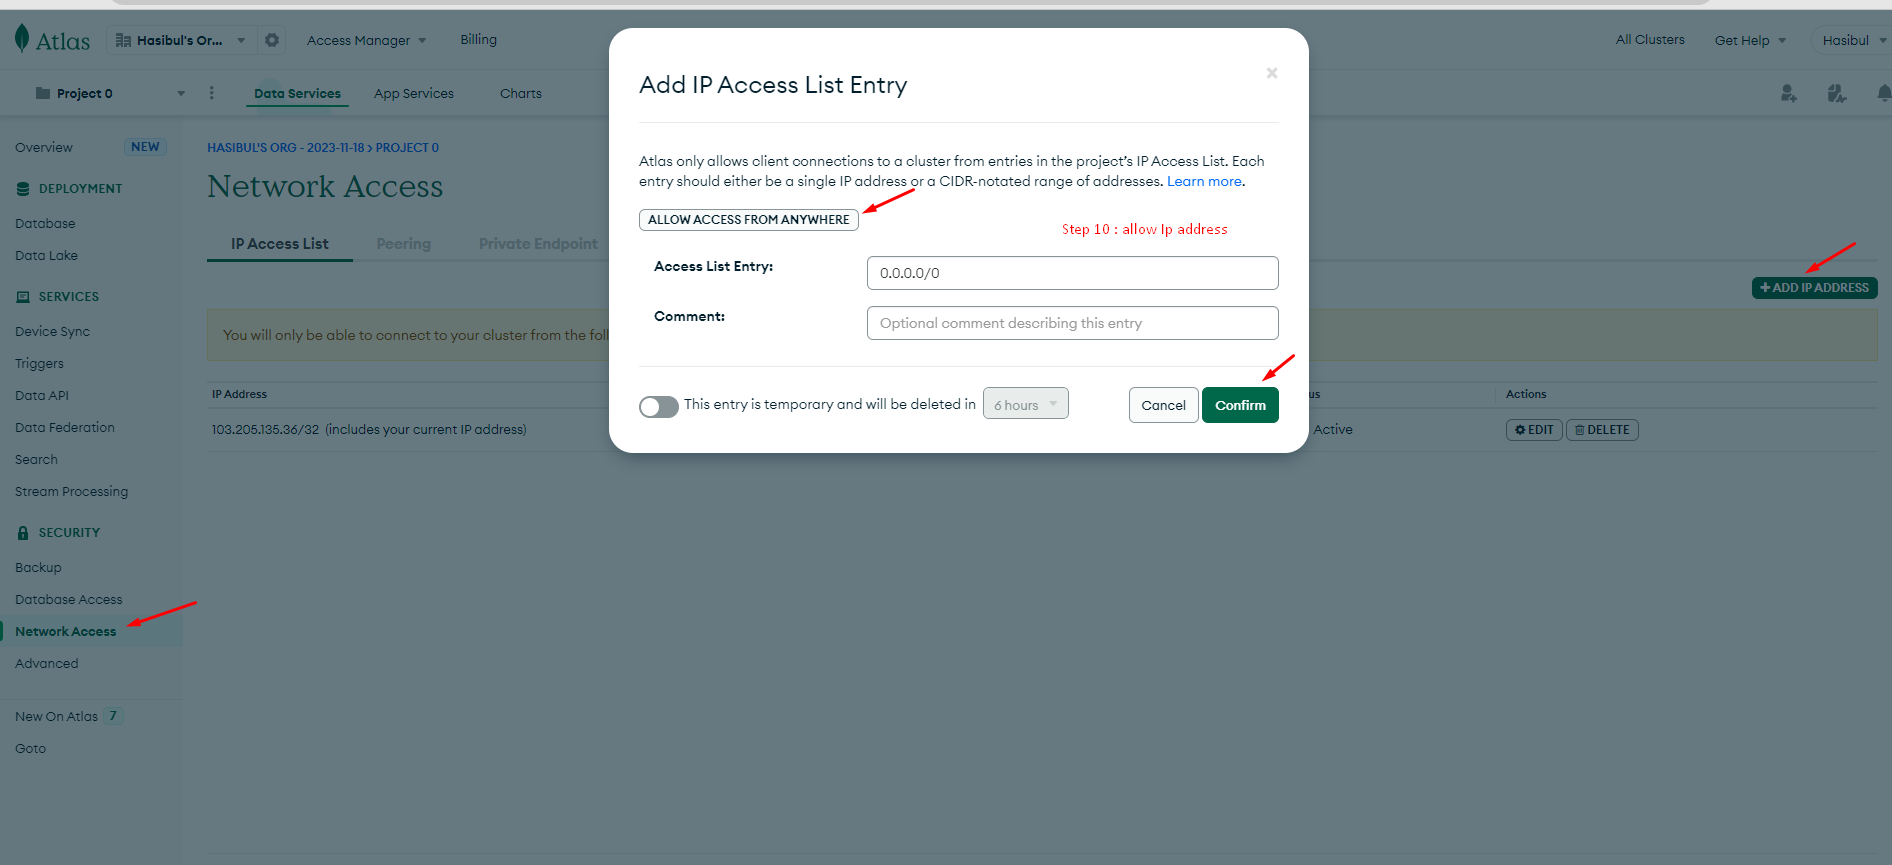
Step 10
Step 11
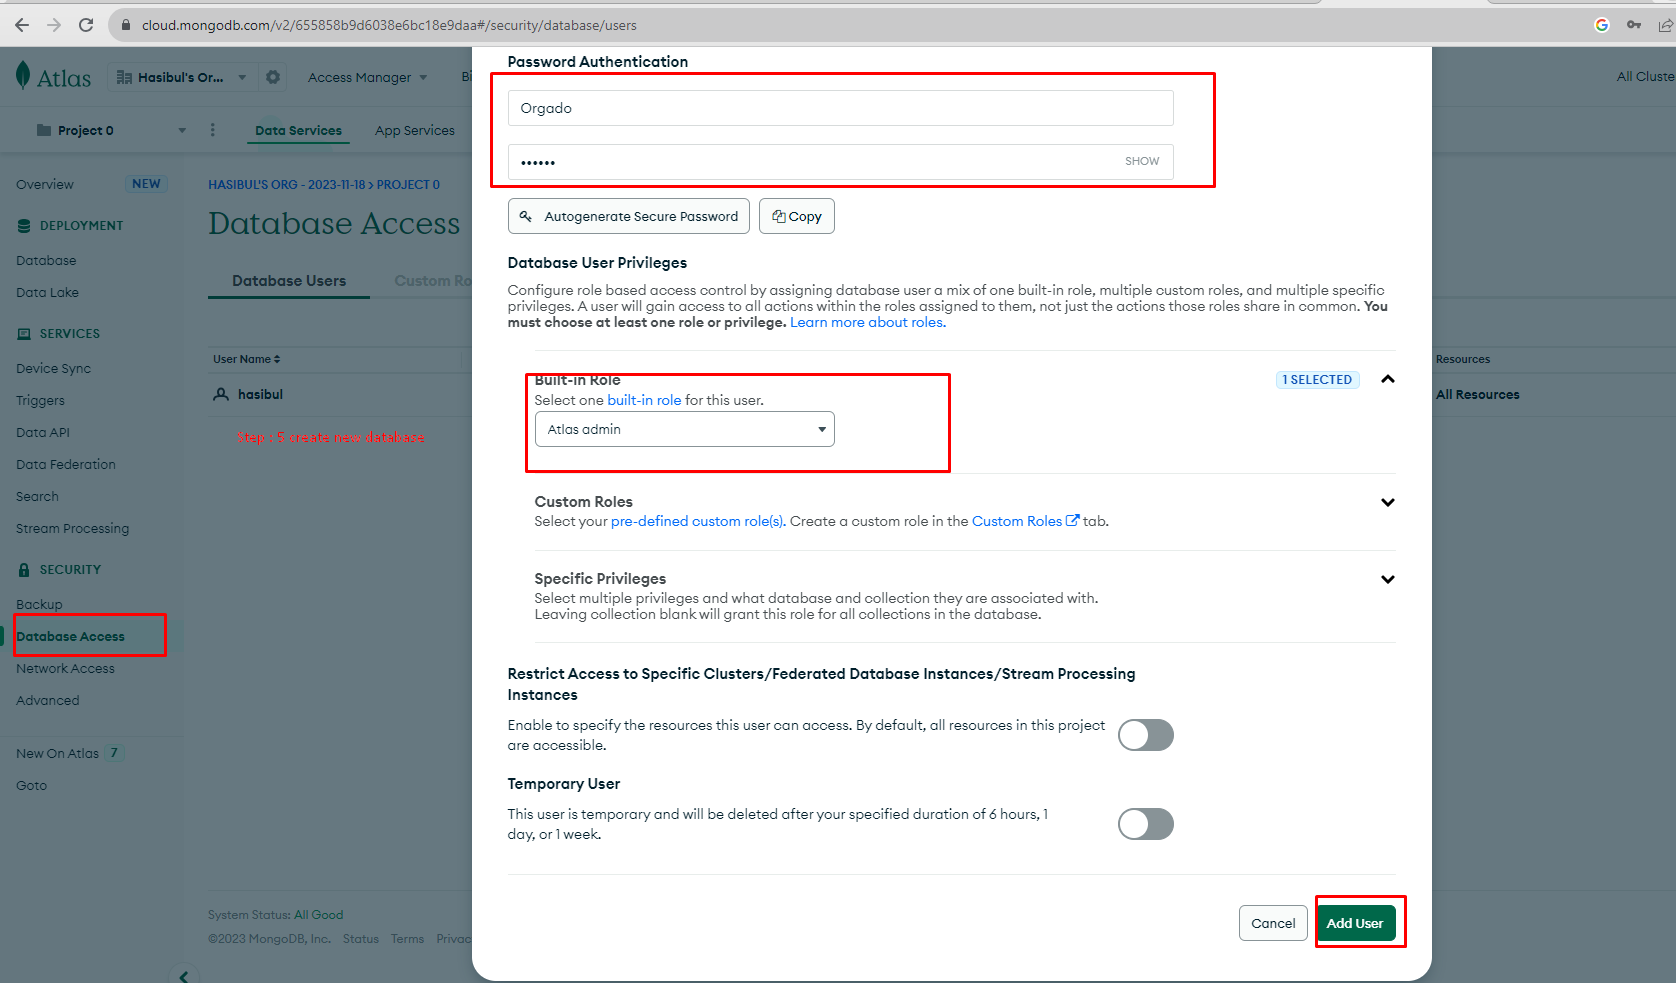
How To get admin Power
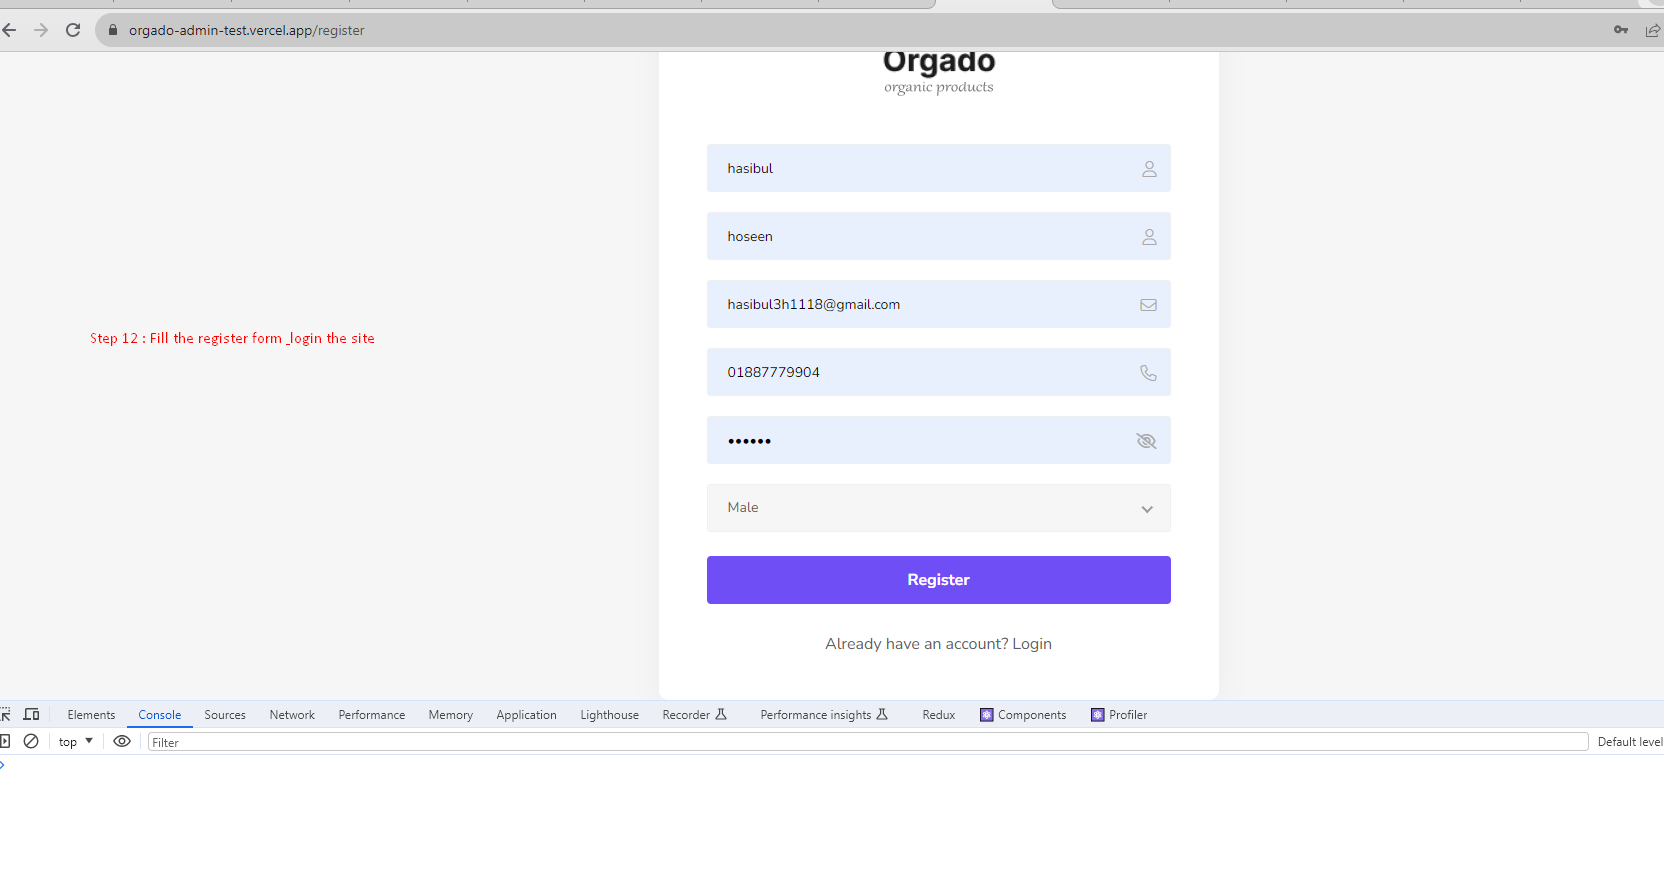
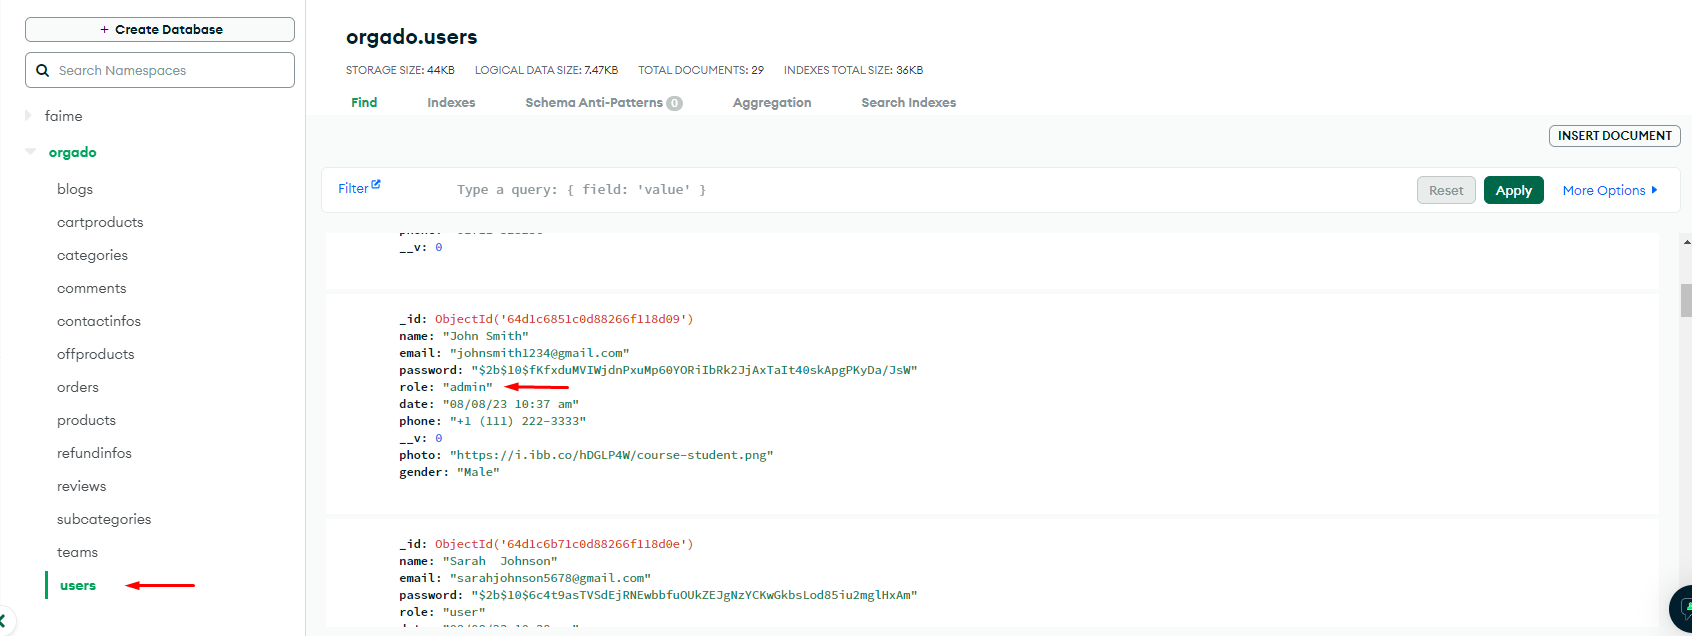
How To Get Admin Power First Time ?
First of all go your Mongodb database you will see the role:user and change it to admin (first time ) , then you get the admin power to your email, and you can then do all admin operations, and then you can make any user to admin from your admin Panel.
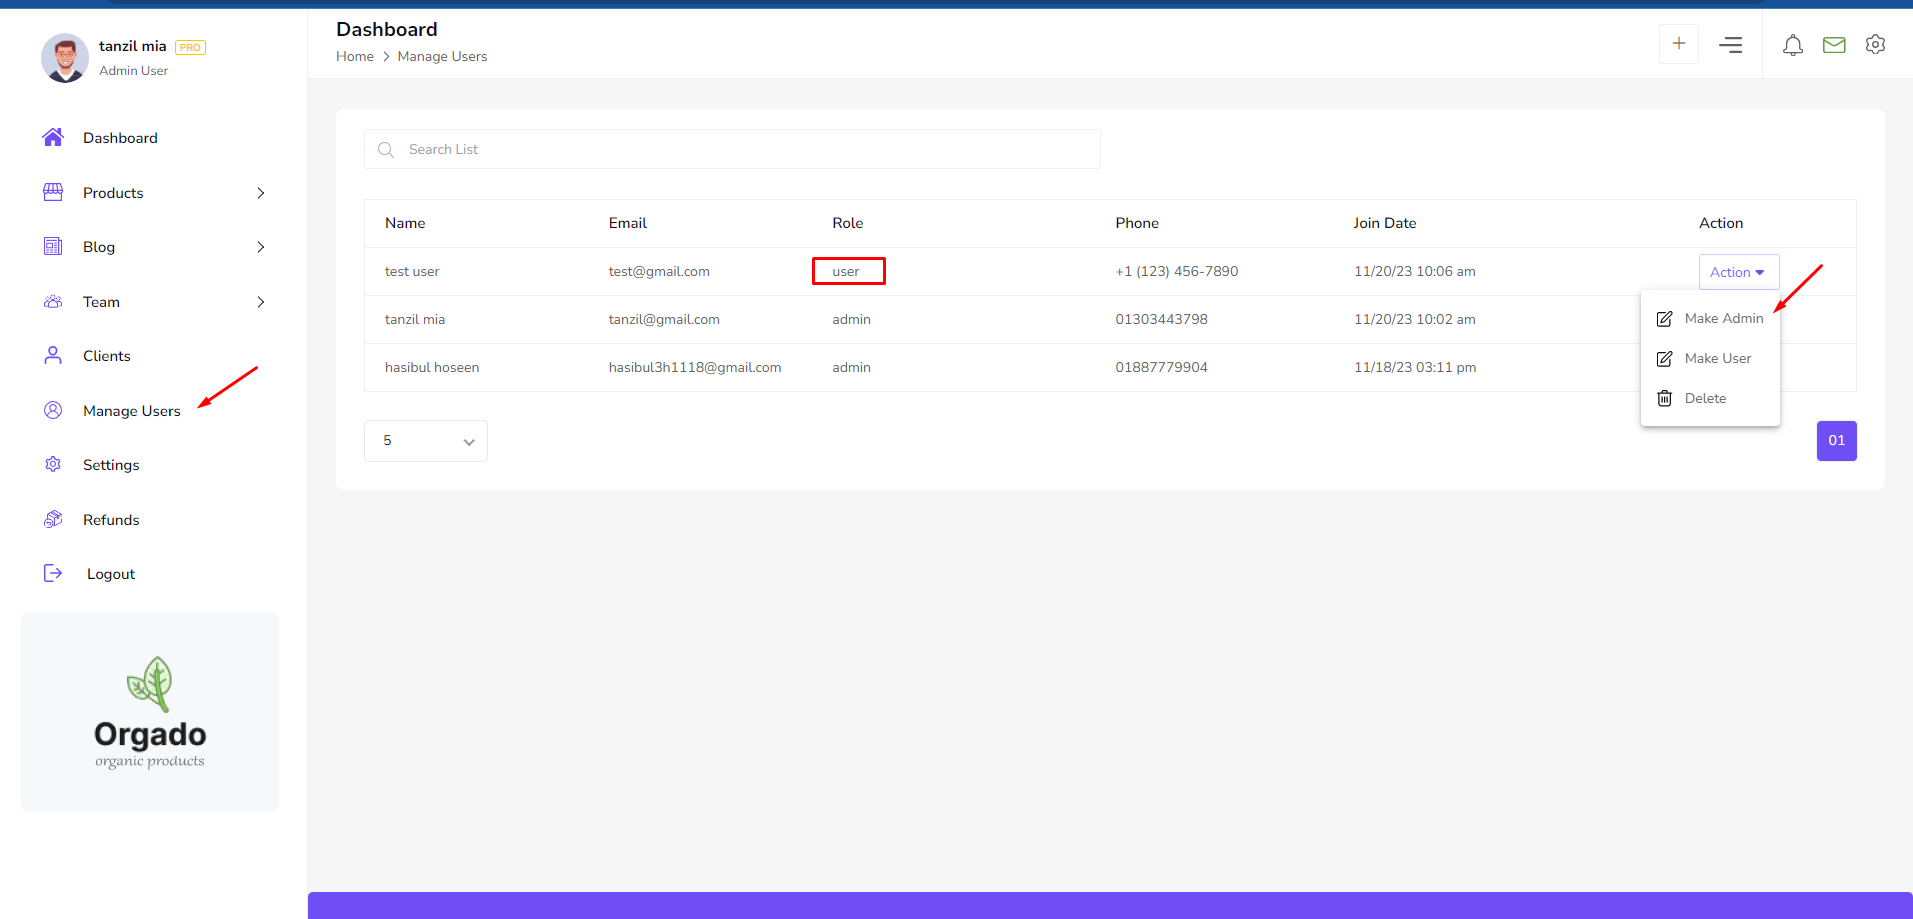
Make Any User To Admin From Admin Panel
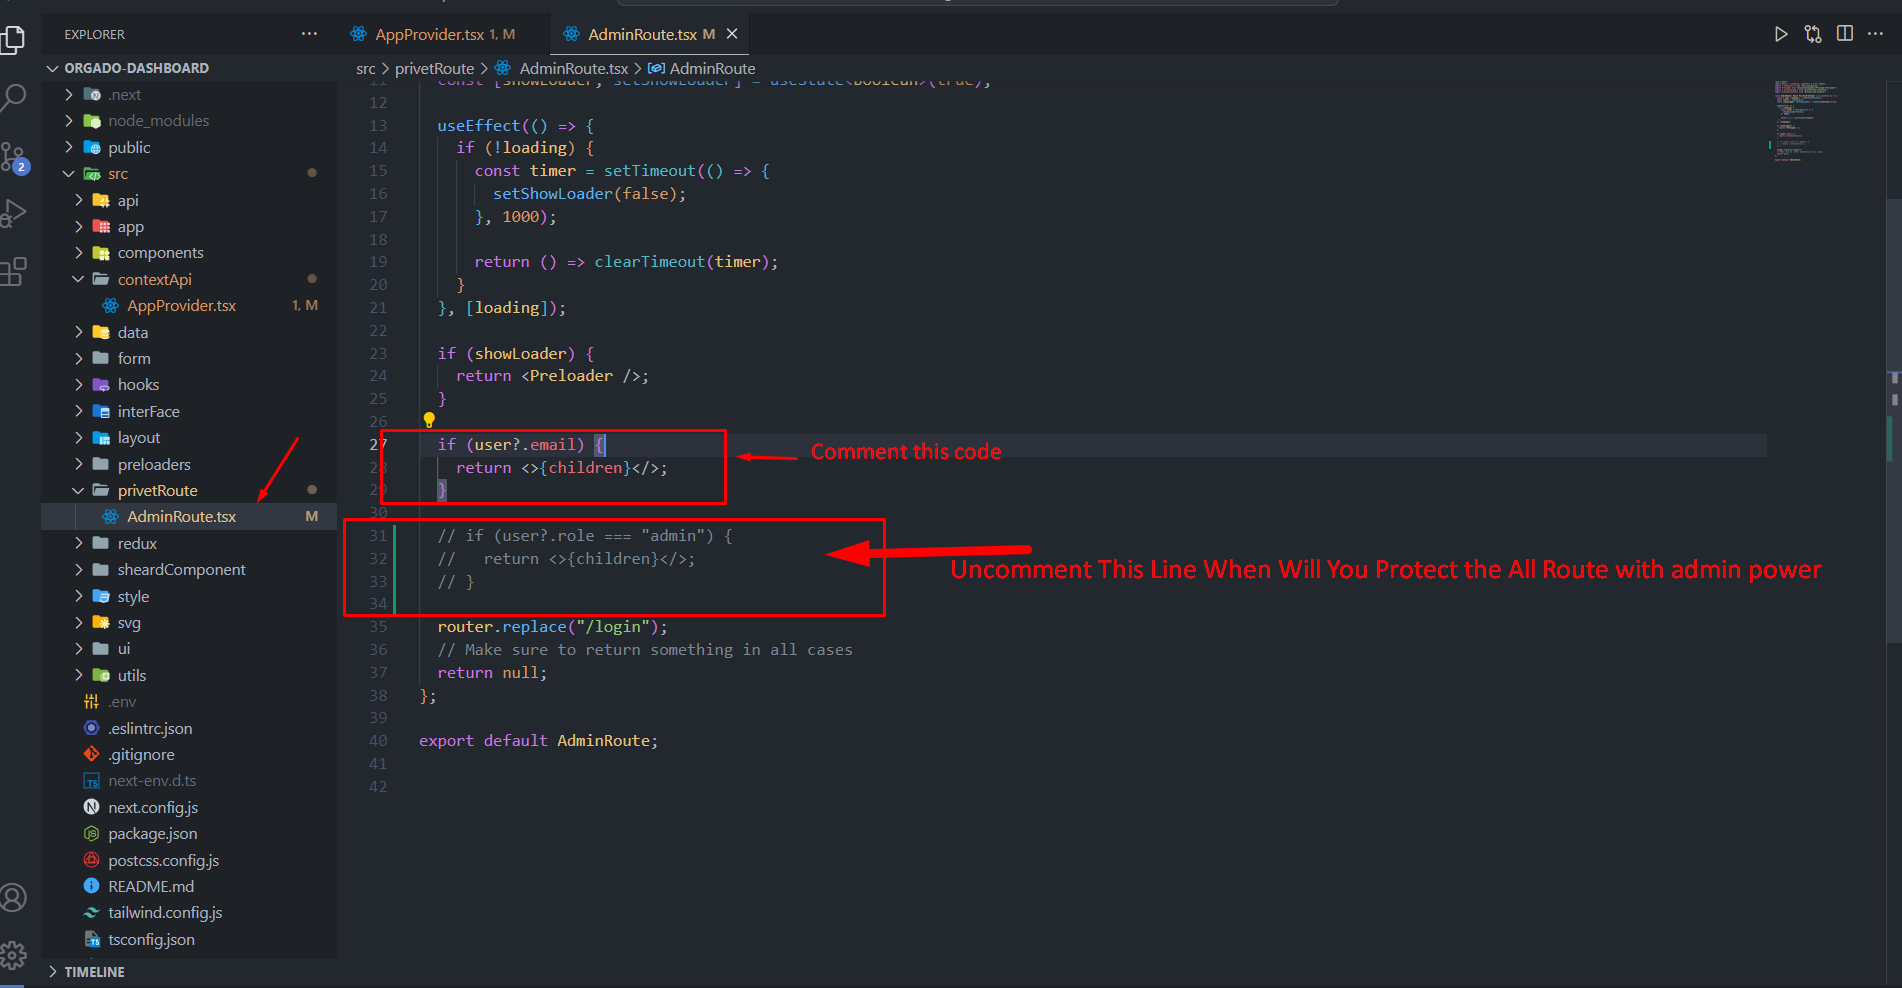
How To Protect Route For Admin , Admin Panel (If Not Protected)
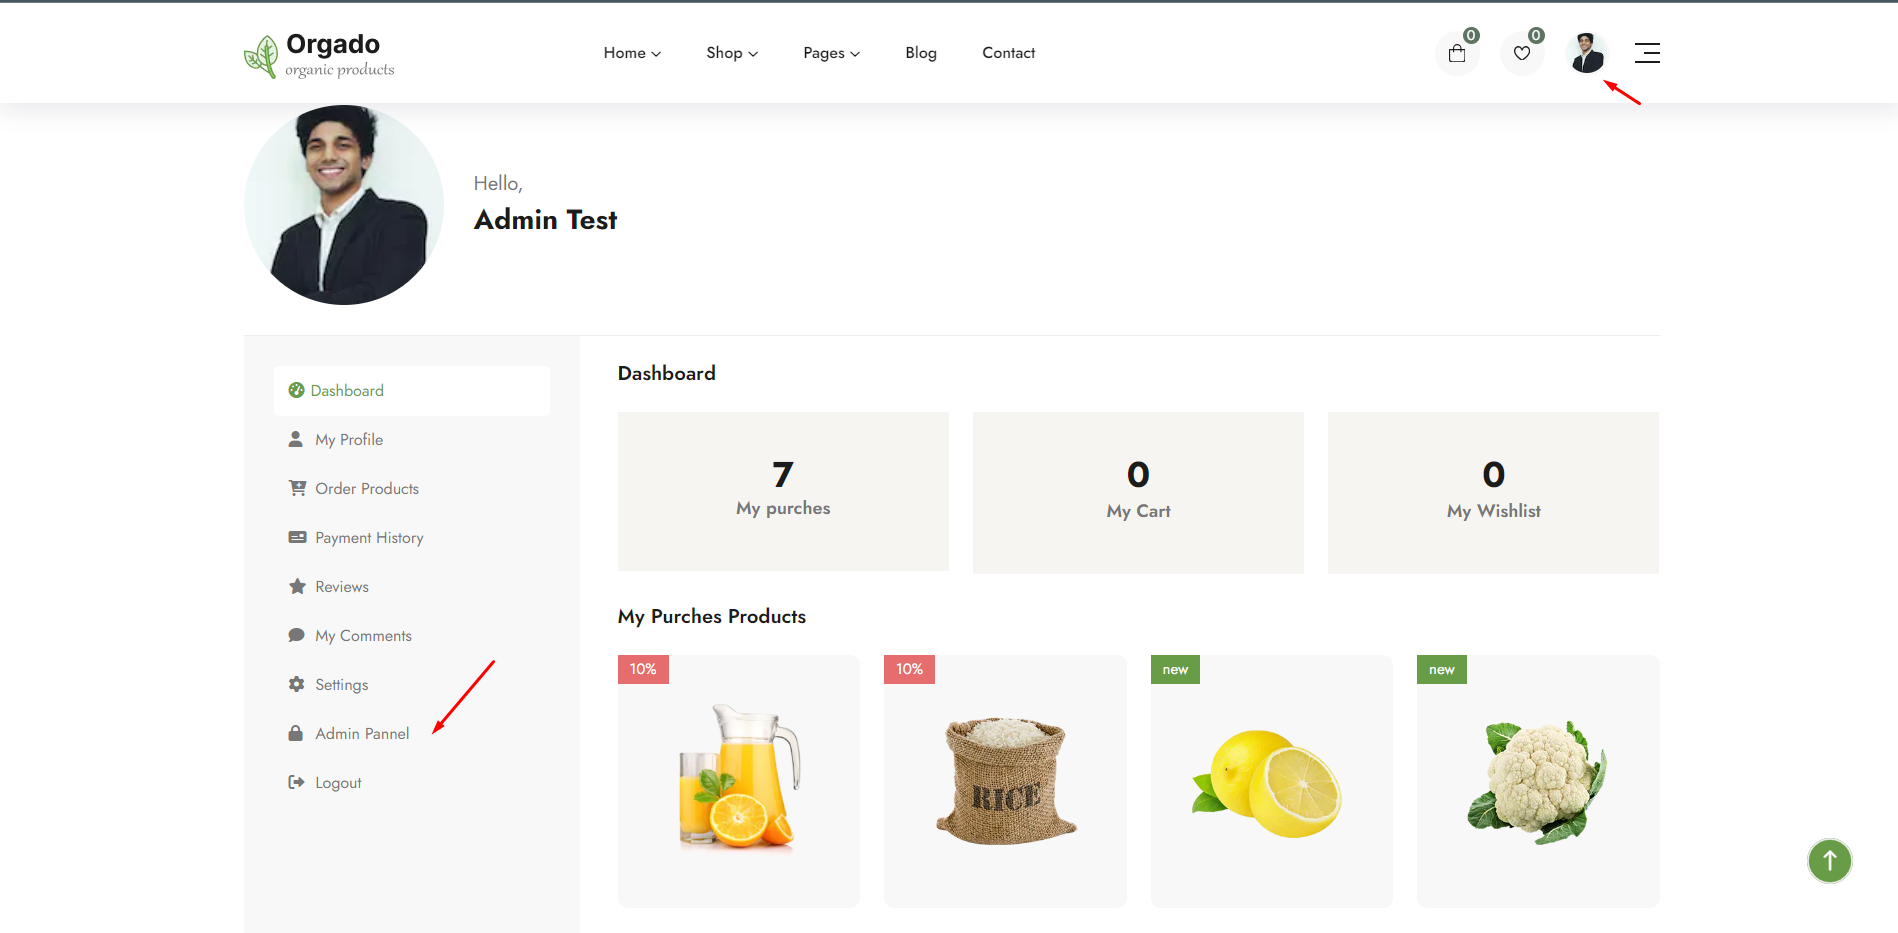
When will you Login With Admin Email Then You will See the admin Panel links (from client site)
How To Create Product First Time ?
it's mandatory to create categories and brand to add any product, you can't add any product without any category or brand
Follow This Steps
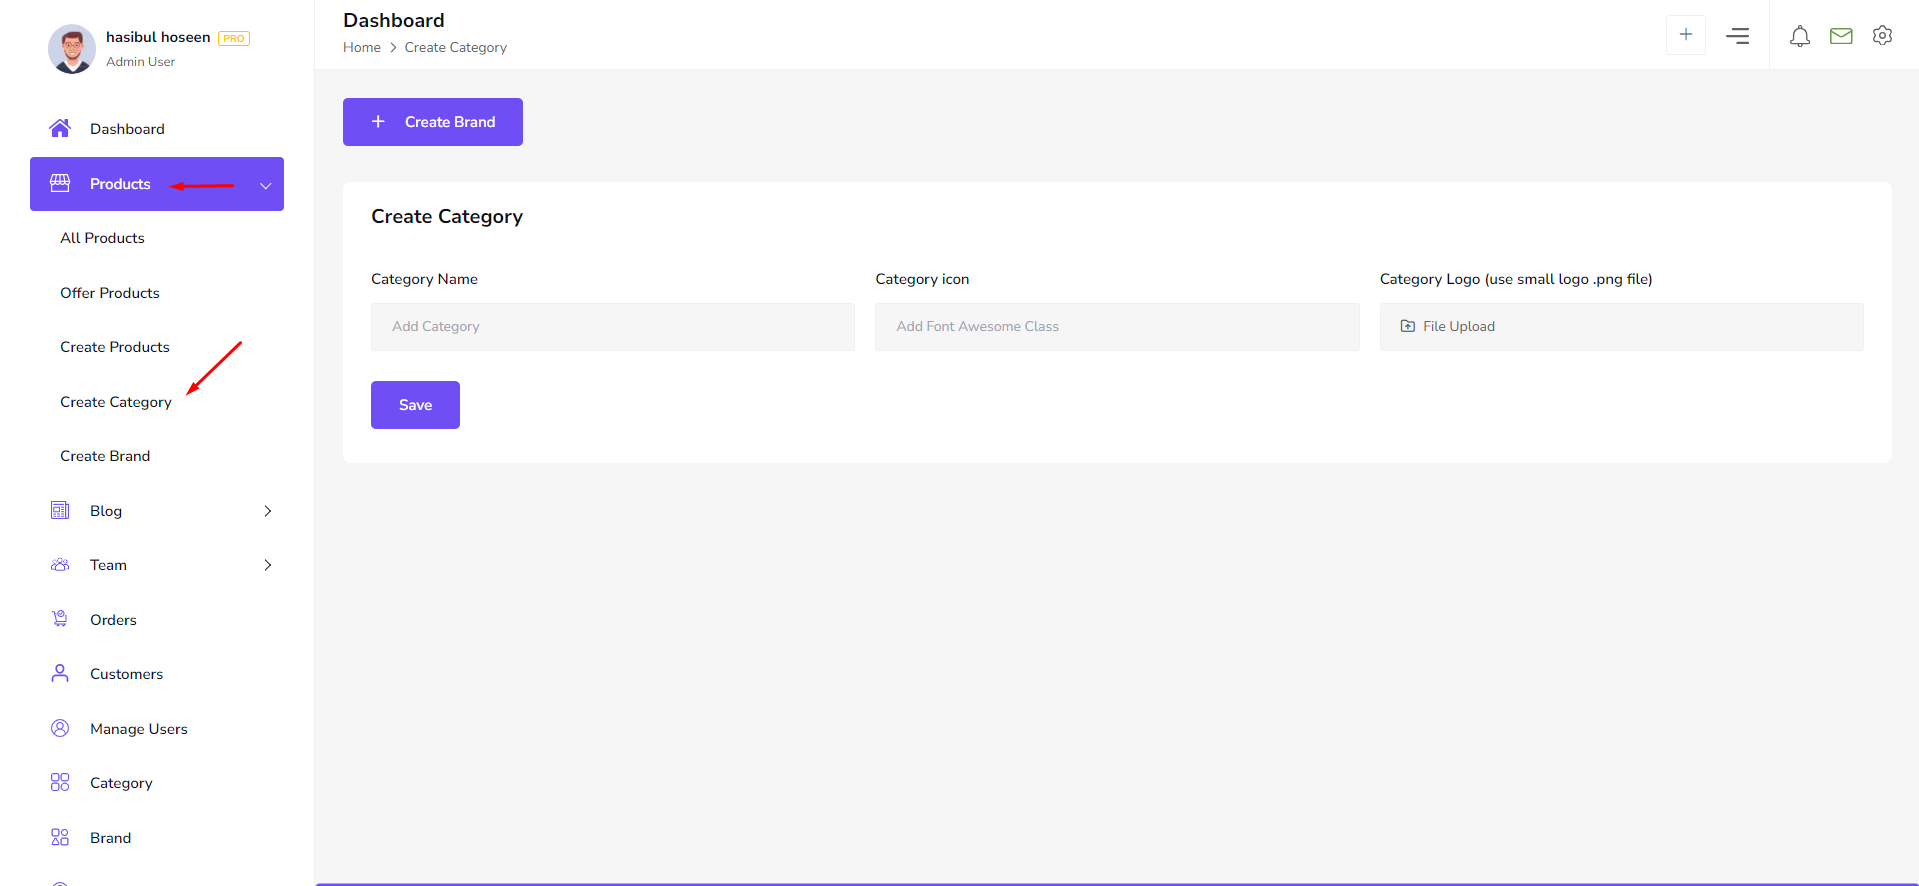
Step 1
Create Category (If Not)
Step 2
Create Brand (If Not )
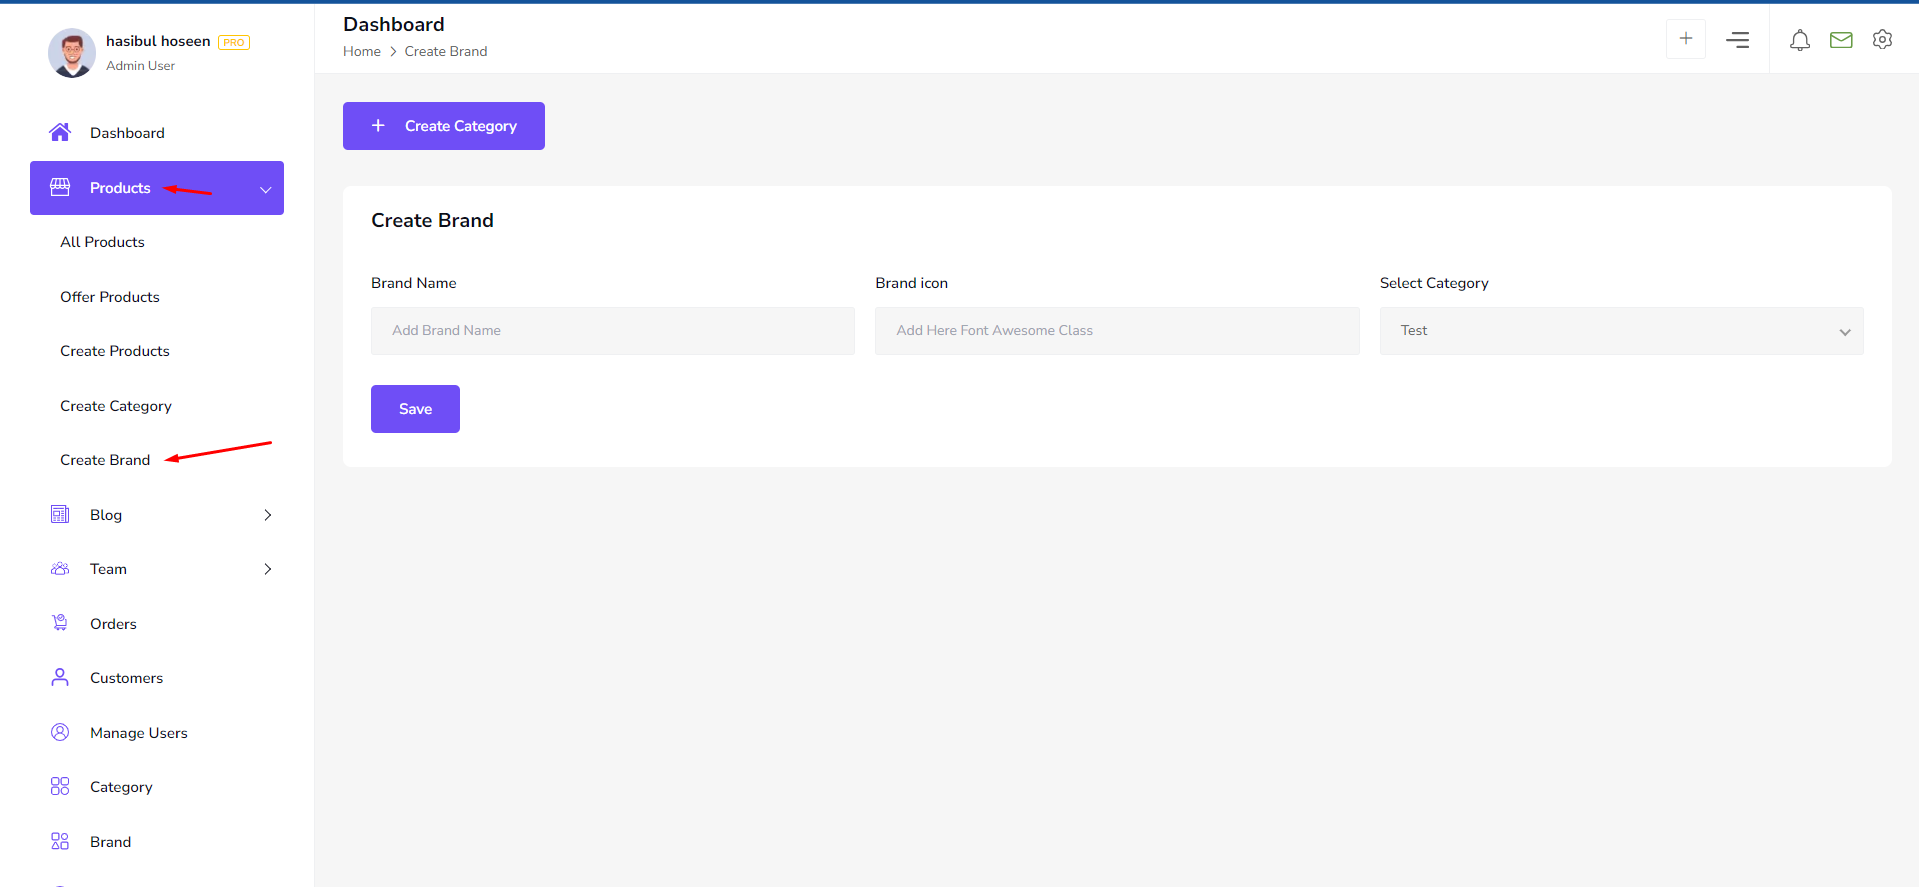
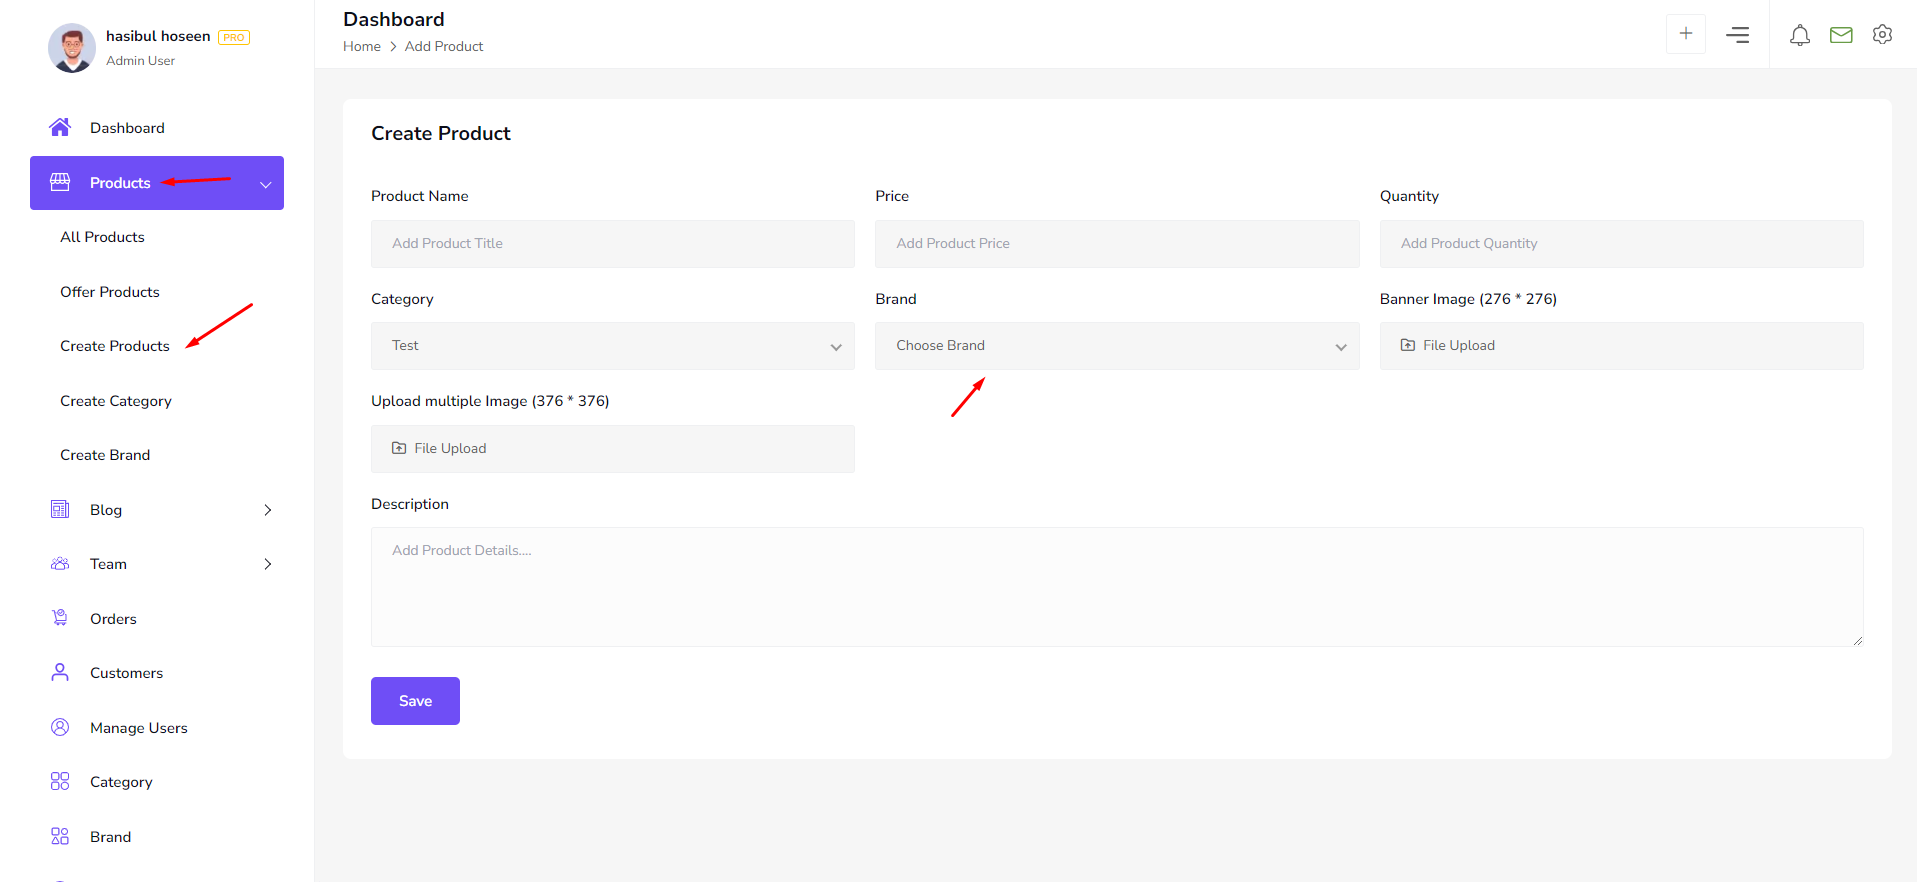
Step 3
After Creating Category And Brand You Can See Here Category and Brand (When You Select Category Then Brand Will Be Show) . thats means now you can add product in your website
Important Notes :
Don't Use Our Any .env File Link, Any Variables Or Database Link, Because It Is Bdevs's Property. It is illegal To Use Without Permission
We Used Img Server For imgbb : explore imgbb
We Used Email Service For Email Js : explore Email Js
We Used Payment Method For Stripe : explore Stripe
need to custom work.
If you need to theme customization or make custom theme or template. Please, you can contact us for this.
Contact